IrisCTF 2023 Select Forensics, RF, and Networking Writeups
Categories: forensics
&& rf
&& netsec
2023-03-22
by skat
These writeups are also readable on my personal blog. I forgot to upload these to the Iris website for a while, but they’ve been accessible on my personal blog for quite some time now.
Earlier this month, I had the pleasure of hosting IrisCTF 2023 with my team at IrisSec. This was our first time ever hosting a CTF event and we’re very happy with how it turned out! Our feedback was overwhelmingly positive and we’re already thinking of ideas for next year’s IrisCTF. Thank you to everyone who came out to our event that weekend!
For IrisCTF 2023, I authored the forensics, radio frequency, and networking challenges. This was unique for many participants as these three categories are seldom seen in the CTF scene – precisely the reason why I was so excited to author these in an effort to increase their prevalence in CTFs and introduce many CTF-goers to other facets of the hacker culture.
This post covers writeups for the following challenges:
- Forensics / babyforens
- Forensics / Now Where Could My Flag Be?
- Forensics / Cherry MX Blues
- Networks / babyshark
- Networks / wi-the-fi
- Networks / Needle in the Haystack Secure
- Networks / MICHAEL
- Radio Frequency / babyrf 1
- Radio Frequency / babyrf 2
- Radio Frequency / monke
The following challenges are not covered as they are unsolved and I encourage anybody trying these challenges post-event to continue pushing without being tempted by the solutions:
- Forensics / Strange Evasion
- Radio Frequency / babyrealrf
- Radio Frequency / backpack
- Radio Frequency / Here In My Garage
If anyone has completed these, please contact me on Discord at skat#4502 (via the IrisCTF Discord, see the Discord widget on 2023.irisc.tf). If you’re attempting these and would like hints, please also feel free to reach out to me for a nudge in the right direction. After each unsolved challenge has been blooded, I will release my associated author writeup with the intended solution as well as how I created the challenge and my thought process as an author.
You may attempt these challenges on our archived event site at 2023.irisc.tf. There are all challenge descriptions, hints, and attachment URLs available on the archived event site. If an attachment is broken, please contact an organizer on the IrisCTF Discord.
Forensics / babyforens
URL: Forensics
I created this challenge as an introduction to forensics for those who have never done forensics before. When I say forensics, I’m specifically referring to digital forensics: the branch of forensic science related to the investigation of digital data and media, typically pertaining to cybercrime. A common way to think about it is as “digital paleontology” or “hacker detective.” This field involves a lot of knowledge in information theory, among others.
The premise of this challenge is to repair an image, find the metadata contained within an image’s format, and correctly interpret it. Right away, we can open the image under a hex editor and observe that the header bytes (magic bytes) are missing:
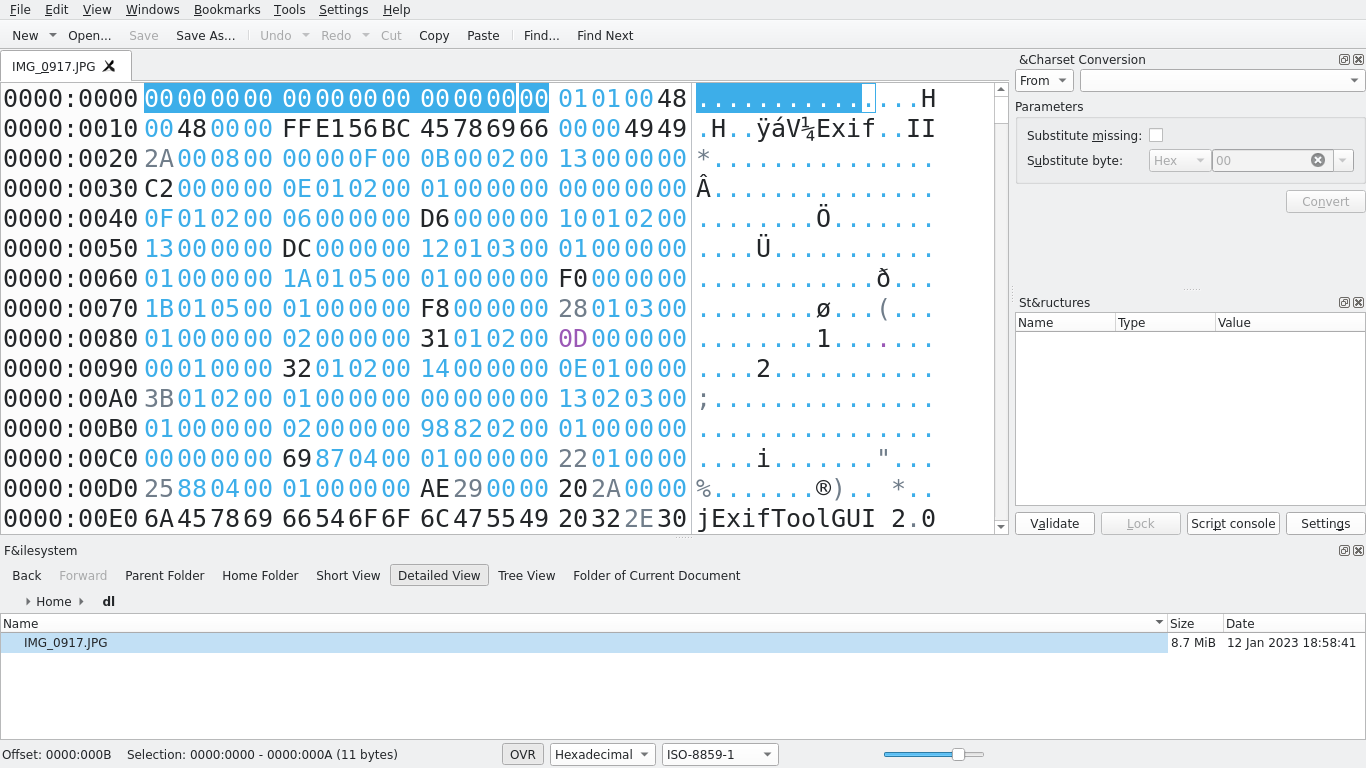
We can simply re-insert the magic bytes for a JPG: FF D8 FF E0 00 10 4A 46 49 46 00 01. Upon doing so, we recover the original image:
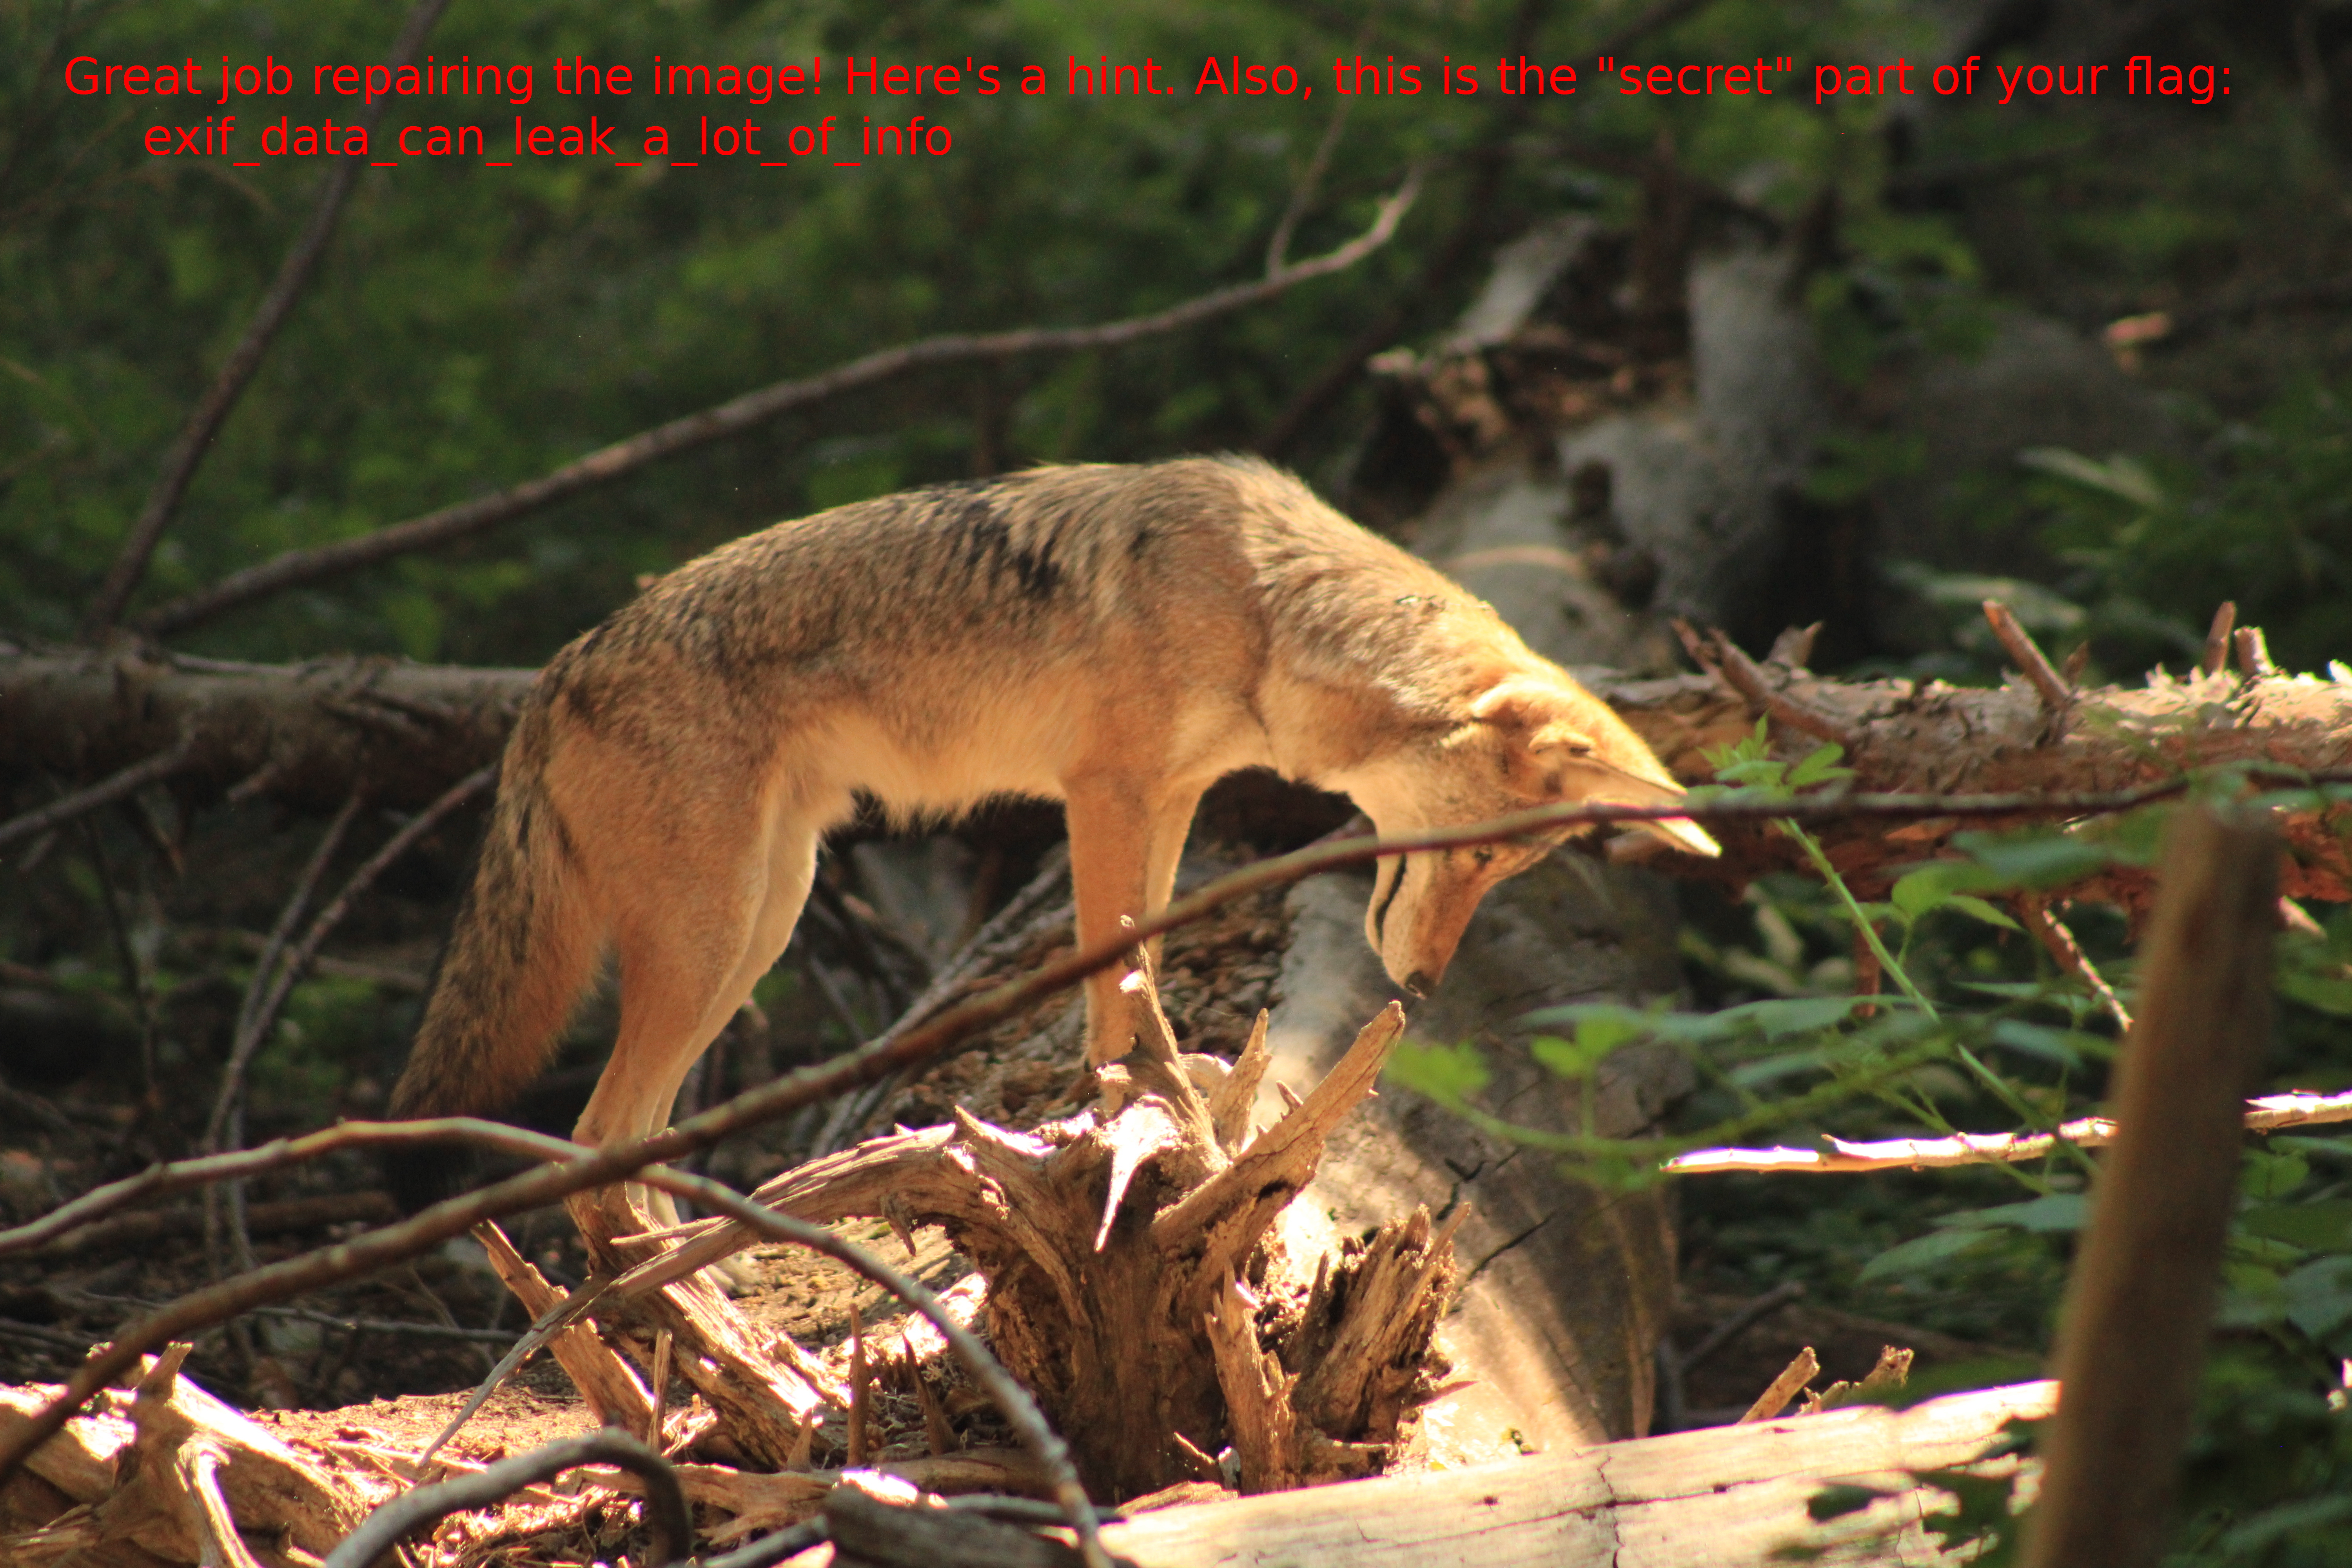
We can use exiftool to view the EXIF metadata contained within this file’s format. Upon doing so, we find the coordinates, time the picture was taken, and serial number:
$ exiftool IMG_0917.JPG | grep "GPS Position"
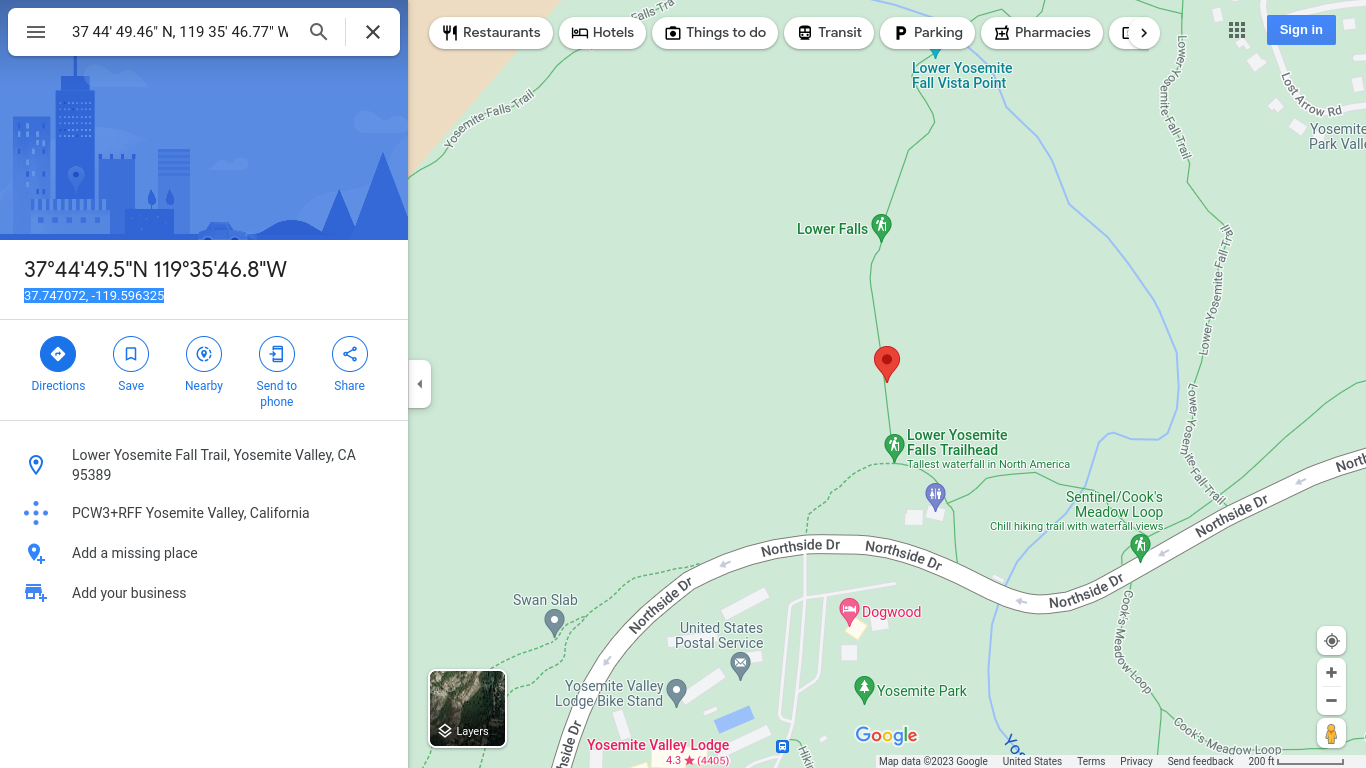
GPS Position                    : 37 deg 44' 49.46" N, 119 deg 35' 46.77" W
$ exiftool IMG_0917.JPG | grep "Serial"
Internal Serial Number          : RL2218903
Serial Number                   : 392075057288
Lens Serial Number              : 0000000000
$ exiftool IMG_0917.JPG | grep "Create Date"
Create Date                     : 2022:08:27 10:04:56
Create Date                     : 2022:08:27 10:04:56.27
The GPS coordinates can easily be converted to decimal using a tool such as Google Maps:
There are 3 serial numbers, which is why the challenge description specifically states that it is the serial number found on the bottom of the camera (example search terms: “Canon serial number”). This is neither the “Internal Serial Number” nor the “Lens Serial Number,” but just “Serial Number.”
The timestamp is 2022:08:27 10:04:56. However, this is not in UTC+0. We know from the GPS coordinates that this was taken in Yosemite National Park in California, which is usually UTC-8. If this timestamp were UTC+0, then that would mean that this image would have been taken at 2 AM, which clearly doesn’t make sense. However, we must also account for daylight savings time, which we do have because we have the calendar date. Thus, we can conclude that the given timestamp is in UTC-7 (-8, +1 for daylight savings). In order to convert this to seconds since epoch, we will need to convert this to UTC+0.
We had over 100 tickets sent in for this and I would usually have the player explain to me exactly what they were doing. Sometimes they would pause for a really long time and then say “Ohhh, nevermind.” Sometimes they needed a little nudge. If you have UTC-7 and you need to get to UTC+0, you should…
You should add 7. -7+7=0. We had over 100 tickets where people subtracted 7 because they saw the “-7” in “UTC-7.” Once we add 7, we can simply convert 2022:08:27 17:04:56 to epoch time to assemble the full flag: irisctf{37.74_-119.59_1661619896_392075057288_exif_data_can_leak_a_lot_of_info}.
This challenge taught players how to analyze file formats, extract and interpret metadata, and surprisingly, learn how timezones work. Timezones are important! The sequence in which events occur can mean the difference between a suspect’s alibi being legitimate or faulty. If your client got attacked at some specific time, you want to make sure you know exactly when the attack took place instead of having hours of error.
Forensics / Now Where Could My Flag Be?
URL: Forensics
This is a fun one. The original video is given as well as a modified video. Upon comparing their checksums, one can quickly find that they’re not the same. If you were to extract each frame and compare their checksums, you can quickly find that this will do you no good. The reason for this is because of a concept known as encoding. Video formats are not simply frames one after the other like a slideshow, and so comparing each frame pixel-by-pixel will do you no good.
Instead, we will need to calculate some metric of deviation or error between two frames, observe a baseline of error, and then calculate this metric for all frames between the original and modified videos and alert us when the calculated deviation or error goes beyond a reasonable threshold based on the observed baseline.
There are plenty of approaches to this problem. One computationally inexpensive approach is to calculate mean squared error. Upon doing so, one will notice that an additional frame is inserted later on in the video, an artifact of splicing. We can account for this off-by-one and adapt our algorithm, and then let it run again.
The following is a sample solution written in Python:
#!/usr/bin/env python3
# Go through both videos and compare their frames. If a frame is beyond a
# threshold, it must be the spliced frame. Usage: ./0_solve.py <startFrame>

import cv2
import math
import numpy as np
import sys
import time

ORIGINAL = "./original.mp4"
EDITED = "./now-where-could-my-flag-be.mp4"

# Arbitrary threshold, adjust by feel.
THRESHOLD = 30

def diff(arrA: np.array, arrB: np.array):

	assert arrA.shape == arrB.shape, "Input matrix size mismatch"

	mse = np.sum((arrA-arrB)**2) / (arrA.shape[0] * arrA.shape[1])

	if mse > THRESHOLD:
		print(f"{mse=}")
		return True

	return False

def main(start):

	# Original.
	cap1 = cv2.VideoCapture(ORIGINAL)
	fps1 = cap1.get(cv2.CAP_PROP_FPS)

	# Edited.
	cap2 = cv2.VideoCapture(EDITED)
	fps2 = cap1.get(cv2.CAP_PROP_FPS)

	# Seek the start.
	cap1.set(cv2.CAP_PROP_POS_FRAMES, start)
	cap2.set(cv2.CAP_PROP_POS_FRAMES, start)

	counter = start
	start = time.time()

	while True:

		if counter % 1000 == 0:
			print(f"[{time.time()-start:02f}] On frame {counter}")

		# On 84739, we discover the frames are slightly off by one, an artifact
		# of splicing. We correct for this accordingly.
		if counter == 84739:
			cap2.set(cv2.CAP_PROP_POS_FRAMES, counter+1)

		_, frame1 = cap1.read()
		_, frame2 = cap2.read()

		if diff(frame1[:,:,0], frame2[:,:,0]):

			print(f"Candidate: frame {counter}")
			cv2.imshow("Candidate", frame2)

			k = cv2.waitKey(10) & 0xFF
			if k == ord('q'):
				break

			input("Press ENTER to continue.")

		counter += 1

if __name__ == "__main__":
	main(int(sys.argv[1]))
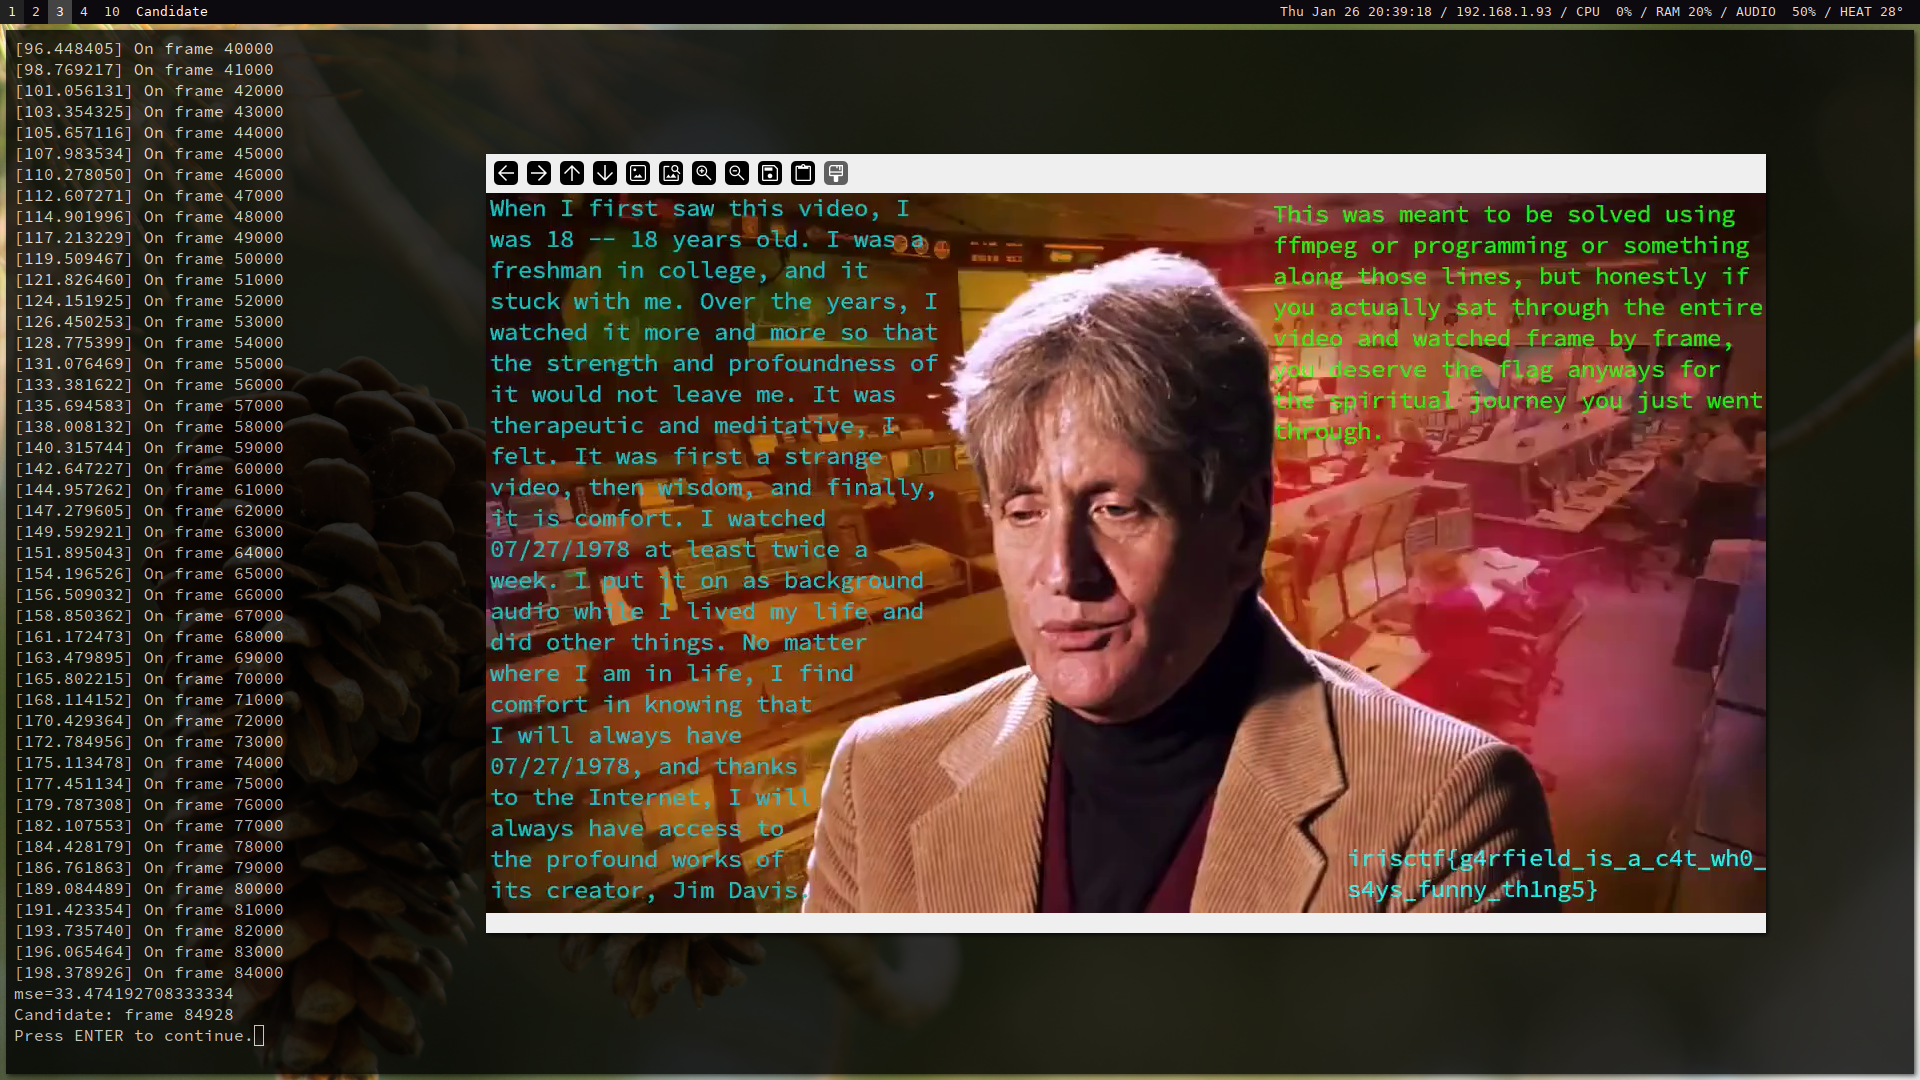
One team told me that they solved it by actually watching the entire video.
Forensics / Cherry MX Blues
URL: Forensics
This is also a really fun challenge! The given file is a 20-minute-long recording of some typing. Auditory forensic analysis of the given file reveals that acoustic signatures appear multiple times completely identically throughout the file. We can apply a simple peak detection function to the wav file to make this easier for us to visually see when graphing the audio:
#!/usr/bin/env python3
# Most of this follows a standard tutorial on wav:
# https://learnpython.com/blog/plot-waveform-in-python/

import numpy as np
import plotly.graph_objects as go
import pandas as pd
import wave

from scipy.signal import find_peaks

# Analytically determined minimum height for peak detection.
HEIGHT = 5000

# Grouping threshold for peaks profiles.
GROUP_THRESH = 1000

def main():

	# Read the wav.
	wav = wave.open("./recording.wav", "rb")
	sampleRate = wav.getframerate()
	nSamples = wav.getnframes()
	nChannels = wav.getnchannels()
	duration = nSamples/sampleRate

	print(f"Sample rate: {sampleRate} Hz")
	print(f"Samples: {nSamples}")
	print(f"Channels: {nChannels}")
	print(f"Duration: {duration:.2f} seconds")

	# Read the frames.
	frames = np.frombuffer(wav.readframes(nSamples), dtype=np.int16)[:100000]

	indices = find_peaks(frames, height=HEIGHT)[0]

	fig = go.Figure()
	fig.add_trace(go.Scatter(
		y=frames,
		mode='lines+markers',
		name='Original Plot'
	))

	fig.add_trace(go.Scatter(
		x=indices,
		y=[frames[j] for j in indices],
		mode='markers',
		marker=dict(
			size=8,
			color='red',
			symbol='cross'
		),
		name='Detected Peaks'
	))

	fig.show()

if __name__ == "__main__":
	main()
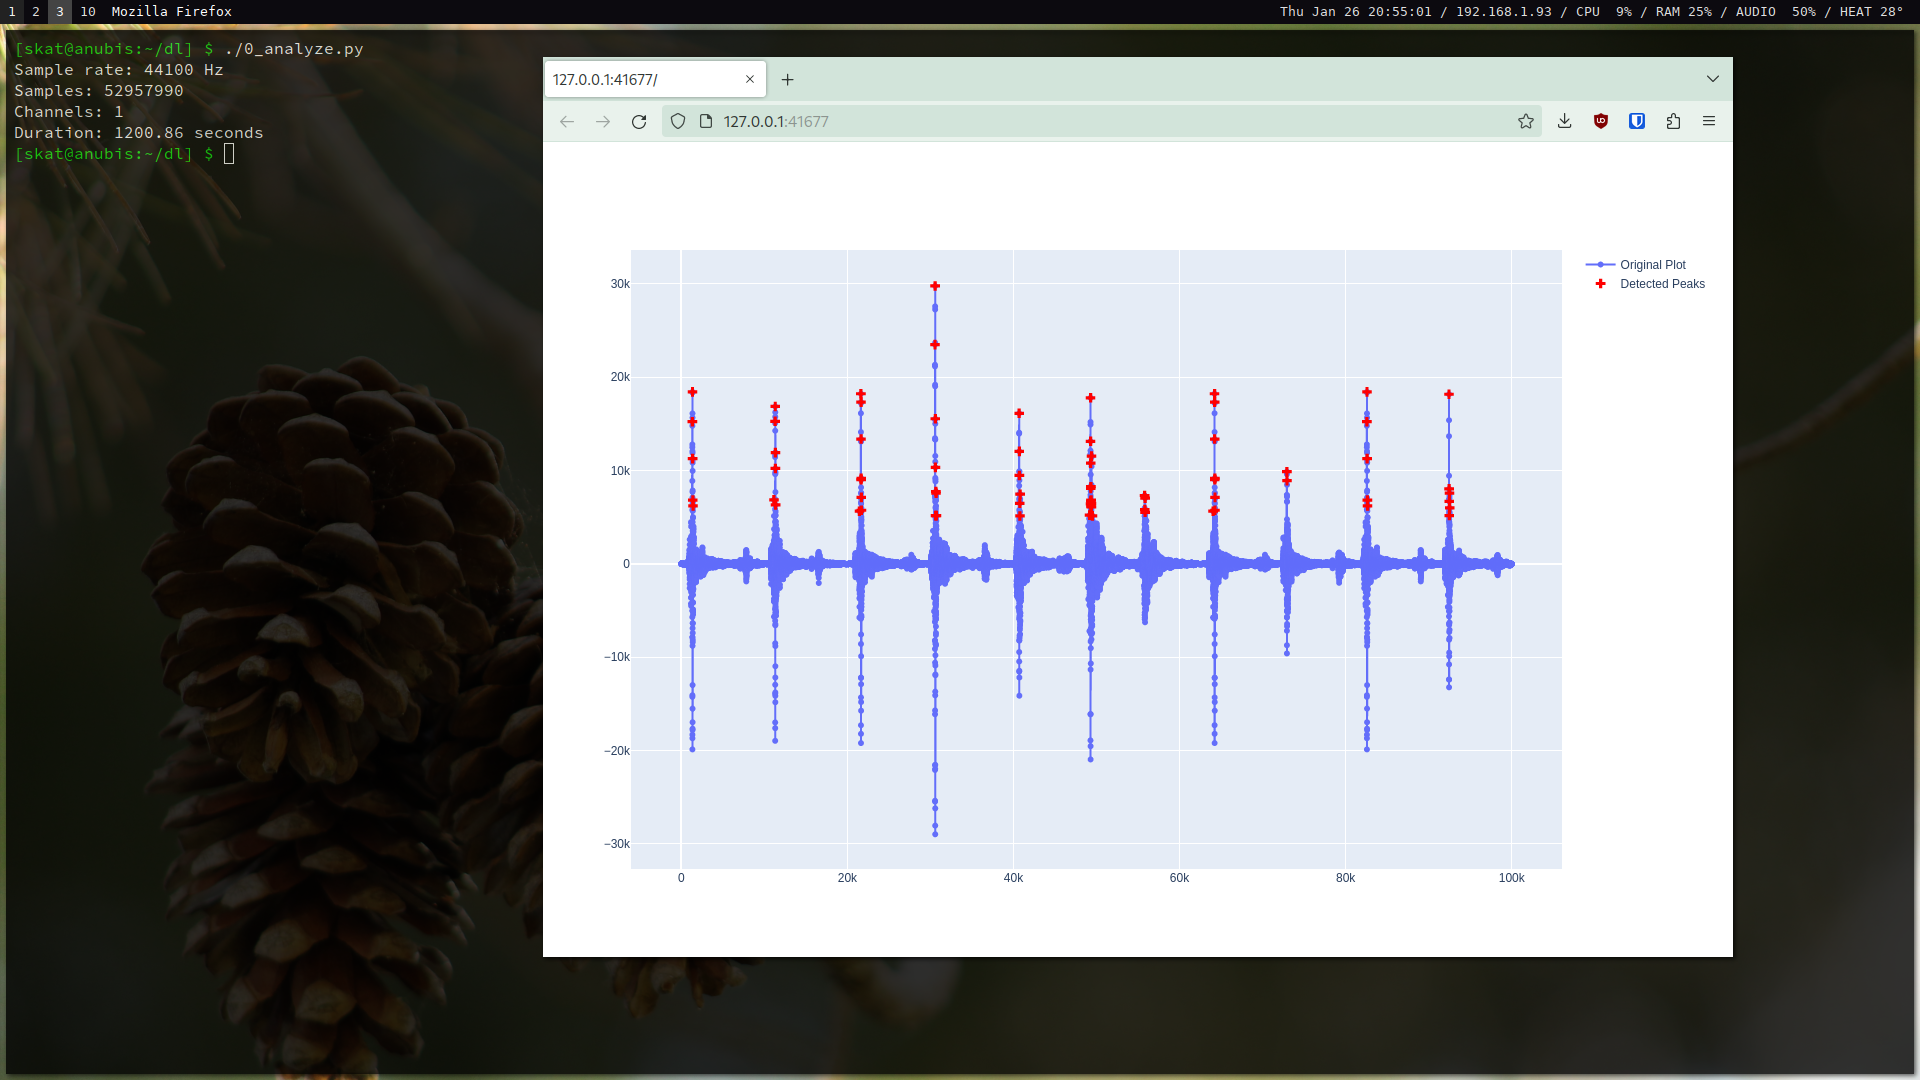
This is true. When creating this challenge, I blessed the user with perfect conditions in order to lessen the load and make it easier for participants; instead of needing to create an algorithm that would k-cluster the signatures or otherwise develop an acoustic similarity metric, one merely needs to check for equality. This was done to make the challenge easier so that a solution could be created within the timespan of the event.
This challenge exploits letter frequency. Because each keystroke’s acoustic signature is perfectly equal to that of other keystrokes from that particular key, we can simply analyze the recording and match letter frequency to keystroke frequency and then fine-tune our correlations accordingly.
There are many approaches to this problem. To make this computationally cheaper, I classified each keystroke based on the result of a peak detection function so that instead of comparing long lists of values with each other, I’m only comparing short lists:
#!/usr/bin/env python3

import numpy as np
import pickle
import wave

from scipy.signal import find_peaks

# Analytically determined minimum height for peak detection.
HEIGHT = 5000

# Grouping threshold for peaks profiles.
GROUP_THRESH = 1000

def main():

	# Read the wav.
	wav = wave.open("./recording.wav", "rb")
	sampleRate = wav.getframerate()
	nSamples = wav.getnframes()
	nChannels = wav.getnchannels()
	duration = nSamples/sampleRate

	# Read the frames.
	frames = np.frombuffer(wav.readframes(nSamples), dtype=np.int16)

	# Peak detection.
	print("Detecting peaks.")
	indices = find_peaks(frames, height=HEIGHT)[0]

	groups = []
	buffer = [indices[0]]

	print("Grouping signatures.")
	for i in range(1,len(indices)):
		if indices[i] < buffer[-1]+GROUP_THRESH:
			buffer.append(indices[i])
		else:
			groups.append(buffer)
			buffer = [indices[i]]

	signatures = [[frames[i] for i in group] for group in groups]
	print(signatures)

	print("Saving.")
	with open("signatures.pickle", "wb") as f:
		pickle.dump(signatures, f)

	print("Done.")

if __name__ == "__main__":
	main()
Then, we can analyze the frequencies at which these occur in the recording:
#!/usr/bin/env python3

import pickle

def main():

	with open("signatures.pickle", "rb") as f:
		data = pickle.load(f)

	signatures = []
	frequencies = []

	for group in data:
		if group not in signatures:
			signatures.append(group)

	for signature in signatures:
		frequencies.append(data.count(signature)/len(data))

	assert len(signatures) == len(frequencies)
	joined = {tuple(signatures[i]):frequencies[i] for i in range(len(signatures))}
	ordered = {k:v for k, v in sorted(joined.items(), key=lambda item: item[1])[::-1]}

	print(ordered)

if __name__ == "__main__":
	main()
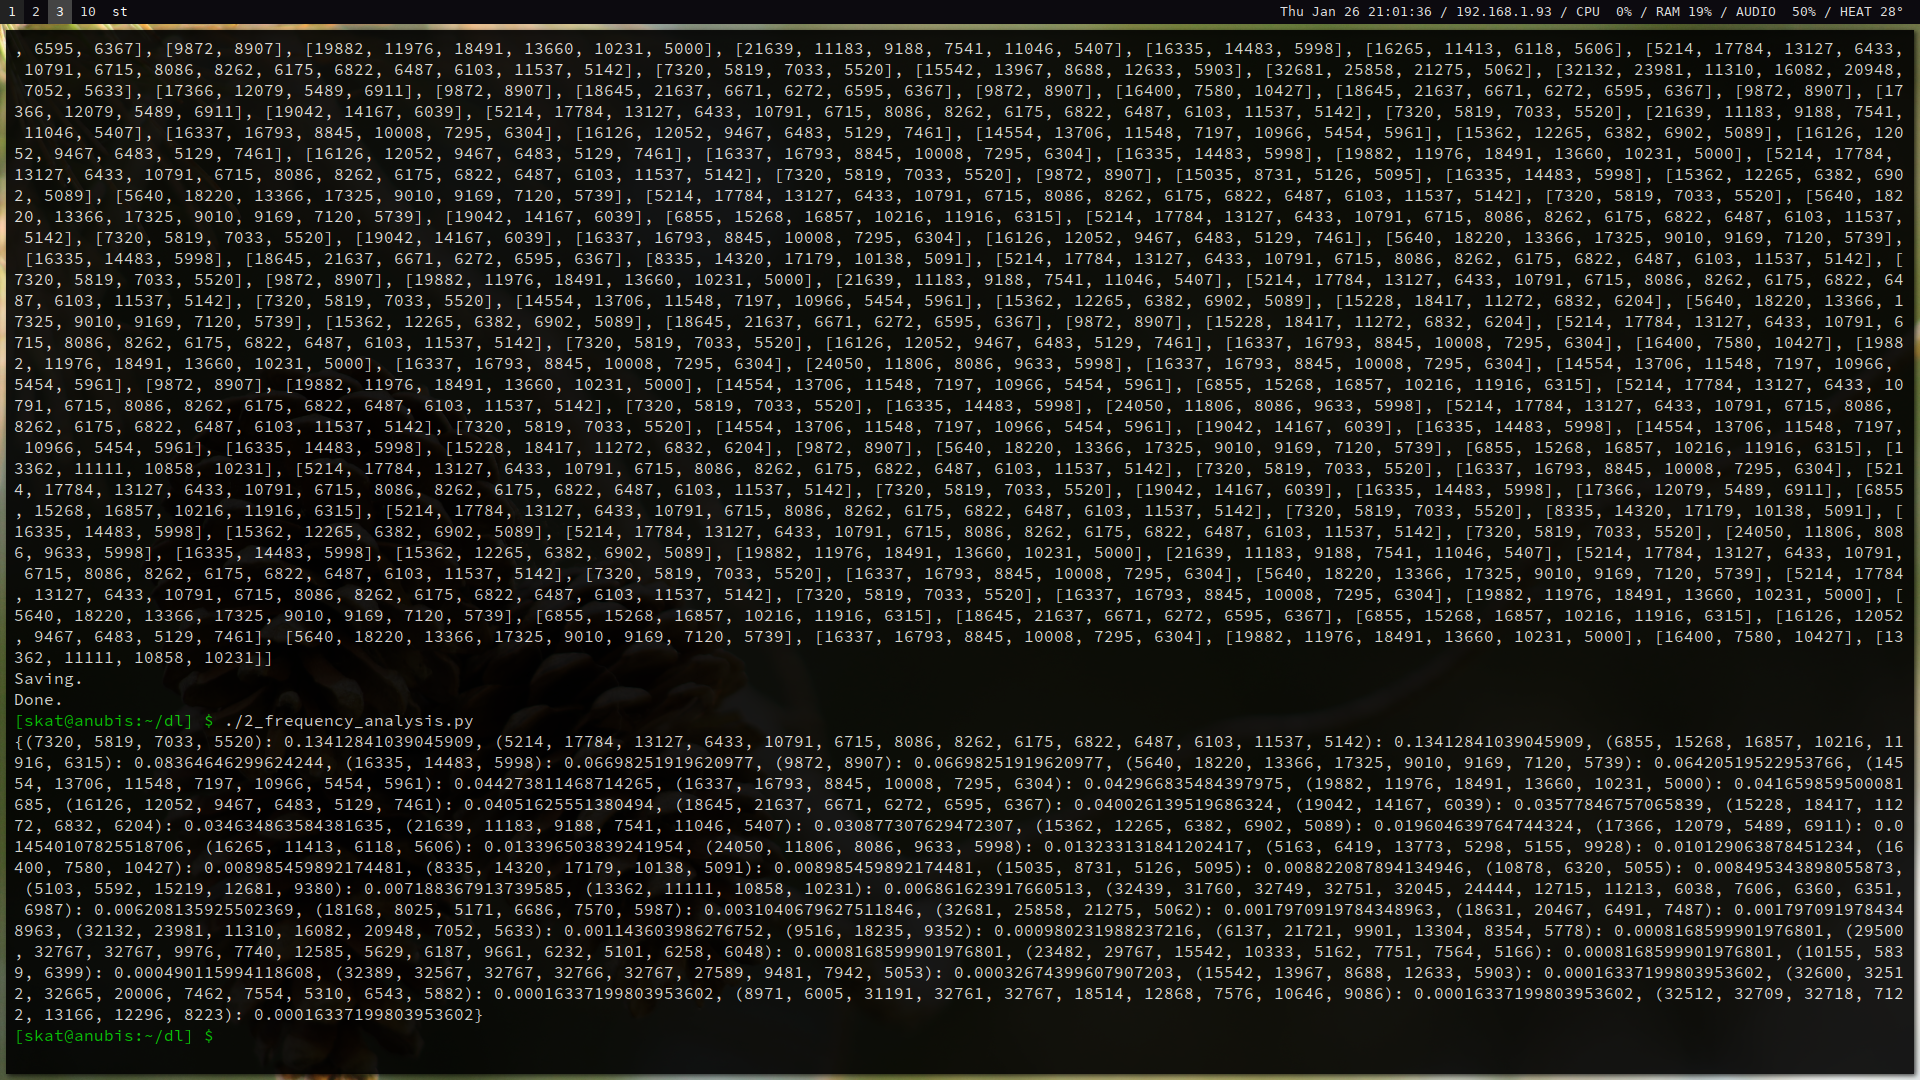
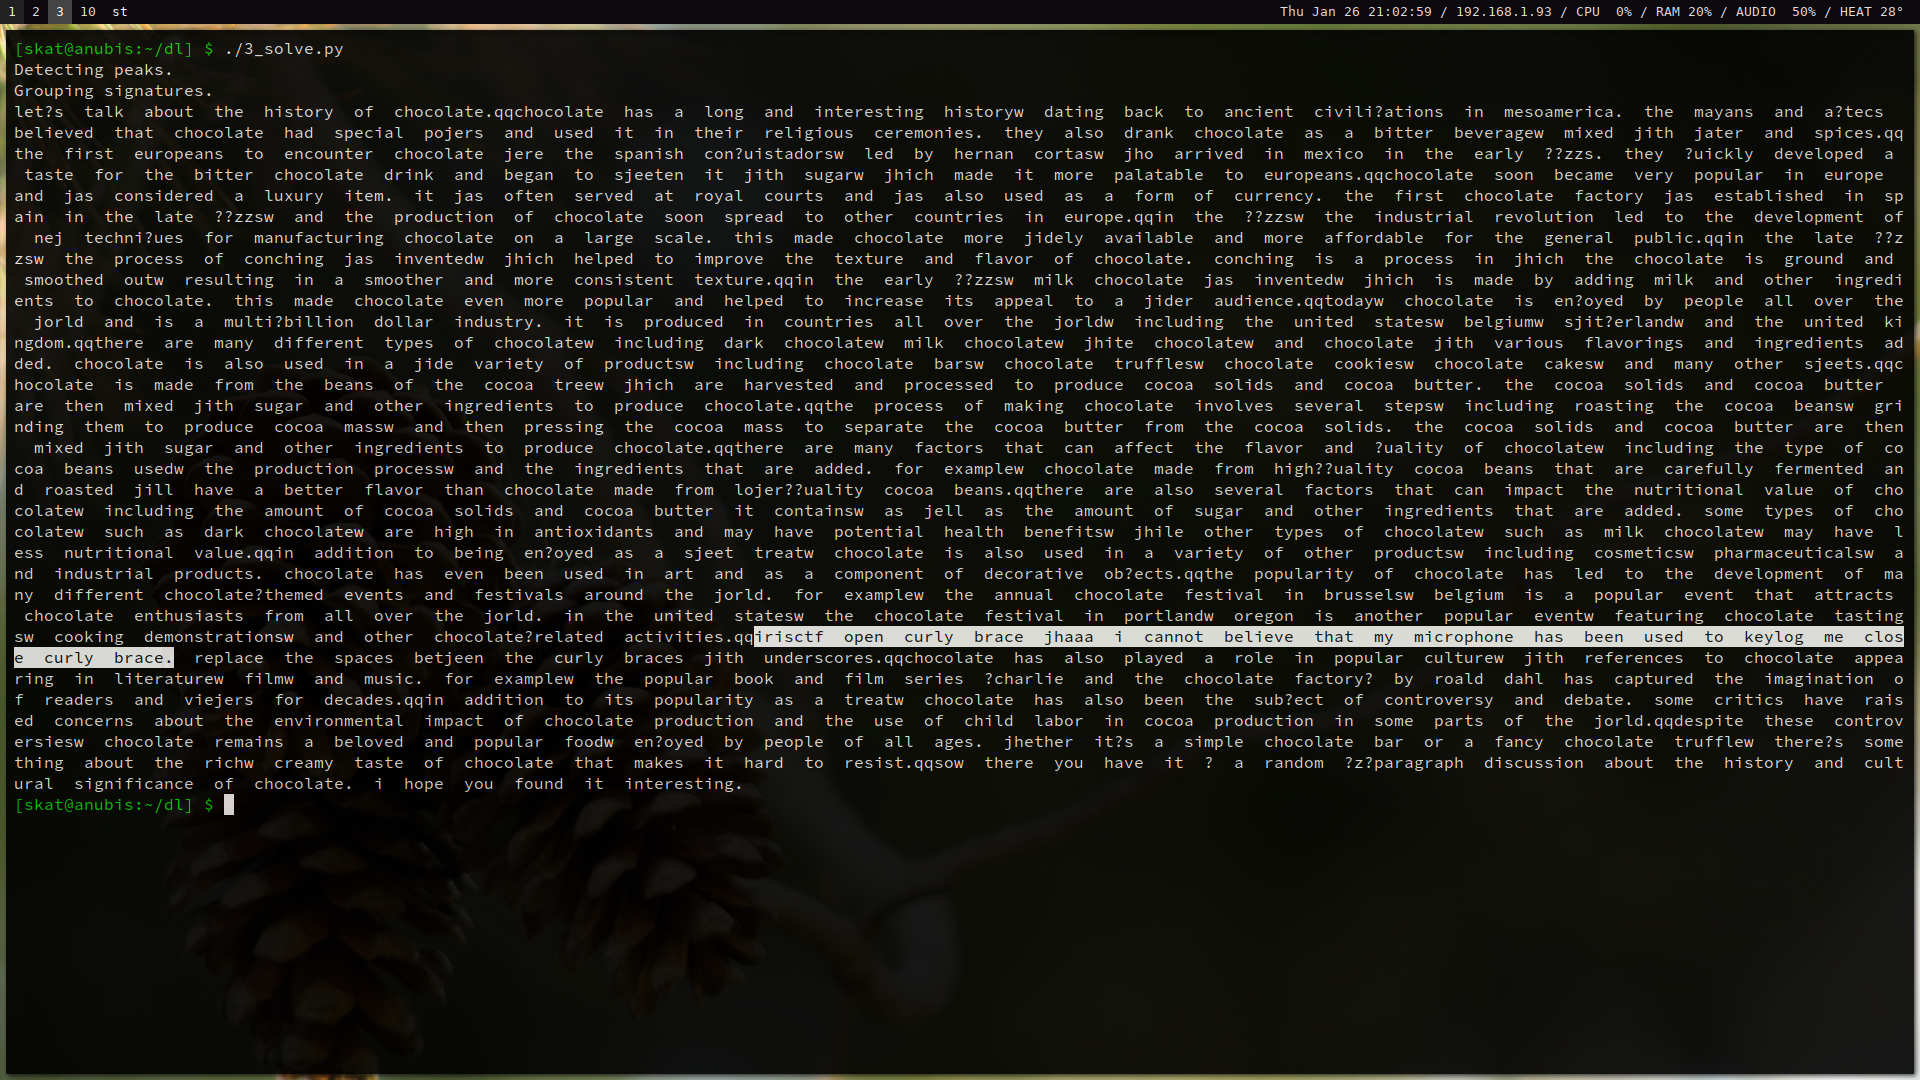
After we analyzed the frequencies of the keystrokes, we have a good starting point to correlate these with letter frequencies. Some of these frequencies are close, however, so a manual, iterative process of trial and error is used to tweak our substitutions until we have a readable-enough plaintext that we can get the flag:
Networks / babyshark
URL: Networks
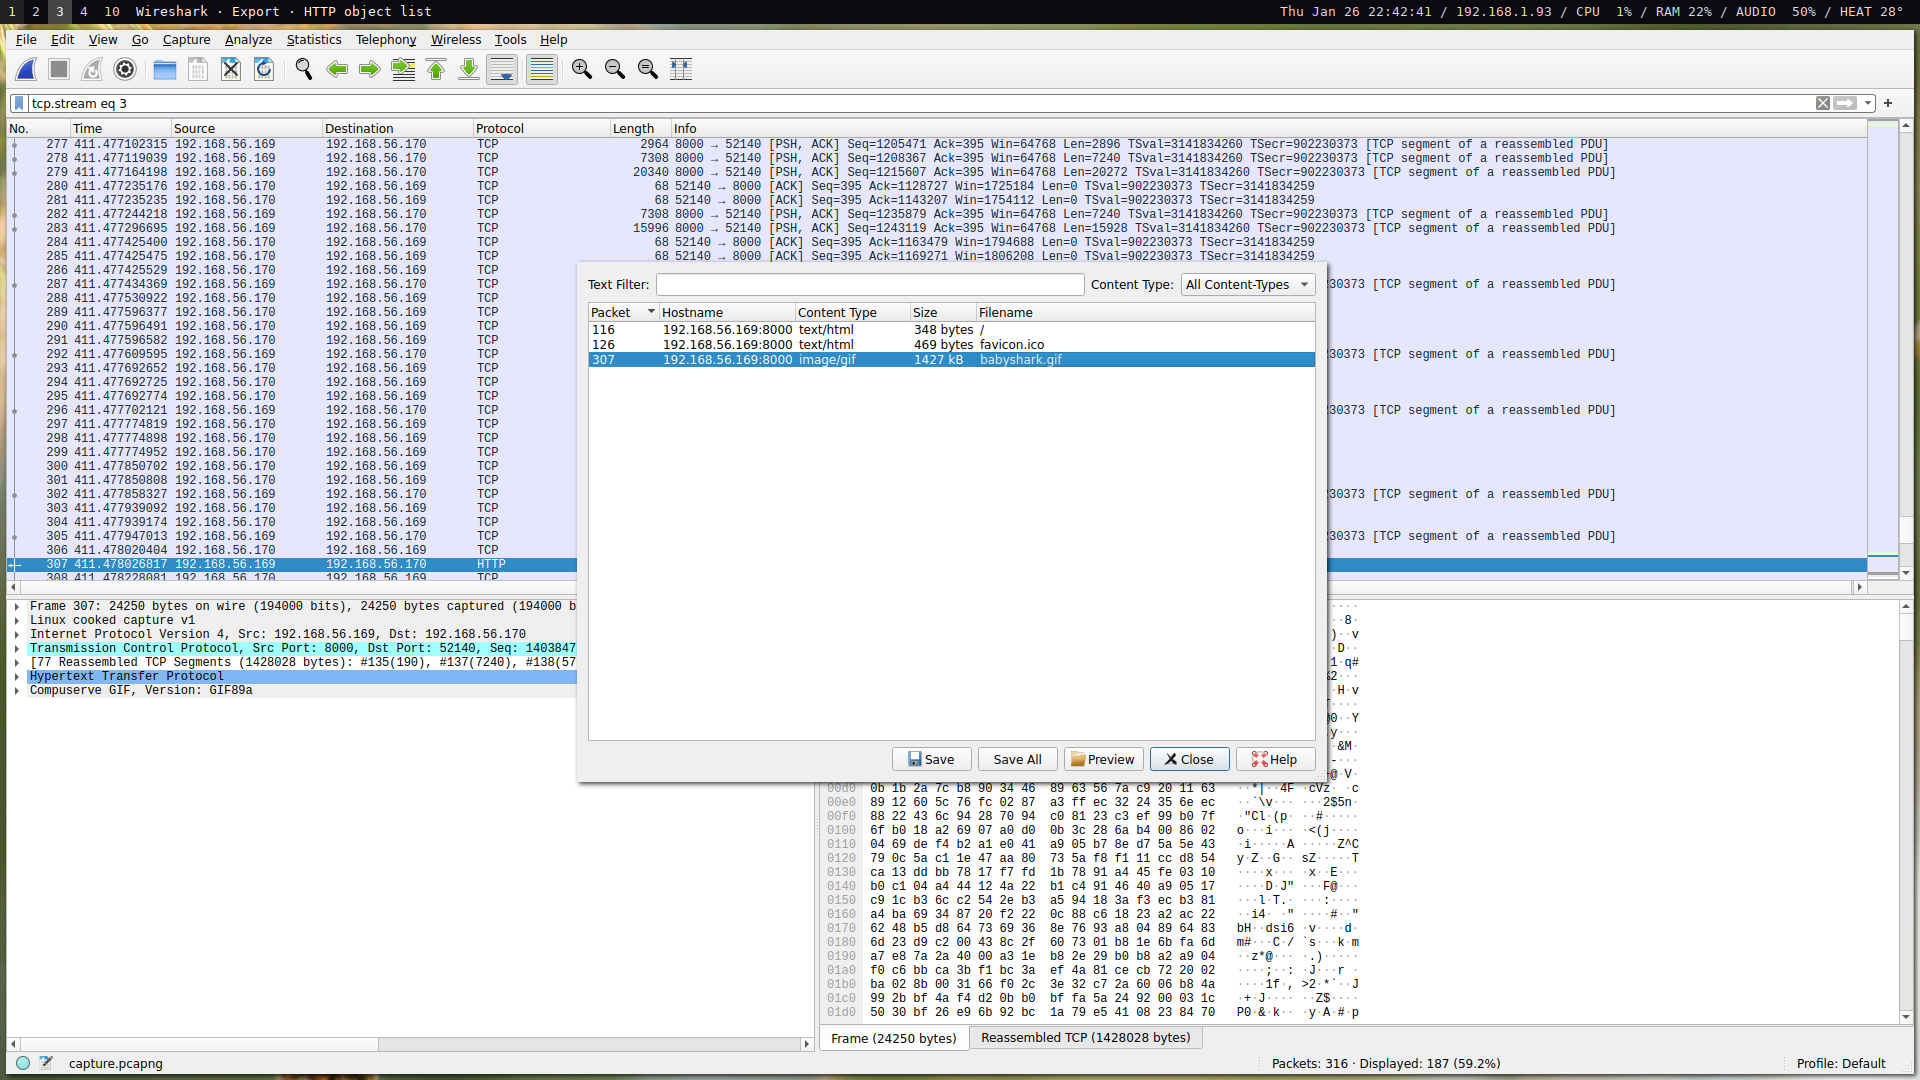
This one is a freebie meant to introduce participants to computer networks with a simple Wireshark exercise. Upon opening up the pcap with Wireshark and quickly skimming through the traffic, we can see an HTTP GET request for a file called babyshark.gif from 192.168.56.170 to 192.168.56.169 followed by a bunch of TCP traffic between the two nodes:
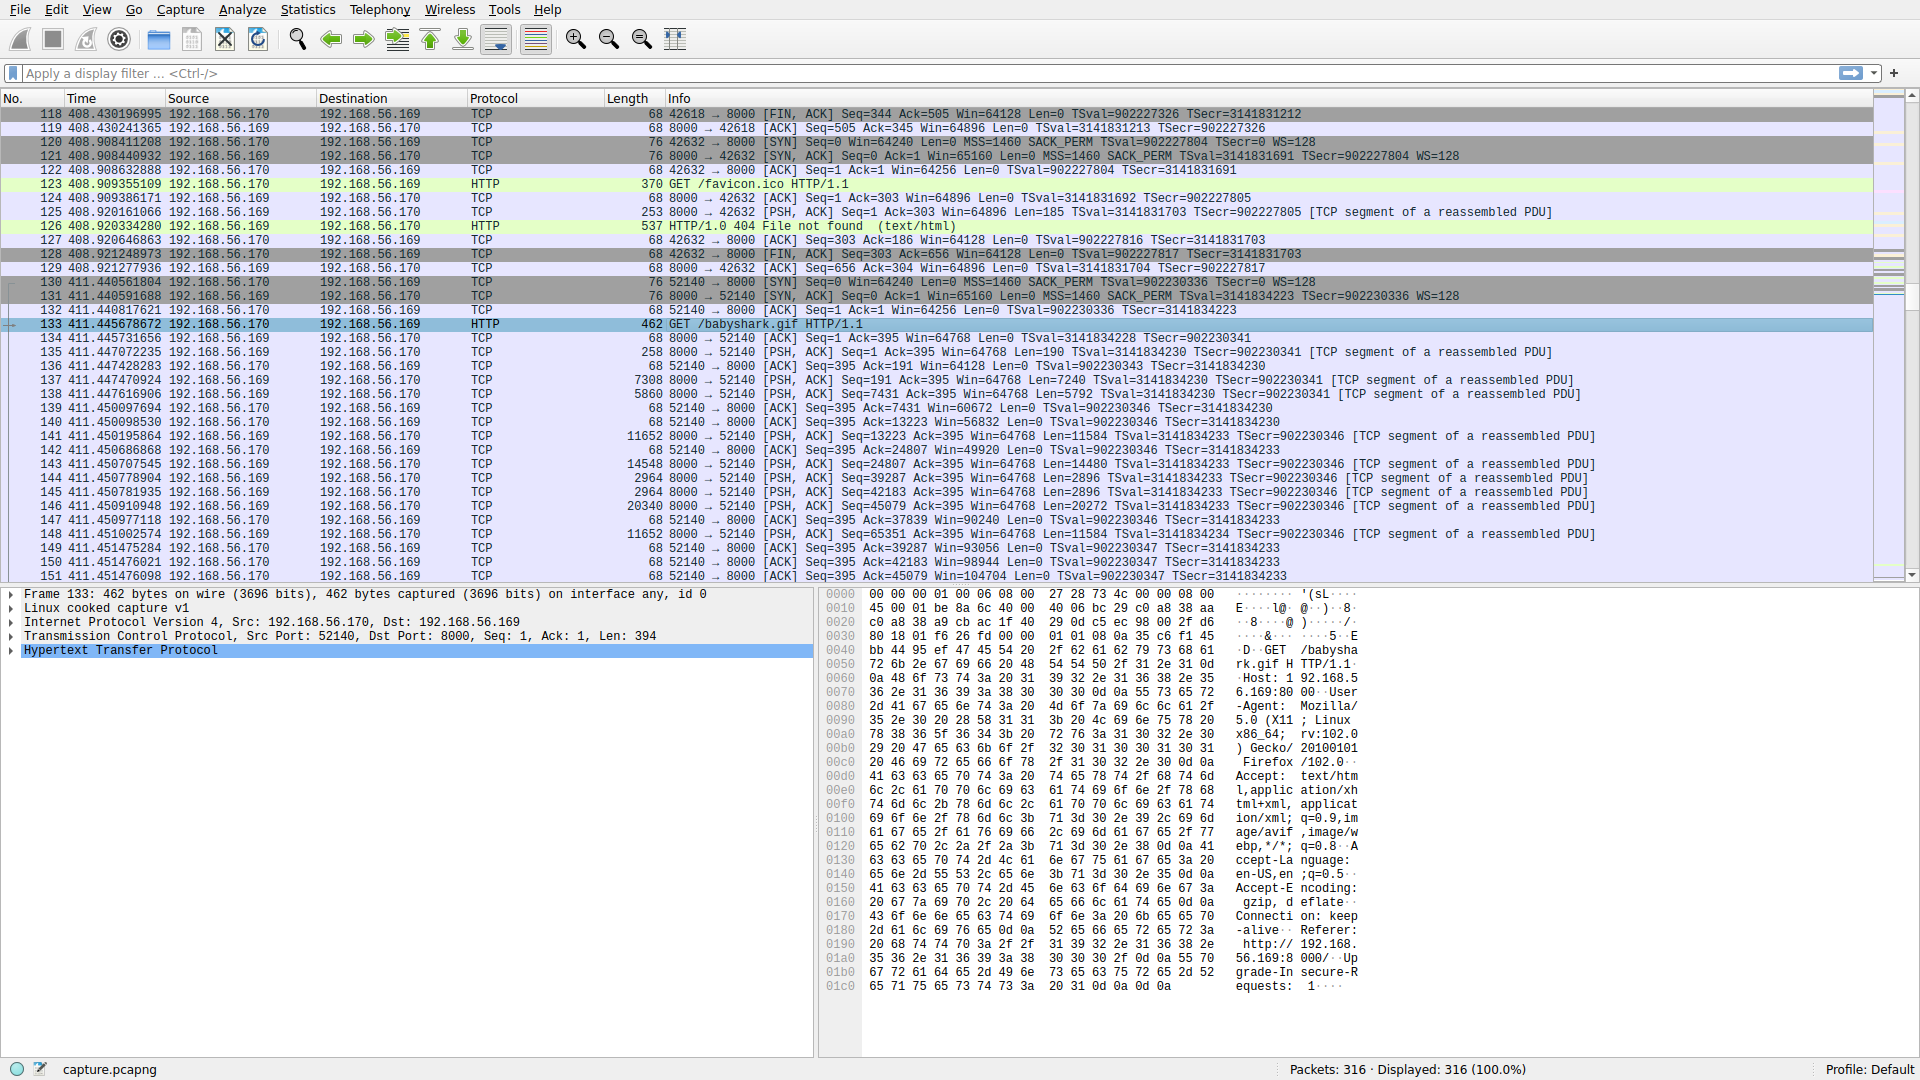
Using some intuition, we can conclude that 192.168.56.170 requested the file babyshark.gif from 192.168.56.169, which then served the file over TCP. We can extract the file using a variety of methods such as following the stream, decoding as raw, and then saving the file and viewing it after stripping the headers. A simpler way to extract the file, since it is based over HTTP, is to use Wireshark’s object exporter:
After exporting the file, we can view it to get the flag:

Networks / wi-the-fi
URL: Networks
I made this challenge to address something I’ve commonly seen among newbie network hackers: after cracking a network’s key, they connect to the network in order to sniff traffic. When you’re sniffing the air in order to capture a handshake, you’re capturing at layer 2 in monitor mode. When you’re connected to a network and you start sniffing the network, you’re capturing at layer 3 in promiscuous mode. An important concept to understand is that each layer contains the layers above it. If you crack a network key just to connect to the network and start a packet capture, you’re actively exposing yourself!
Everyone knows what to do with a layer 2 capture: check it for keys and run them against a dictionary attack. Everyone knows what to do with a layer 3 capture: sift through the packets to see what you can find. If you have a layer 2 capture, that means you also have a layer 3 capture. Thus, crack the key and then use it to decrypt layer 3.
We can crack the key using a standard tool such as aircrack-ng paired with a common wordlist such as rockyou.txt:
$ aircrack-ng -w rockyou.txt BobertsonNet.cap
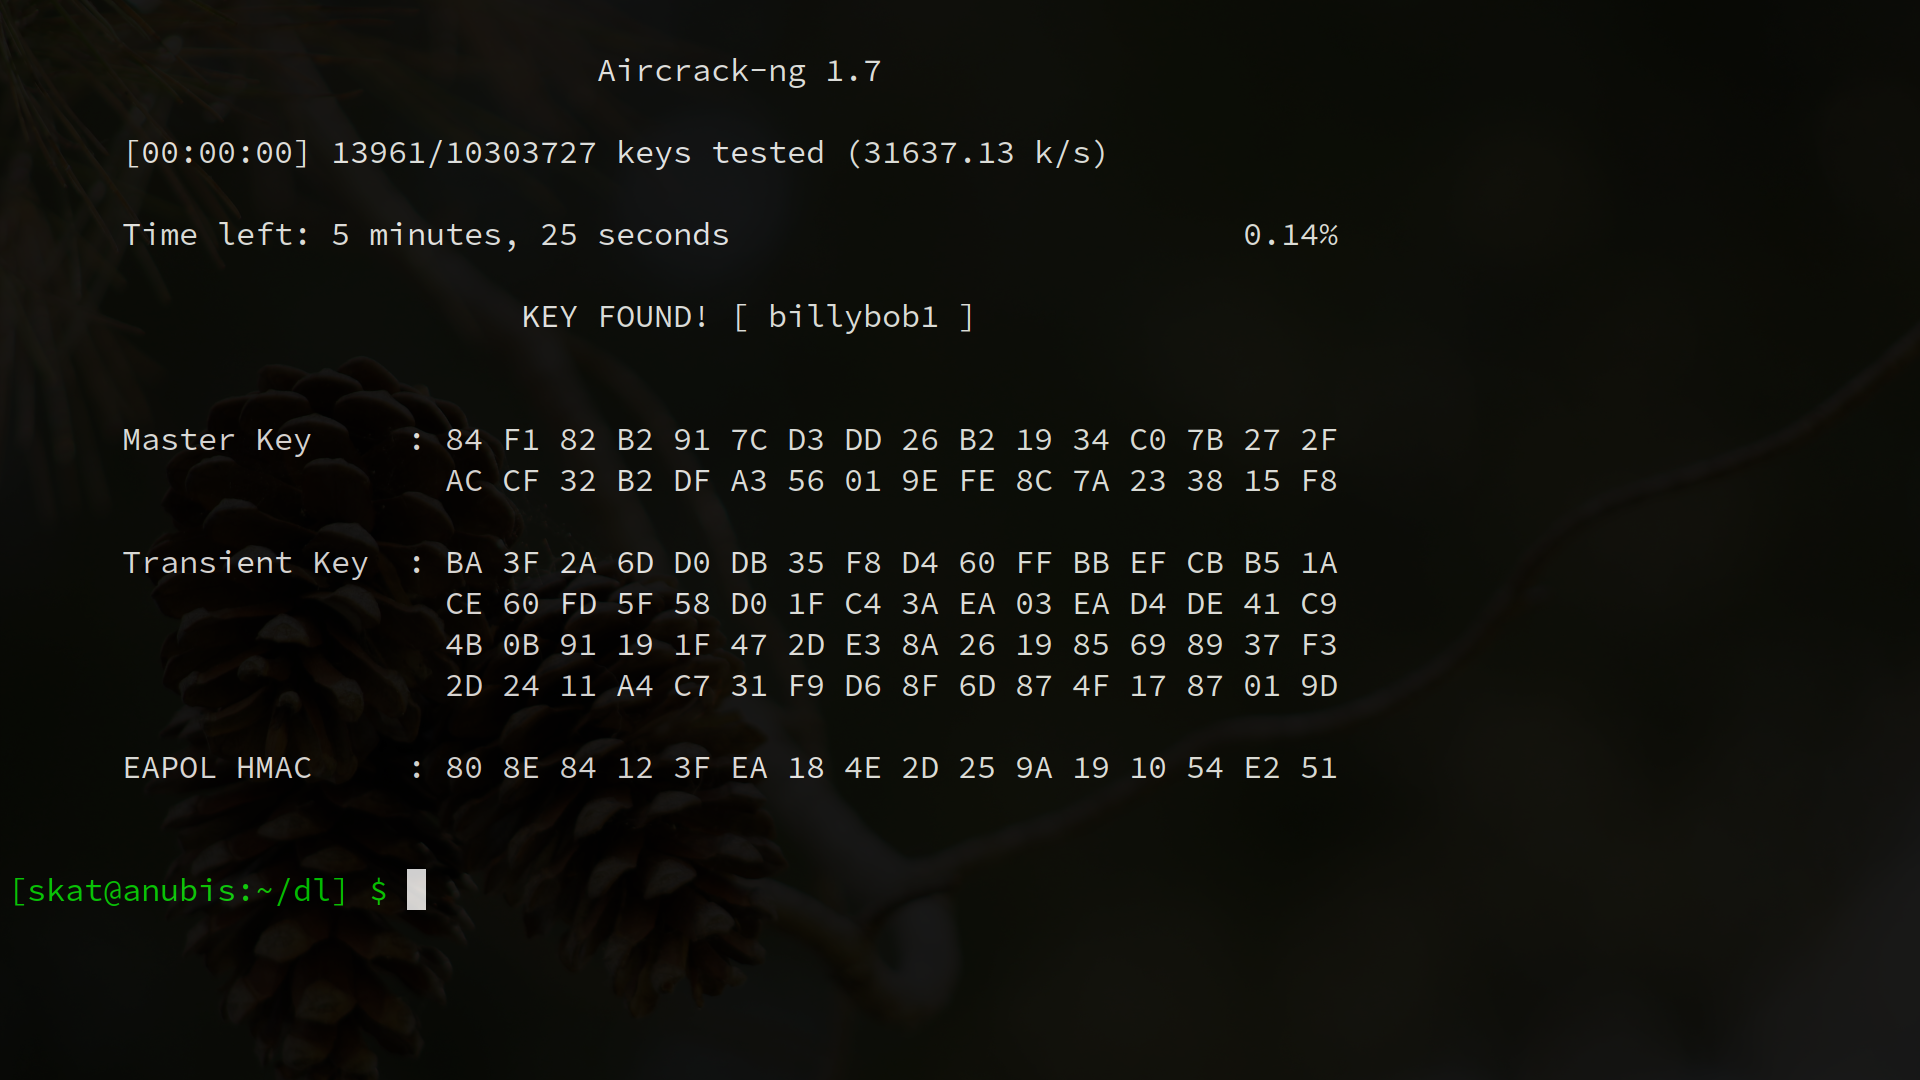
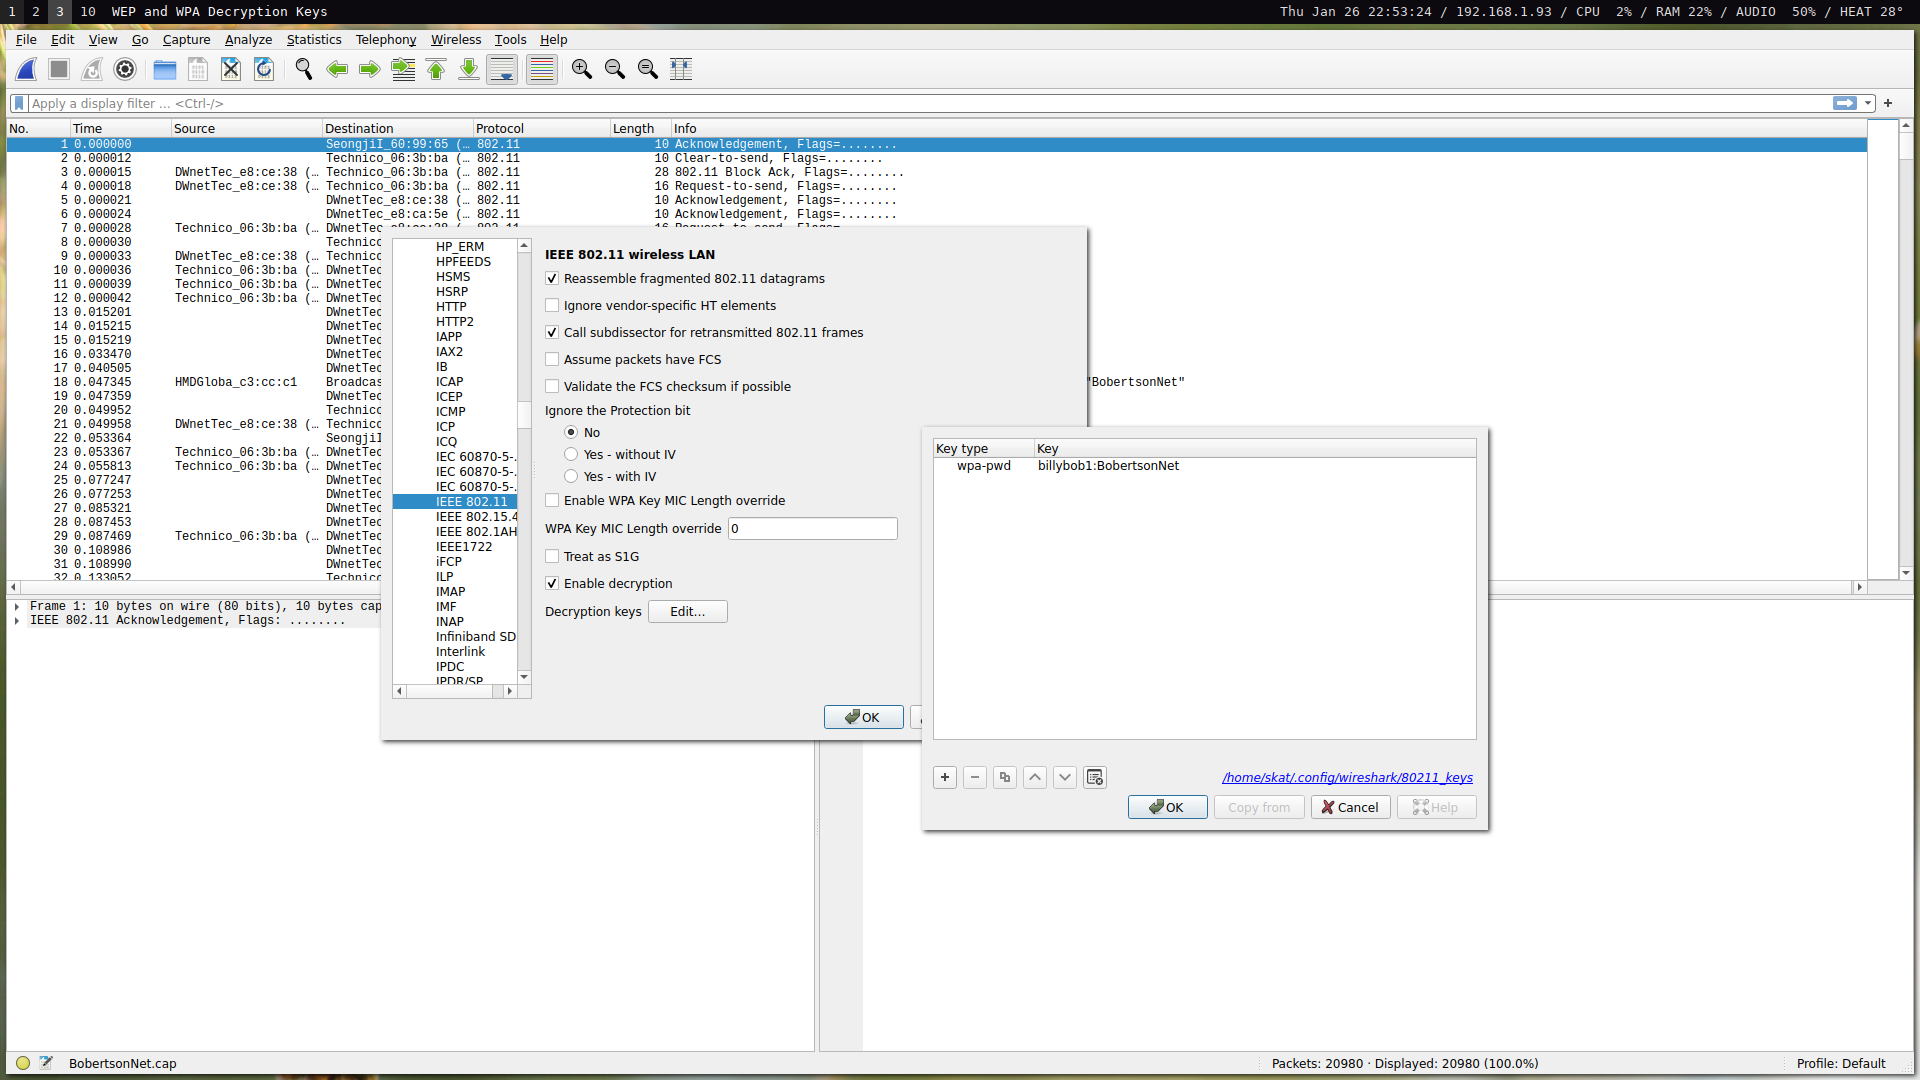
We can now decrypt the traffic. Wireshark is capable of decryption by adding the key to the list of decryption keys in the IEEE 802.11 preferences menu:
We can now filter for data frames of non-data subtype using a simple filter: wlan.fc.type == 2 and wlan.fc.type_subtype != 32. This effectively gives us mostly the L3 data that we care about.
Whenever I make a networking challenge, I make it a point to reward those who make an effort to understand what’s going on in the network instead of just looking through all the packets. It’s important to understand transactions instead of looking for the needle in the haystack. My networking challenges challenge you to truly understand what’s going on in a network and the relationship between nodes as opposed to just going through thousands of packets one-by-one.
So what’s going on here?
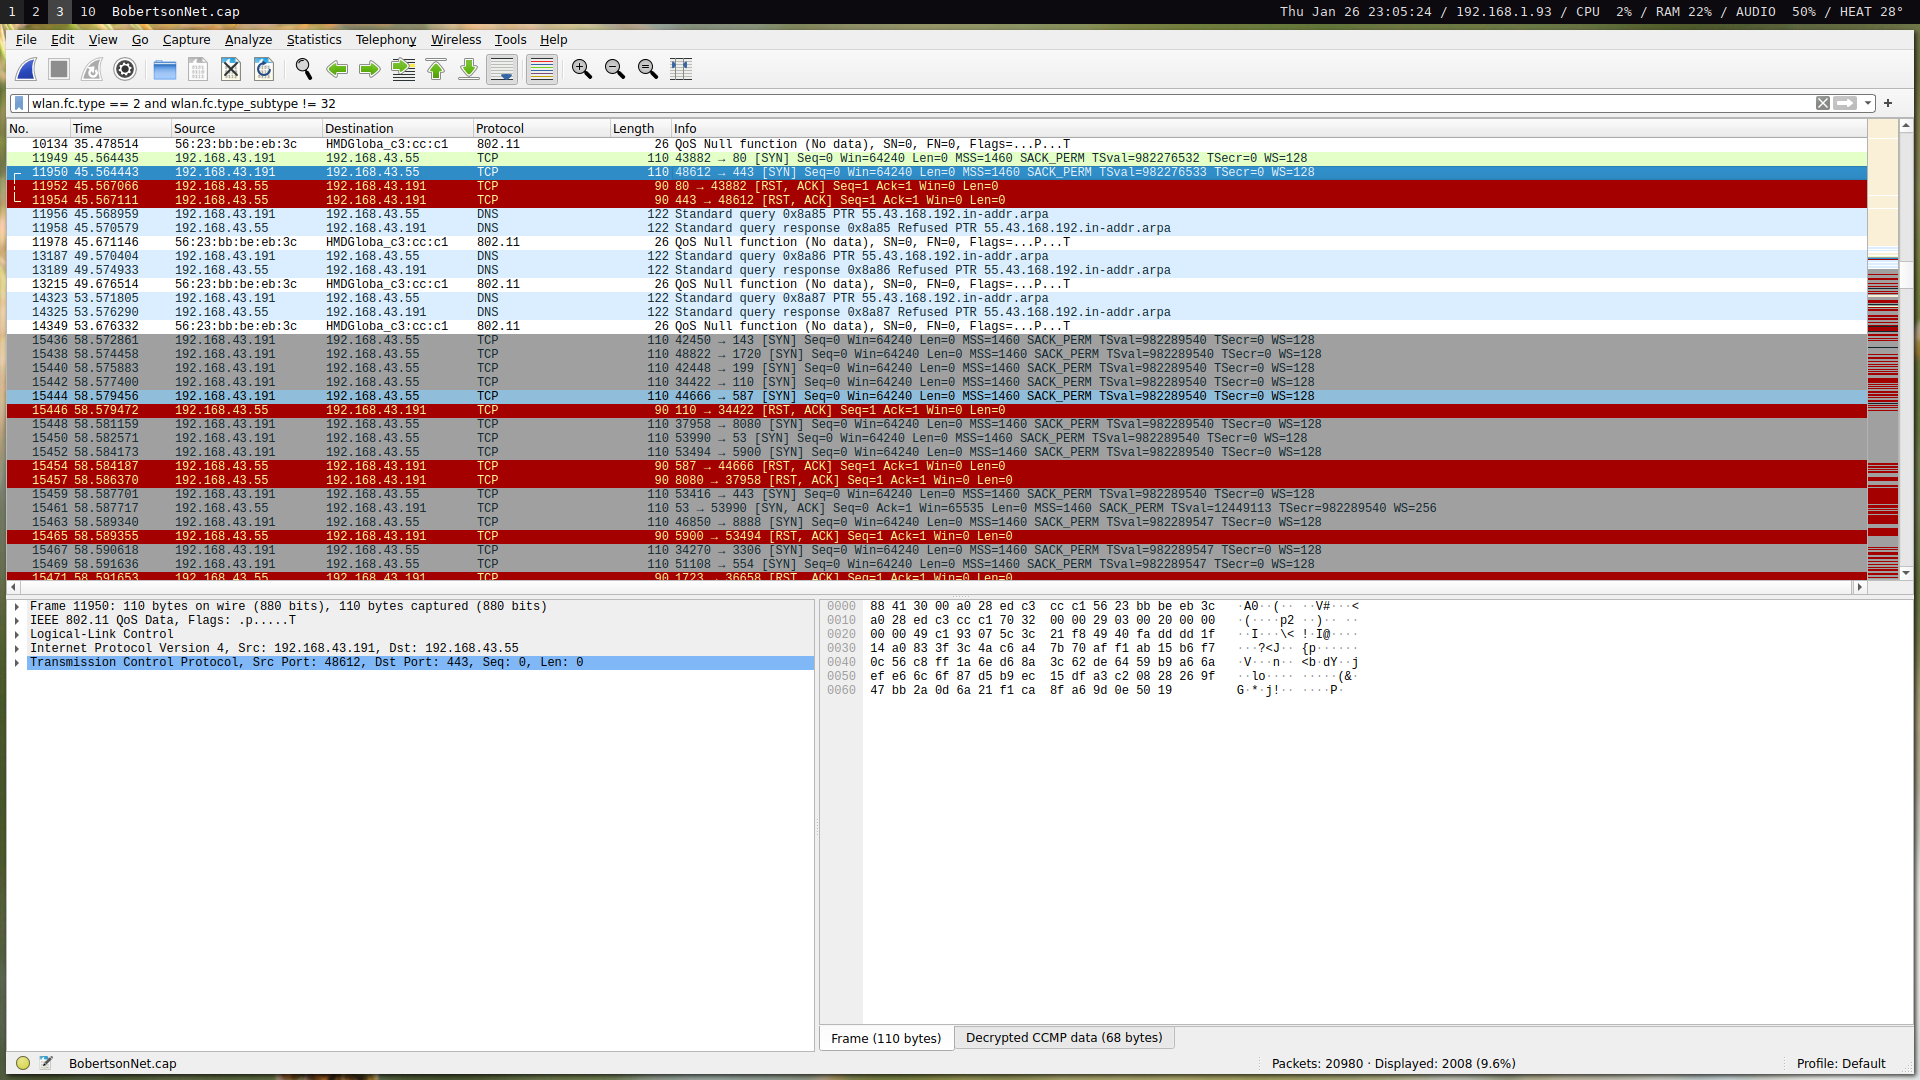
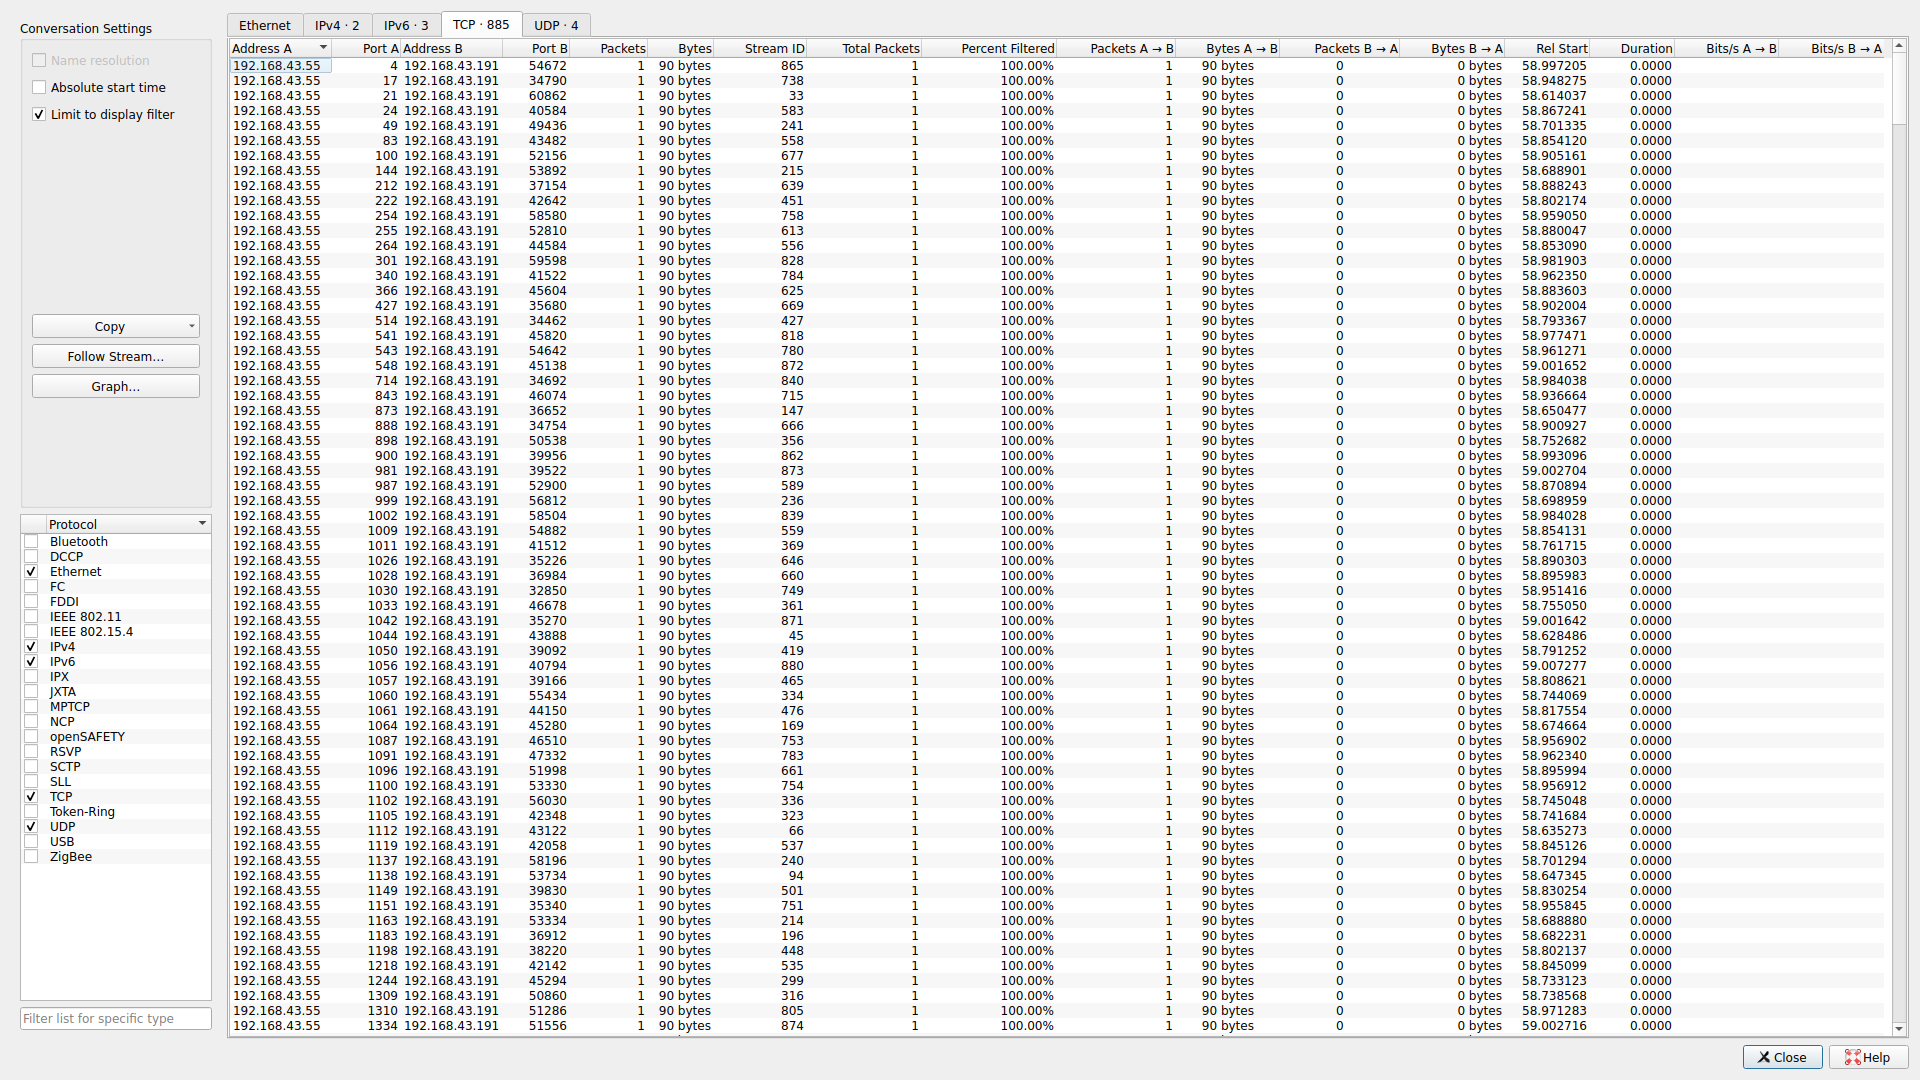
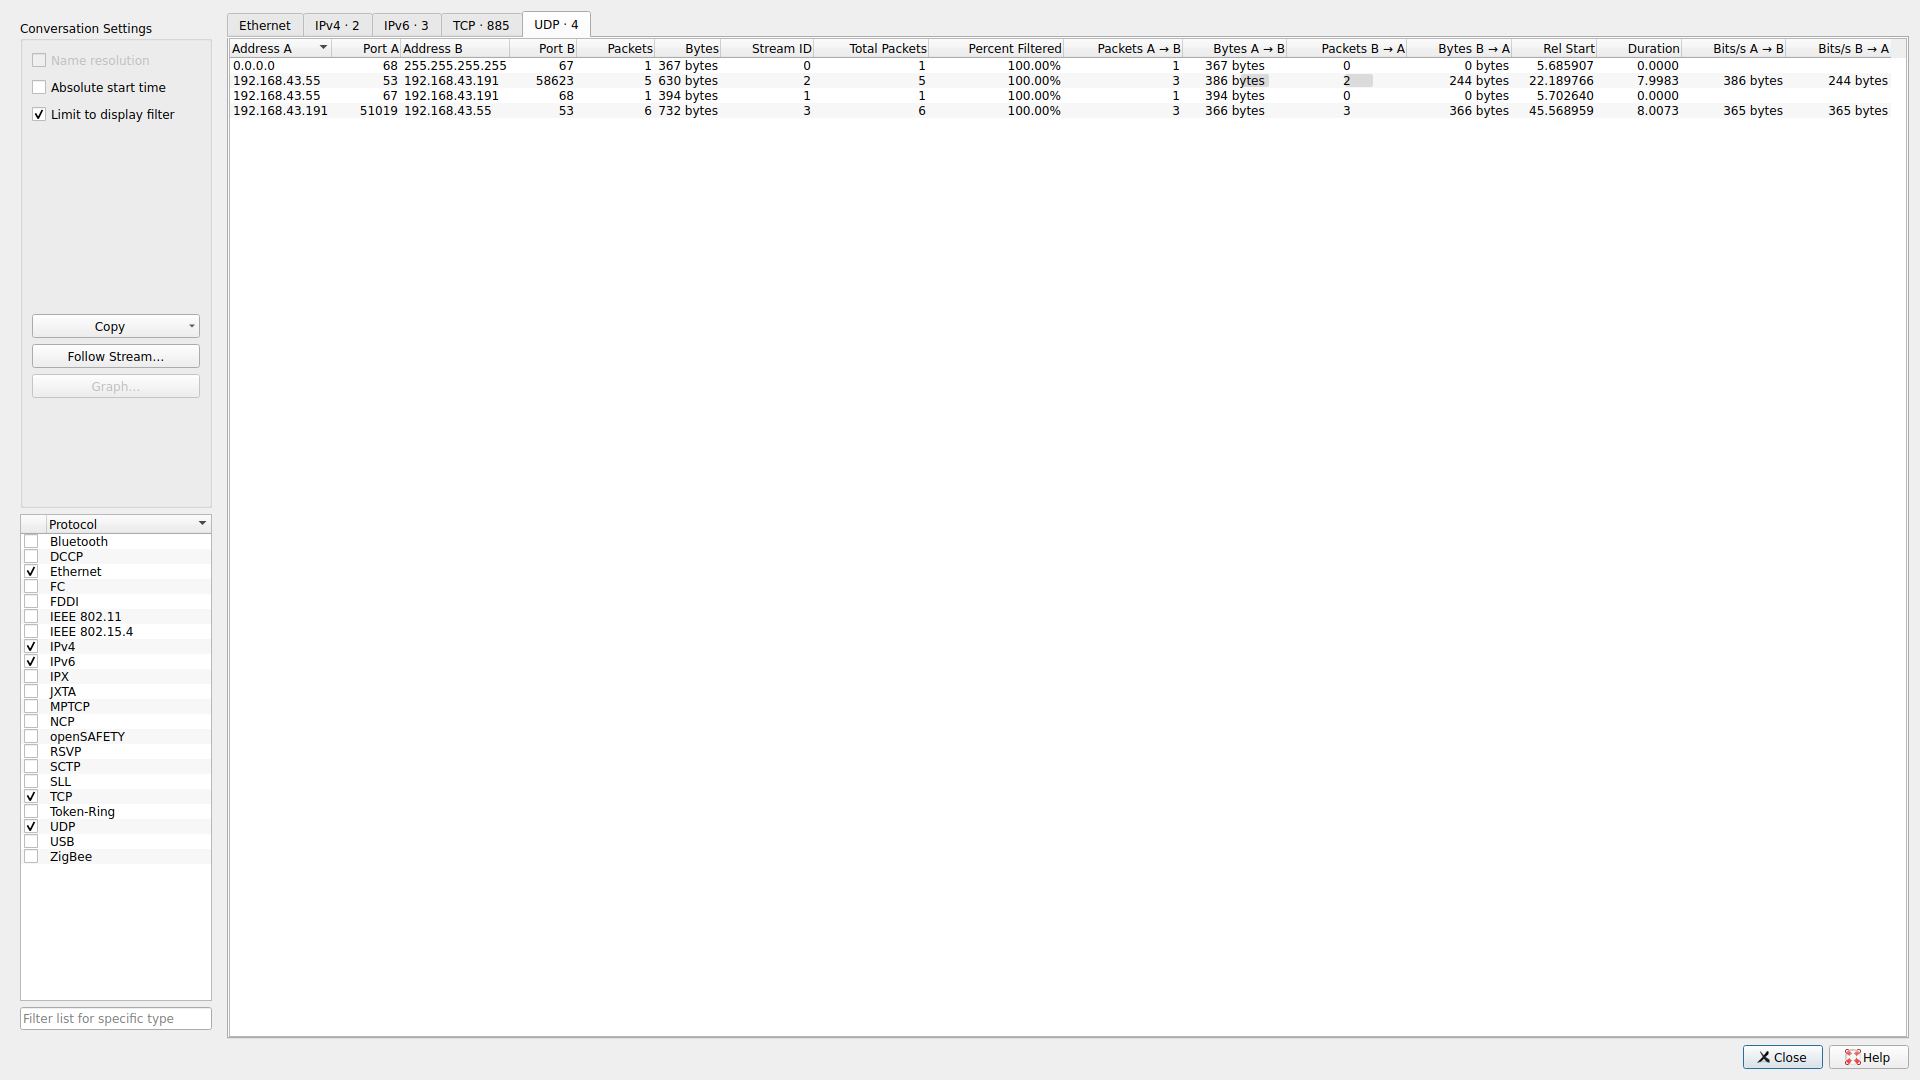
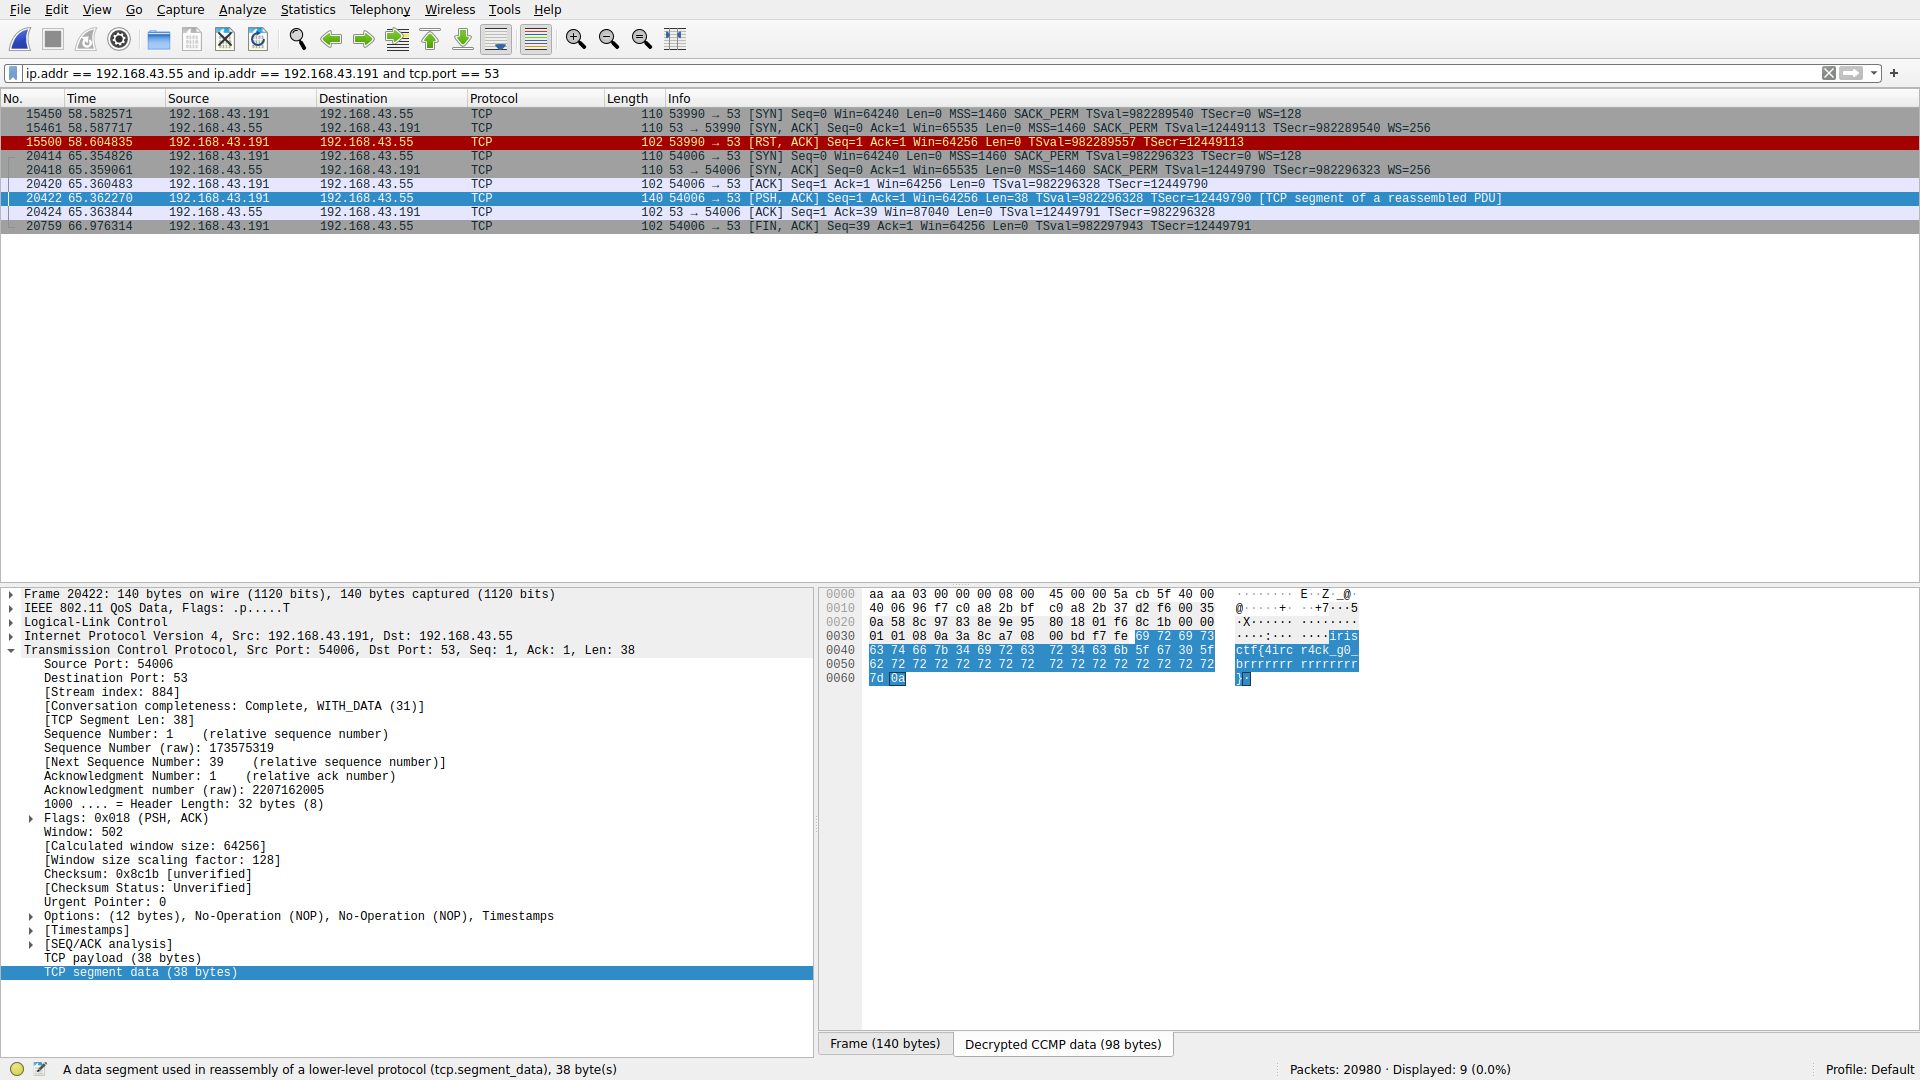
This is what a port scan looks like. We can see a large number of ports over which only one packet is sent. Interestingly, we see multiple packets sent over port 53. Thus, port 53 must have been the only port that was actually open. When we took a moment to make an effort to actually understand what’s going in the network, the solution not only became apparent, but was realized as the only possible solution. We can filter to see the transaction that occurred and retrieve the flag:
I had a lot of tickets sent in where people didn’t know what to do after cracking the key – lots of lessons learned about layering, L2/L3, monitor mode, promiscuous mode, and encryption. For an offline pcap: if you have the key, you can open the door. For a live attack: if you’re just sniffing, there’s no reason to actively connect to a network and expose yourself when you already have everything you need to break the encryption.
Networks / Needle in the Haystack Secure
URL: Networks
I had a lot of fun making this challenge! As I said before, whenever I make a networking challenge, I deliberately design it so that it is rewarding to those who make an effort to understand what’s going on in the network; this challenge is perhaps the greatest example of that.
There were a lot of players who brushed off the given screenshot. The screenshot tells us a lot about the scenario and should not be ignored!
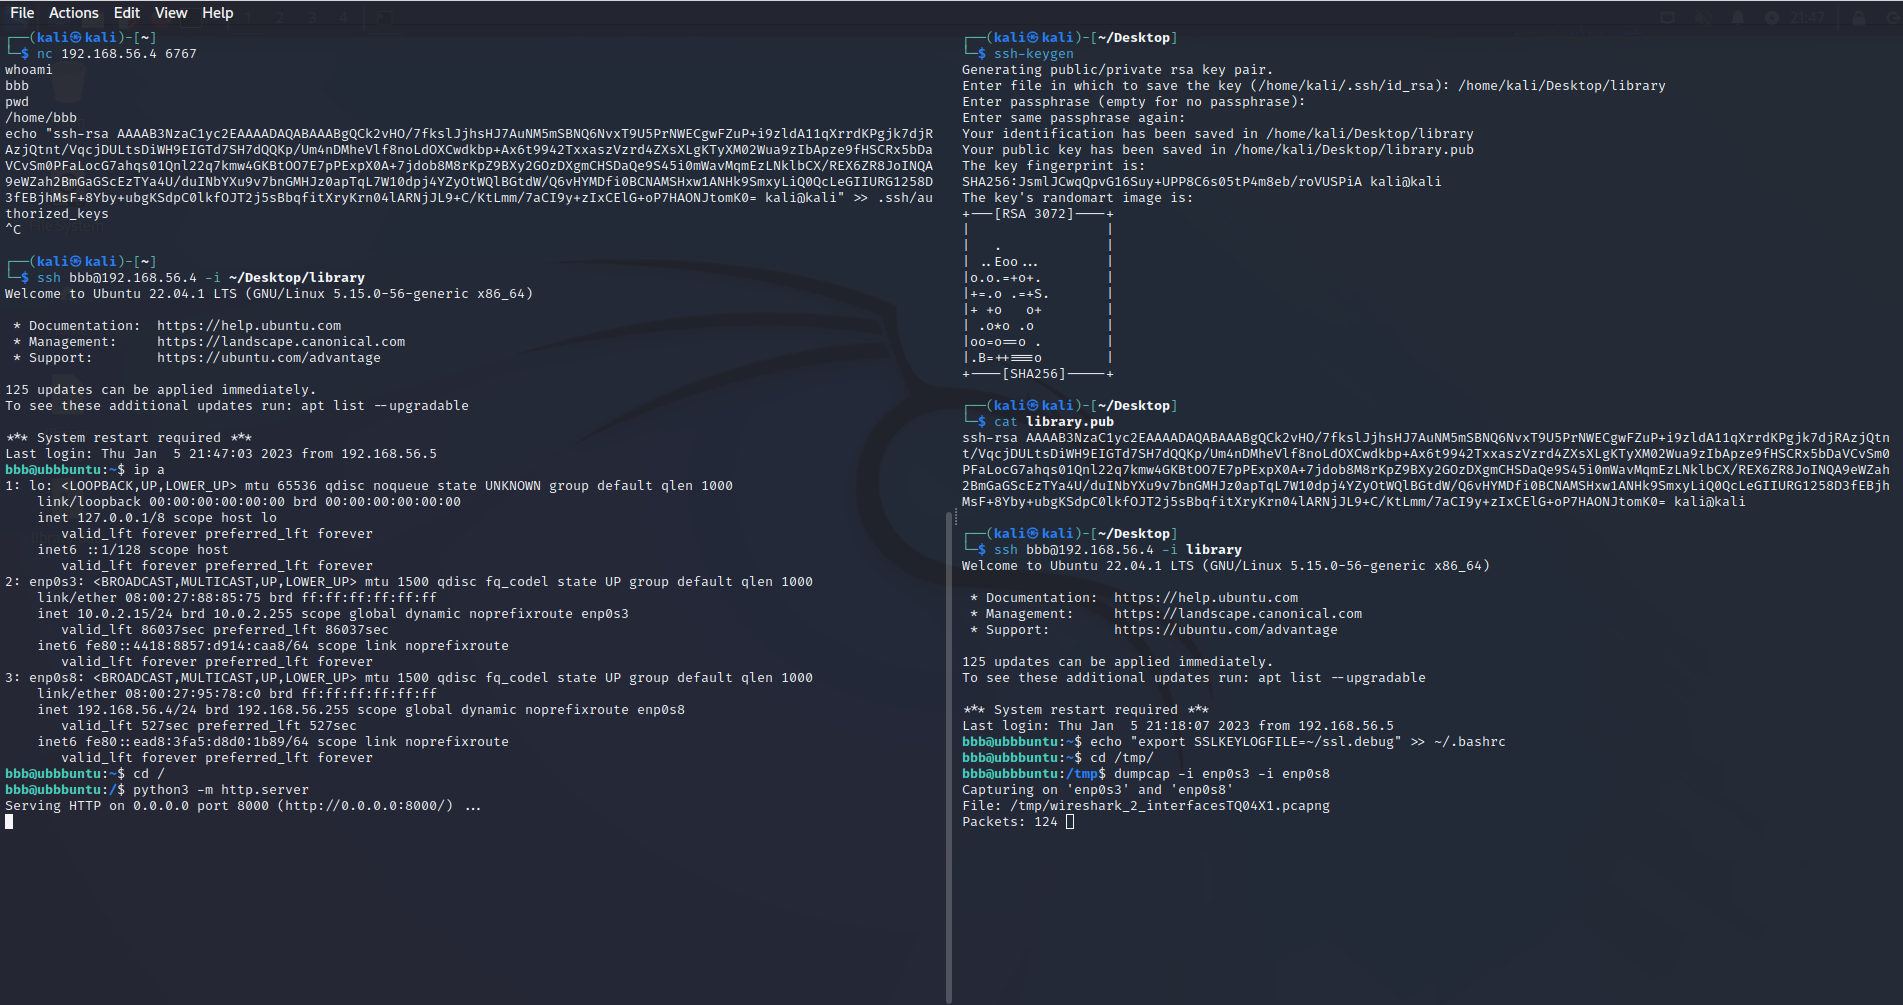
This screenshot is from the attacker machine. As the challenge description explains, the victim suffered from a BadUSB attack and the attacker got a shell. In the screenshot, we can see how this happened: the attacker connected to the shell spawned by the BadUSB; created a pair of SSH keys and then imported the public key into the victim’s authorized SSH hosts file; SSHed into the victim machine; exported an environment variable that writes the SSL key logs to ~/ssl.debug; and finally started a capture with dumpcap on the interfaces enp0s3 and enp0s8 as well as spawning a Python HTTP server from the victim’s root directory.
Looking through the pcap, we can clearly see that the HTTP server is used to conveniently exfiltrate data from the victim machine. In fact, we see 192.168.56.5 browsing through 192.168.56.4’s filesystem and downloading files:
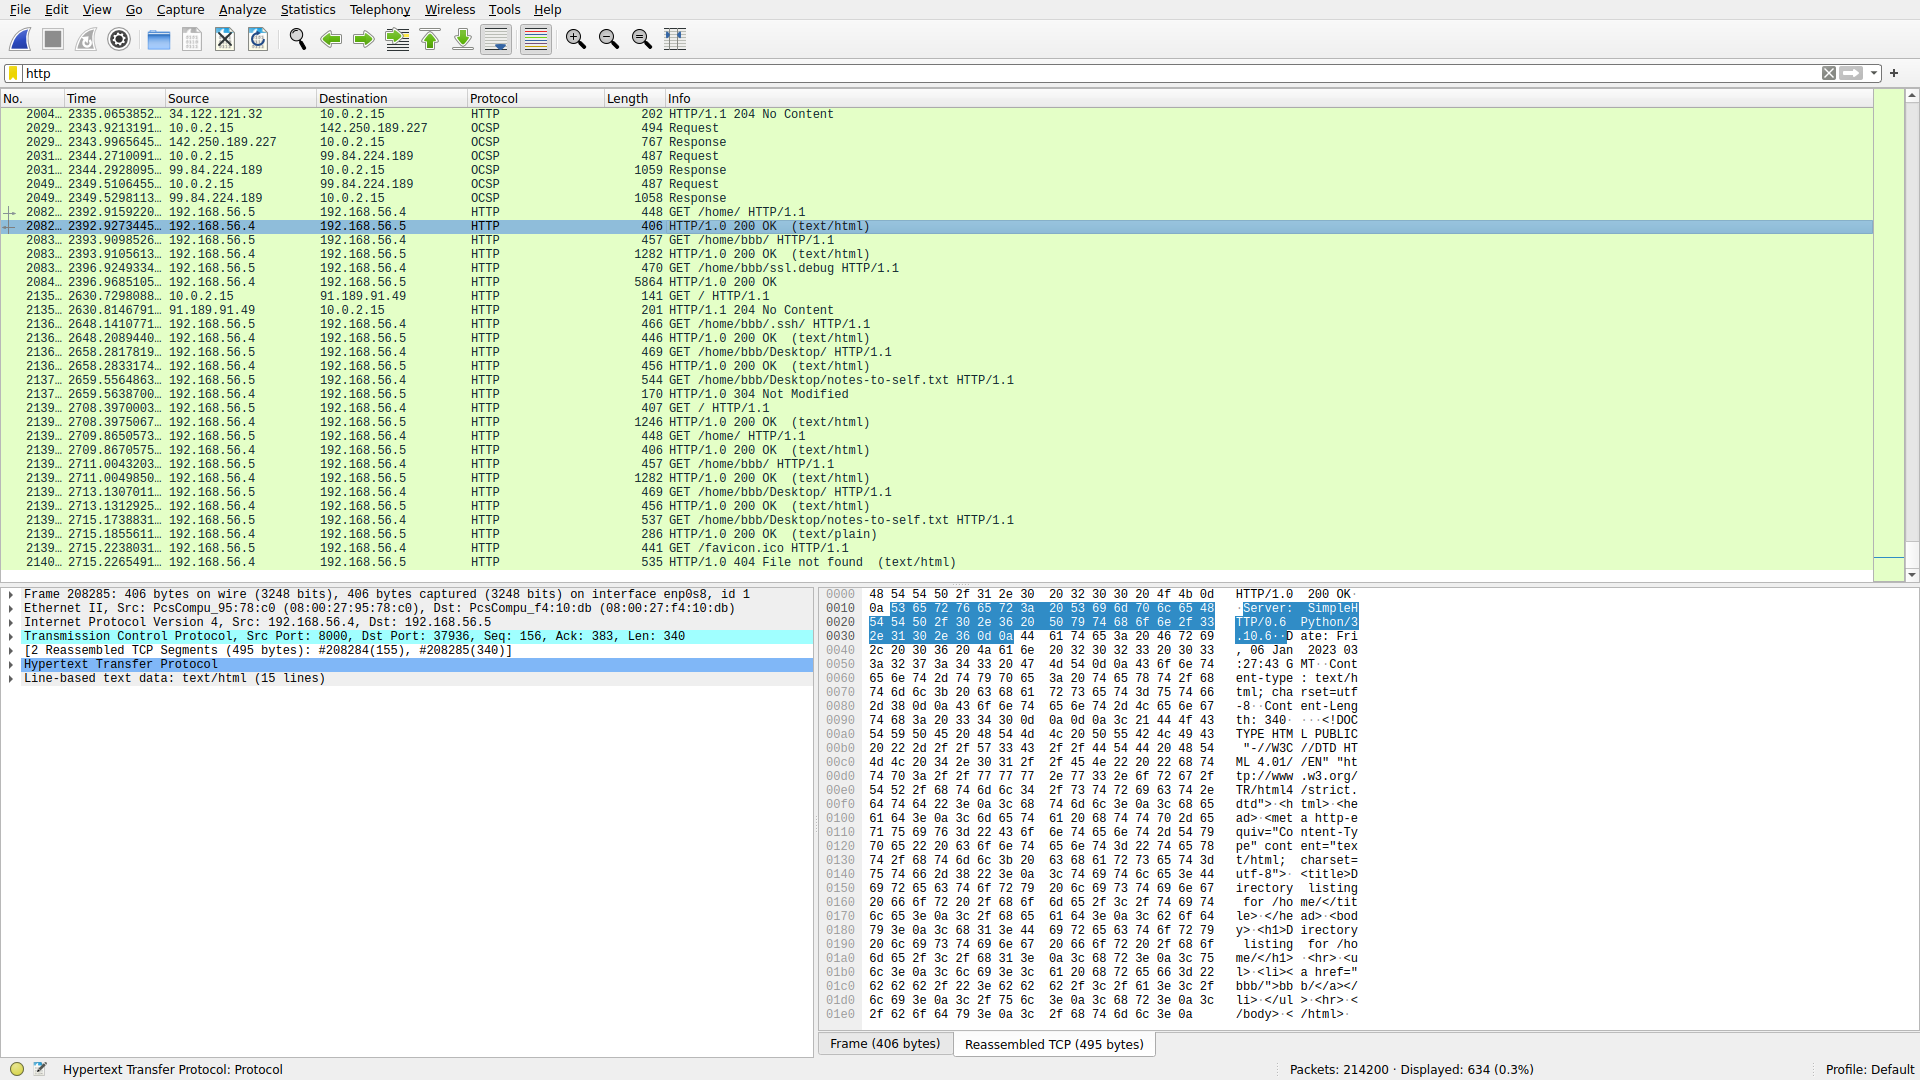
Something important to note is that the ssl.debug file is exported to the attacker machine towards the tail end of the pcap. Thus, it must contain the SSL keylog of the victim’s traffic in the pcap. We piece together the scenario:
- BadUSB the victim.
- Get a shell, gain persistence.
- Configure the system to write the SSL keys to a file.
- Start a pcap on the victim. This guarantees we have all their traffic.
- Start a Python web server as an easy way to browse and exfiltrate data from the victim filesystem.
- Let the victim use their computer as they would normally.
- At a later time, export the SSL keys and the pcap and decrypt all of their traffic using the SSL keys.
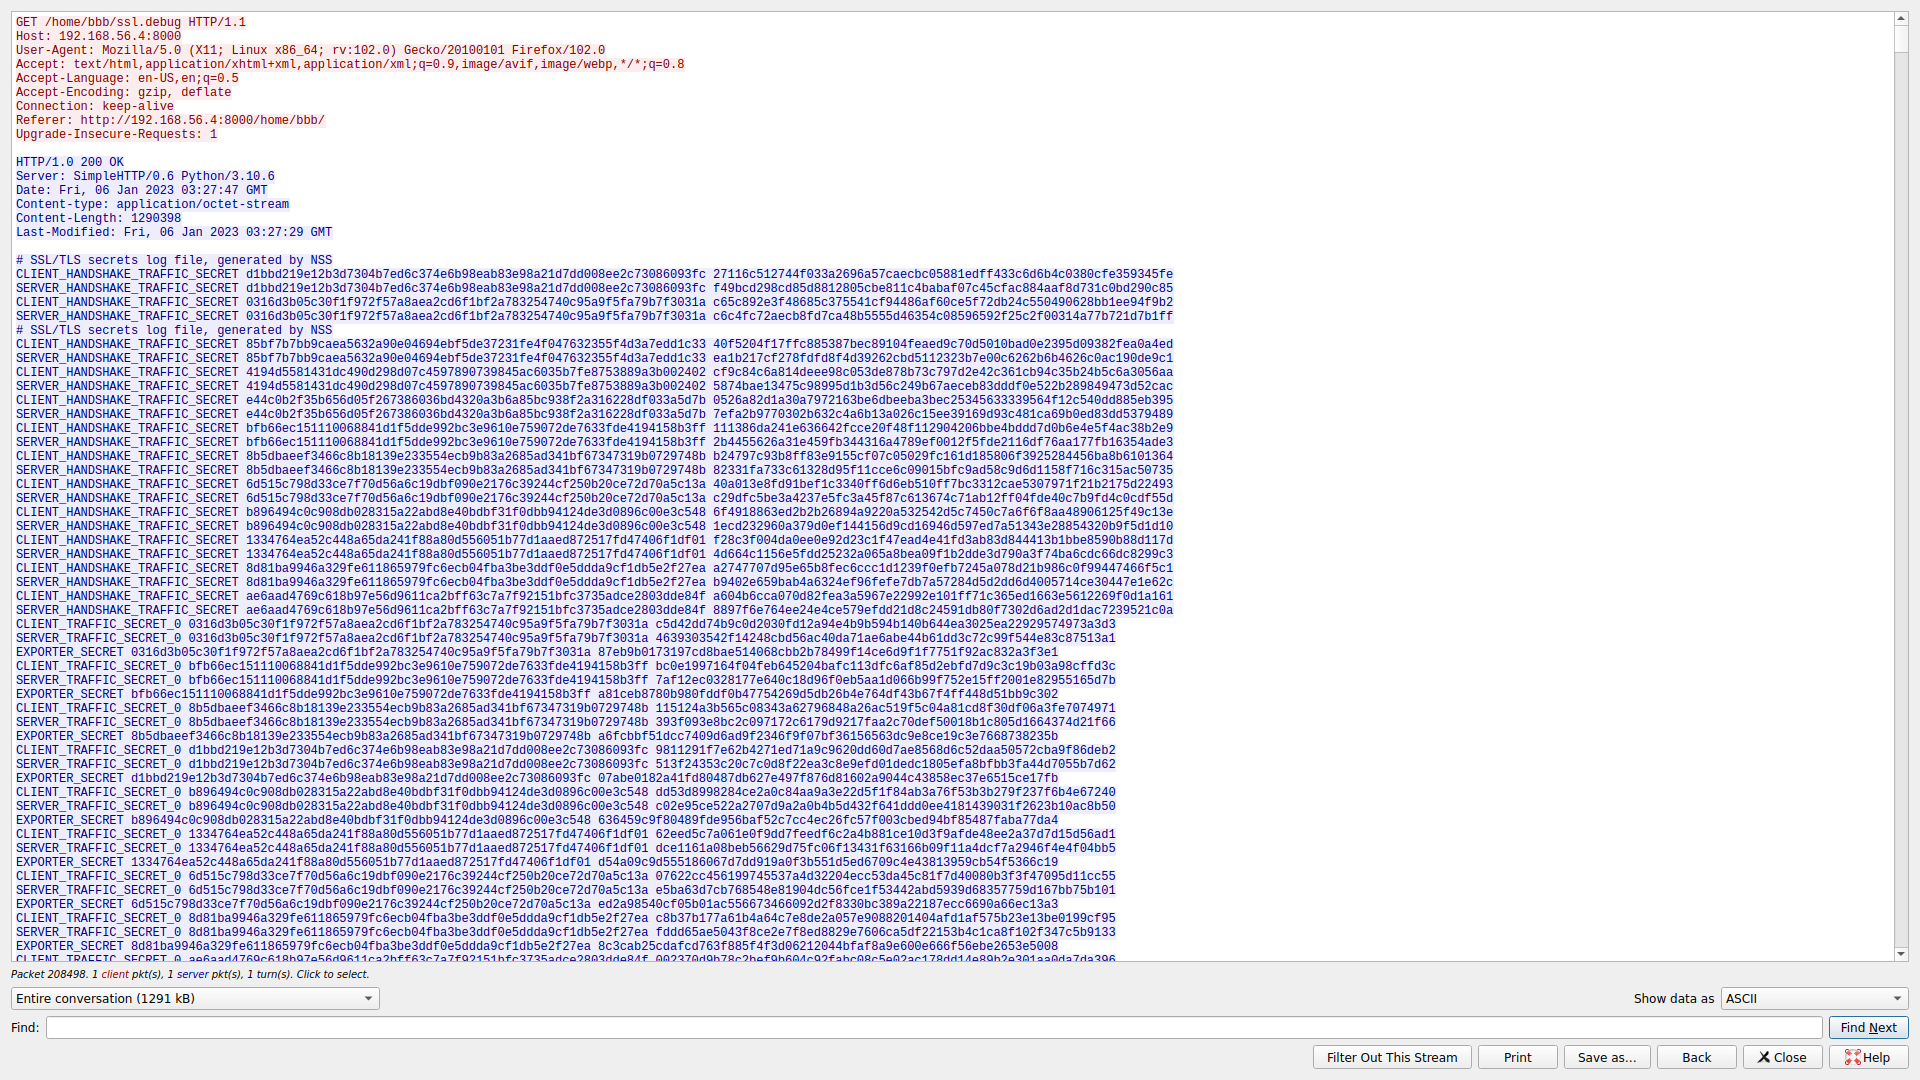
The attacker used a simple HTTP server. Thus, it is not encrypted and we can view the SSL keys too:
We can then use the SSL keys to decrypt the victim’s traffic:
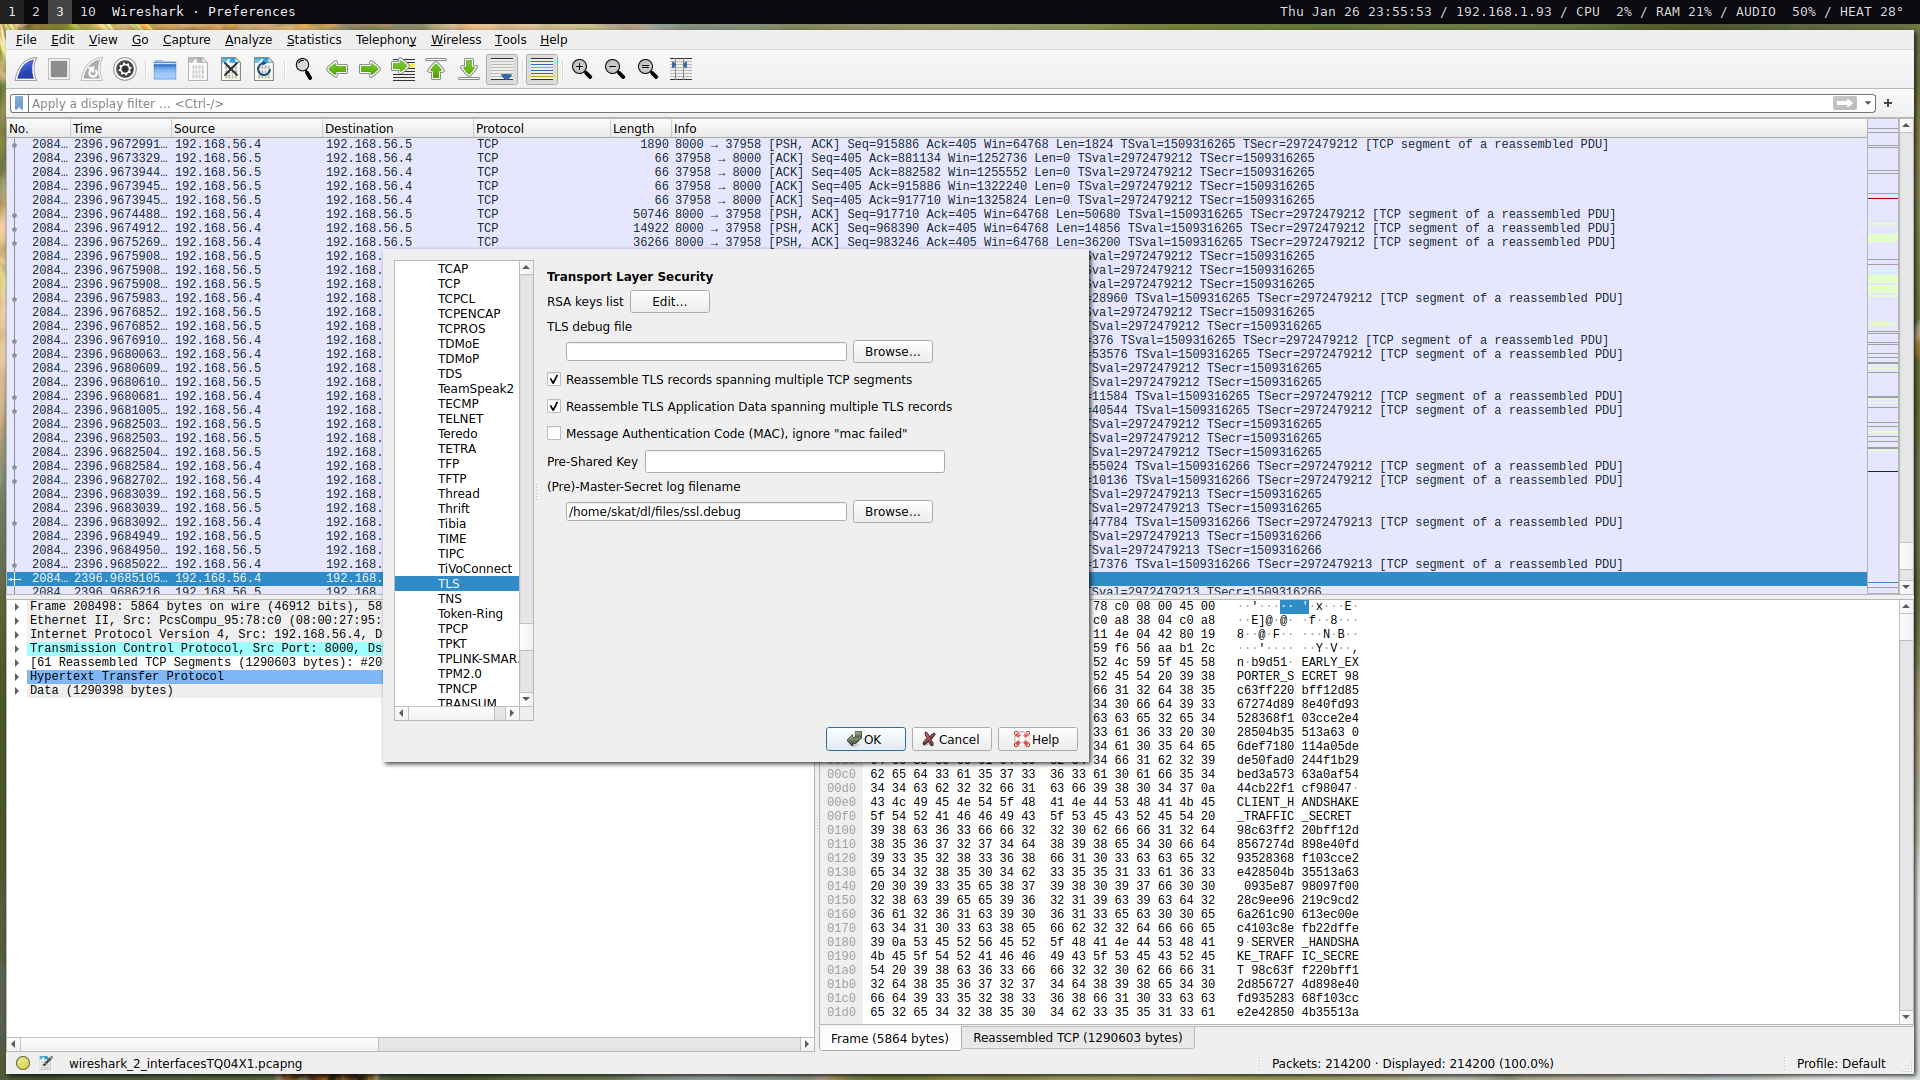
From here, we have 214200 packets in our pcap. All encrypted traffic has been decrypted, so we can view the victim’s HTTPS traffic. If you look at the DNS and HTTPS traffic, you can begin to piece together the victim’s browsing history. For example, the following at HTML site titles:
- ELI5: White-Collar Crimes (Extortion, Laundering, etc.)
- White-collar crime - Wikipedia
- Ponzi scheme - Wikipedia
- Charles Ponzi - Wikipedia
- Will I Go to Jail If Charged with Embezzlement in California?
- Bitcoin (BTC) Price, Real-time Quote & News - Google Finance
- Coinbase, Silvergate Get a Crypto Rally; Bitcoin Moves Higher
- secret password to commit white collar crime wire fraud embezzlement conspiracy - Pastebin.com
- Bernie Madoff - Wikipedia
- Madoff investment scandal - Wikipedia
- 2007-2008 financial crisis - Wikipedia
- Search for ‘how to beat an ostrich’ - wikihow
- 3 Ways to Survive an Ostrich Encounter or Attack - wikiHow
- Search for ‘how to embezzlement’ - wikihow
- How to Hack: 14 Steps (with Pictures) - wikiHow
- 4 Ways to Hack Games - wikiHow
You can quickly see how 214200 packets, a haystack of information, becomes very easy and apparent to digest when you make an effort to understand what’s going on in the network instead of doing random queries and searches or looking through each packet individually. When you view “secret password to commit white collar crime wire fraud embezzlement conspiracy - Pastebin.com,” you will find the flag:
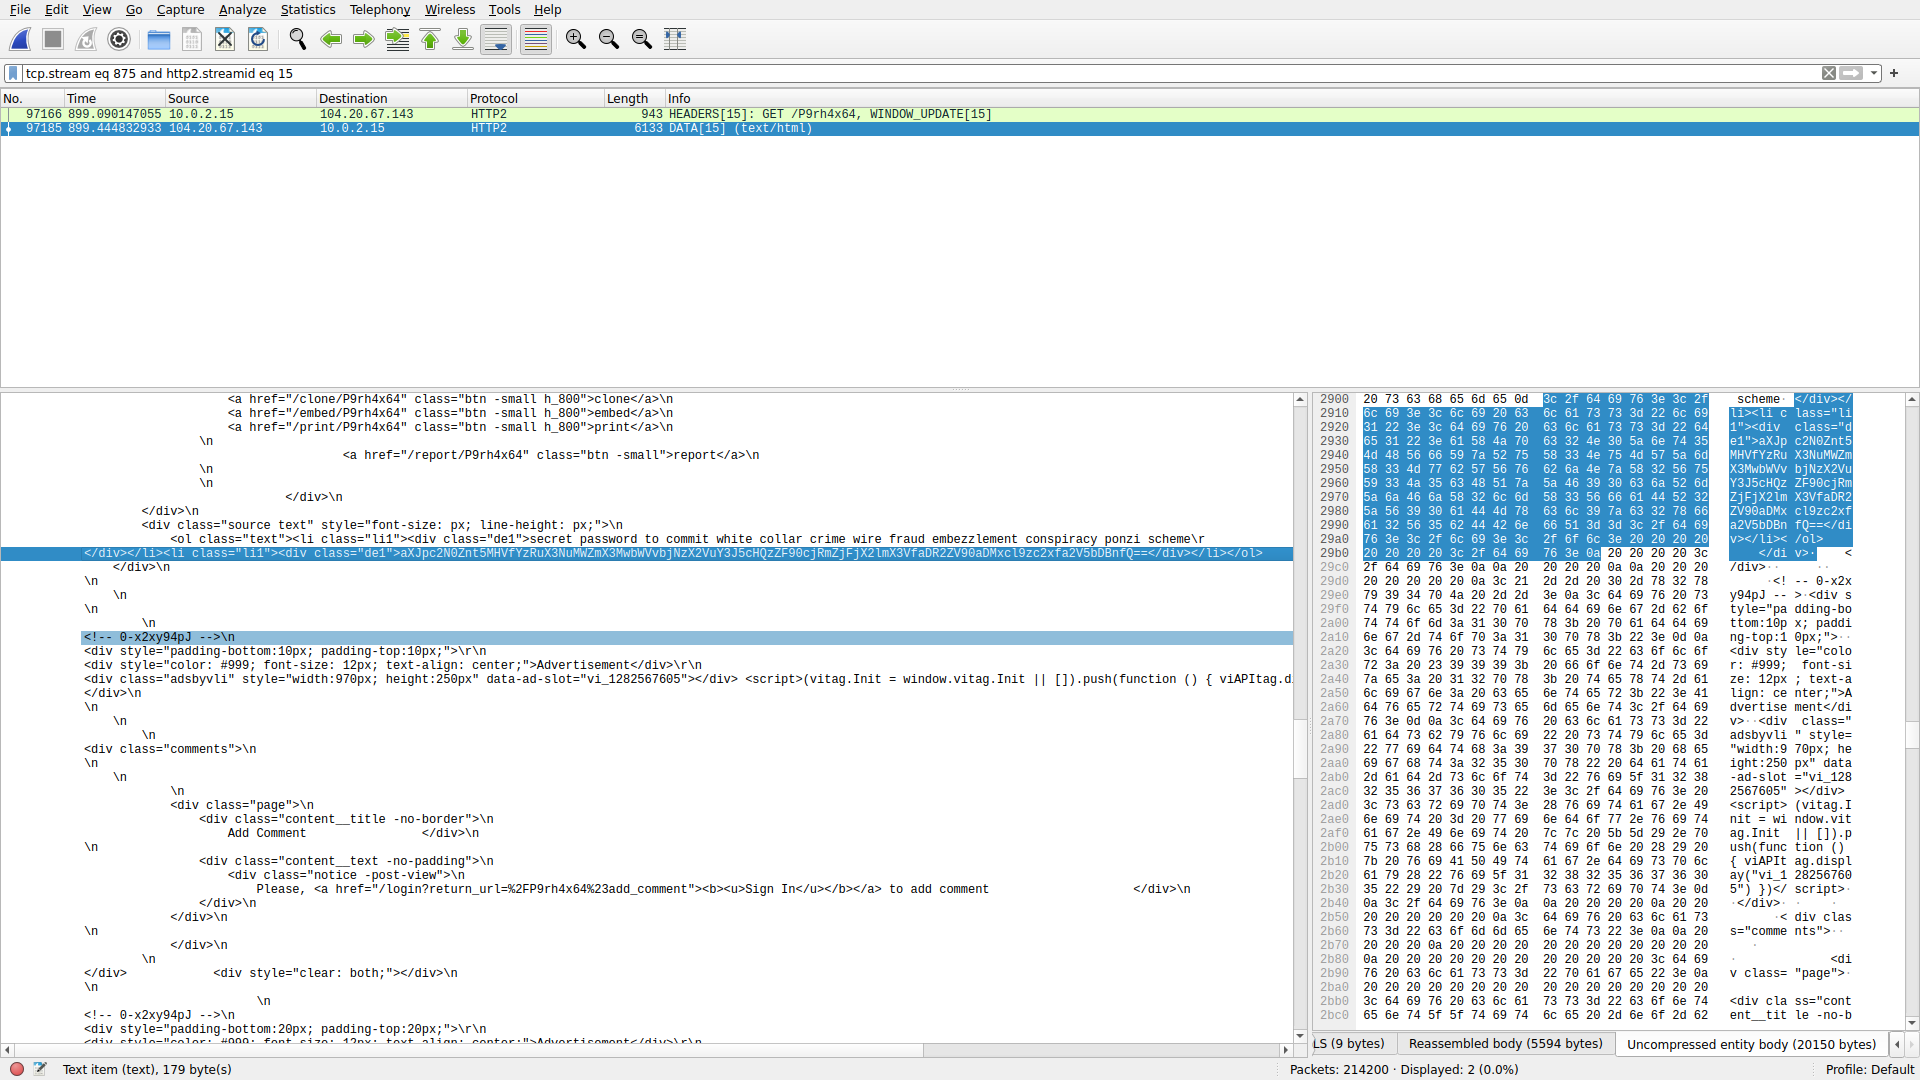
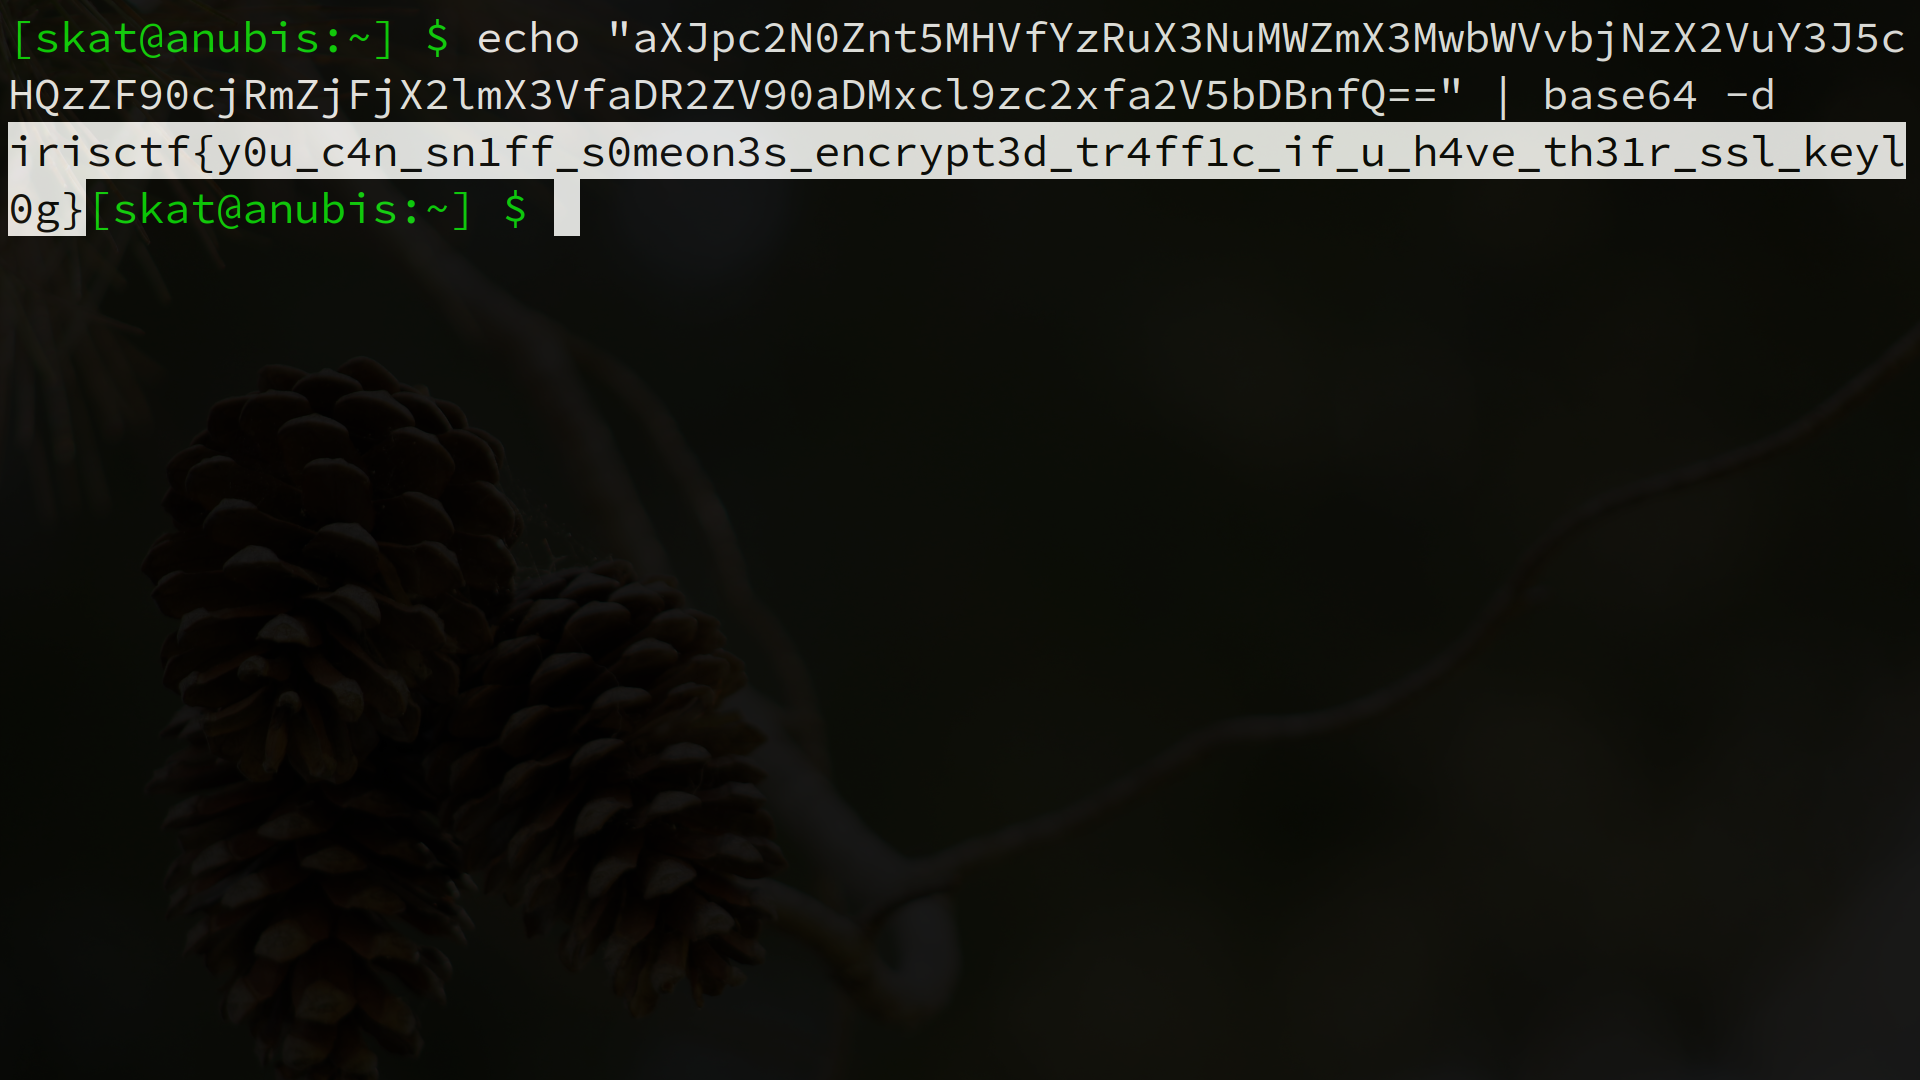
Not particularly difficult, but you need to be situationally aware and put in an effort to understand what’s going on first – the flag comes second.
Networks / MICHAEL
URL: Networks
Oh, this is a neat one. This one introduces you to an important concept known as network coding. As mentioned in the challenge hint, you should not blindly trust Wireshark’s protocol dissector as it may be misleading. Let’s extract the bytes of each packet ourselves and analyze them manually:
00:  41 88 00 de c0 ff ff 00 a7 01 69 72 69 73 63 74 66 7b 93
01:  41 88 00 de c0 ff ff 00 a7 f2 67 68 64 63 5c 65 41 2d ee
02:  41 88 00 de c0 ff ff 00 a7 ae 06 3f 27 62 5b 67 6d 76 78
03:  41 88 00 de c0 ff ff 00 a7 cb 09 3c 2a 75 4c 21 76 59 58
04:  41 88 00 de c0 ff ff 00 a7 cb 09 3c 2a 75 4c 21 76 59 58
05:  41 88 00 de c0 ff ff 00 a7 4f 3a 2a 78 68 76 31 79 1c 08
06:  41 88 00 de c0 ff ff 00 a7 a7 5b 39 2b 75 67 67 63 3e b8
07:  41 88 00 de c0 ff ff 00 a7 5d 08 25 2a 72 64 76 4a 20 05
08:  41 88 00 de c0 ff ff 00 a7 66 0b 18 07 0c 15 01 11 0b ea
09:  41 88 00 de c0 ff ff 00 a7 d3 62 2e 7e 63 60 21 41 09 5f
10:  41 88 00 de c0 ff ff 00 a7 d7 0e 5b 1c 1a 3f 42 33 6c 5f
11:  41 88 00 de c0 ff ff 00 a7 e2 38 0e 55 11 2f 11 1e 4e ba
12:  41 88 00 de c0 ff ff 00 a7 9e 35 6d 65 63 77 23 54 4a 0e
13:  41 88 00 de c0 ff ff 00 a7 ab 03 38 2c 68 67 70 79 68 eb
14:  41 88 00 de c0 ff ff 00 a7 6b 3a 6b 69 62 76 62 6d 26 2a
15:  41 88 00 de c0 ff ff 00 a7 ec 0d 66 31 64 4e 35 68 47 b0
16:  41 88 00 de c0 ff ff 00 a7 77 3d 0c 5f 0d 05 01 28 13 2d
17:  41 88 00 de c0 ff ff 00 a7 73 51 79 3d 74 5a 62 5a 76 2d
18:  41 88 00 de c0 ff ff 00 a7 3e 06 3a 26 74 4d 60 4f 35 7c
19:  41 88 00 de c0 ff ff 00 a7 5b 09 39 2b 63 5a 26 54 1a 5c
20:  41 88 00 de c0 ff ff 00 a7 e9 08 61 3a 6e 72 22 7c 59 23
21:  41 88 00 de c0 ff ff 00 a7 7d 64 11 59 01 3b 46 2c 7f 27
22:  41 88 00 de c0 ff ff 00 a7 d5 63 32 7f 72 5e 71 5f 33 06
23:  41 88 00 de c0 ff ff 00 a7 6d 3b 77 68 73 48 32 73 1c 73
24:  41 88 00 de c0 ff ff 00 a7 f1 63 73 6e 78 5e 22 4b 09 24
Wireshark’s protocol dissector is correct about this being 802.15.4, the wild west of wireless networking right now. The standard header for 802.15.4 is obeyed. However, where Wireshark’s protocol dissector begins to fail is in the interpretation of the actual data bytes.
00:  41 88 00 de c0 ff ff 00 a7 01 69 72 69 73 63 74 66 7b 93
     ^---- these are fine ----^ ^-- we must analyze these --^

We can see that each packet has 10 bytes of payload data. In the first packet, we see the string irisctf{. These are 8 bytes surrounded by 1 byte on each side.
41 88 00 de c0 ff ff 00 a7 01 69 72 69 73 63 74 66 7b 93 A.........irisctf{.
Something common in networking are error detection codes. We can test this by calculating the CRCs, perhaps by hand or our own implementation or with the help of an online tool. Upon testing this idea, we can see that the last byte is the CRC-8 of the 9 bytes of payload preceding it.
The first byte of the payload of the first packet is 01, or 0000 0001 in binary. Given that this the data is also irisctf{, we can conclude that this must be an index of some sort. This will become clearer in a moment.
Something interesting about the behavior of this node is that it is broadcasting at regular, periodic intervals. It is disseminating a message without regards for who hears it, without the need for a response. I tried to spell it out in the challenge description and hint, but in case you didn’t figure it out, this challenge deals with rateless network coding. Specifically, this challenge uses an implementation of Luby transform codes, the first realization of rateless coding invented by Michael Luby. Rateless coding is an amazing advancement in networking because it allows a link to converge to its packet reception rate regardless of its bit error rate!
Each packet contains a number of blocks: linearly combined chunks of plaintext. In the case of Luby transform codes, we use XOR operations. This challenge contains only one block per packet in order to make things easier for analysis. In order to denote the indices of the plaintext chunks each block encodes, there are a variety of methods. A common method is to denote these as a bit string or numerical array in the message header itself. Using a bit string (as is shown here in this challenge) is space efficient for messages with a small number of plaintext blocks, while using a numerical array may be more space efficient for messages with a large number of plaintext blocks but a small number of linearly encoded blocks. Another common method (and perhaps the most efficient!) is to pre-share an index table between all nodes in a network and transmit the index to pull from the index table. For this challenge, I opted to use a bit string instead of pre-shared index table as it would be unsolvable if I used a pre-shared index table since that would require knowledge in each node’s memory.
In order to decode the data, there are a variety of mathematical methods we can use. In my research during my last semester of my undergraduate studies, we use adaptive Gaussian elimination. My teammate, Seraphin, came up with this solution in Sage:
txt = """01 697269736374667B
F2 676864635C65412D
AE 063F27625B676D76
CB 093C2A754C217659
CB 093C2A754C217659
4F 3A2A78687631791C
A7 5B392B756767633E
5D 08252A7264764A20
66 0B18070C1501110B
D3 622E7E6360214109
D7 0E5B1C1A3F42336C
E2 380E55112F111E4E
9E 356D65637723544A
AB 03382C6867707968
6B 3A6B696276626D26
EC 0D6631644E356847
77 3D0C5F0D05012813
73 51793D745A625A76
3E 063A26744D604F35
5B 09392B635A26541A
E9 08613A6E72227C59
7D 641159013B462C7F
D5 63327F725E715F33
6D 3B7768734832731C
F1 63736E785E224B09""".split("\n")

# 8 chunks, 8 bytes per chunk, 8 bits per chunk
F.<x> = GF(2^(8*8))
#m = matrix(F, 8, 25)
m = []
#v = vector(F, 25)
v = []
for rown, line in enumerate(txt):
    chunks, r = line.split(" ")
    chunks = int(chunks, 16)
    r = int(r, 16)
    mrow = []
    m.append(mrow)
    for i in range(8):
        j = chunks & (2^i)
        j = 1 if j > 0 else 0
        mrow.append(j)
    l = 0
    for i in range(8 * 2^8):
        if r & (2^i):
            l += x^i
    #v.append(F.fetch_int(r))
    v.append(l)
v = vector(F, v)
m = matrix(F, m)

vv = m.solve_right(v)
for row in vv:
    print(bytes.fromhex(hex(row.integer_representation())[2:]))
$ sage michael.sage
b'irisctf{'
b'micha3l_'
b'luby_cre'
b'4ted_th3'
b'_f1rst_c'
b'l4ss_0f_'
b'f0untain'
b'_c0des} '
NVTFT, the only person to solve this challenge during the competition weekend, made an excellent YouTube video showing the solution to this challenge as well: YouTube (VN).
irisctf{micha3l_luby_cre4ted_th3_f1rst_cl4ss_0f_f0untain_c0des}
Radio Frequency / babyrf 1
URL: Radio Frequency
I’m very happy and proud of everyone who solved babyrf 1 and 2 during the competition weekend. There were a lot of approaches to these challenges and I enjoyed seeing what everyone did! I’m very proud of these challenges and it truly made me smile to hear the great feedback I got on the RF category.
This challenge involves building your own demodulator. I’m very much a fan of making your own tools and learning how to walk before you run, so I’m forcing you to truly understand the fundamentals of radio frequency by building your own tools instead of going straight to a tool that’ll do it all for you like URH. This challenge comes in three parts. Upon unpickling each part and seeing what was pickled, we have an array of tuples. One increases at a constant rate while the other oscillates between -1 and 1. In order to better understand this data, we can plot the points:
#!/usr/bin/env python3

import pickle
import matplotlib.pyplot as plt

def read_samples(file):

	with open(file, "rb") as f:
		data = pickle.load(f)

	return data

def plot_points(points):

	x = [n[0] for n in points]
	y = [n[1] for n in points]
	plt.plot(x, y)
	plt.show()

def analyze_fsk():

	fsk = read_samples("samples/part1-points.pickle")
	print(f":: Read in {len(fsk)} FSK samples.")
	plot_points(fsk)

def analyze_psk():

	psk = read_samples("samples/part2-points.pickle")
	print(f":: Read in {len(psk)} PSK samples.")
	plot_points(psk)

def analyze_ask():

	ask = read_samples("samples/part3-points.pickle")
	print(f":: Read in {len(ask)} ASK samples.")
	plot_points(ask)

def main():

	analyze_fsk()
	analyze_psk()
	analyze_ask()

if __name__ == "__main__":
	main()
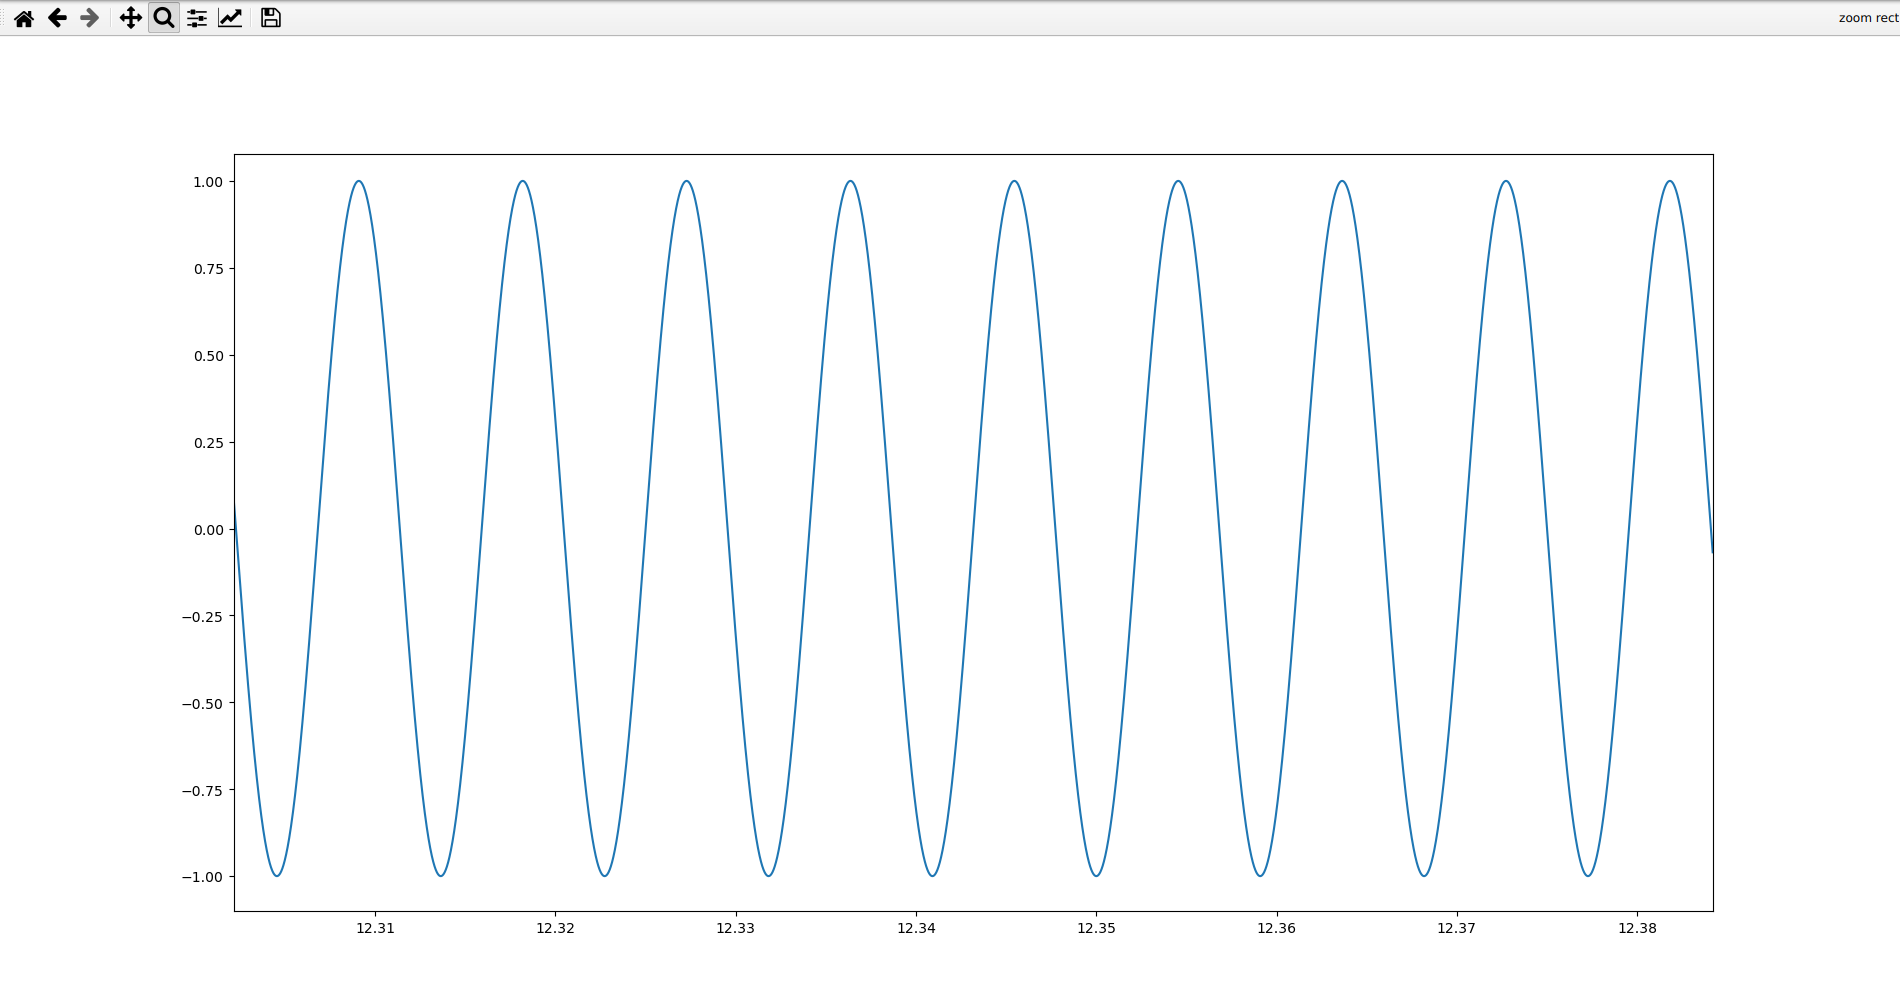
The first one is difficult to tell at first. We will revisit this in a moment:
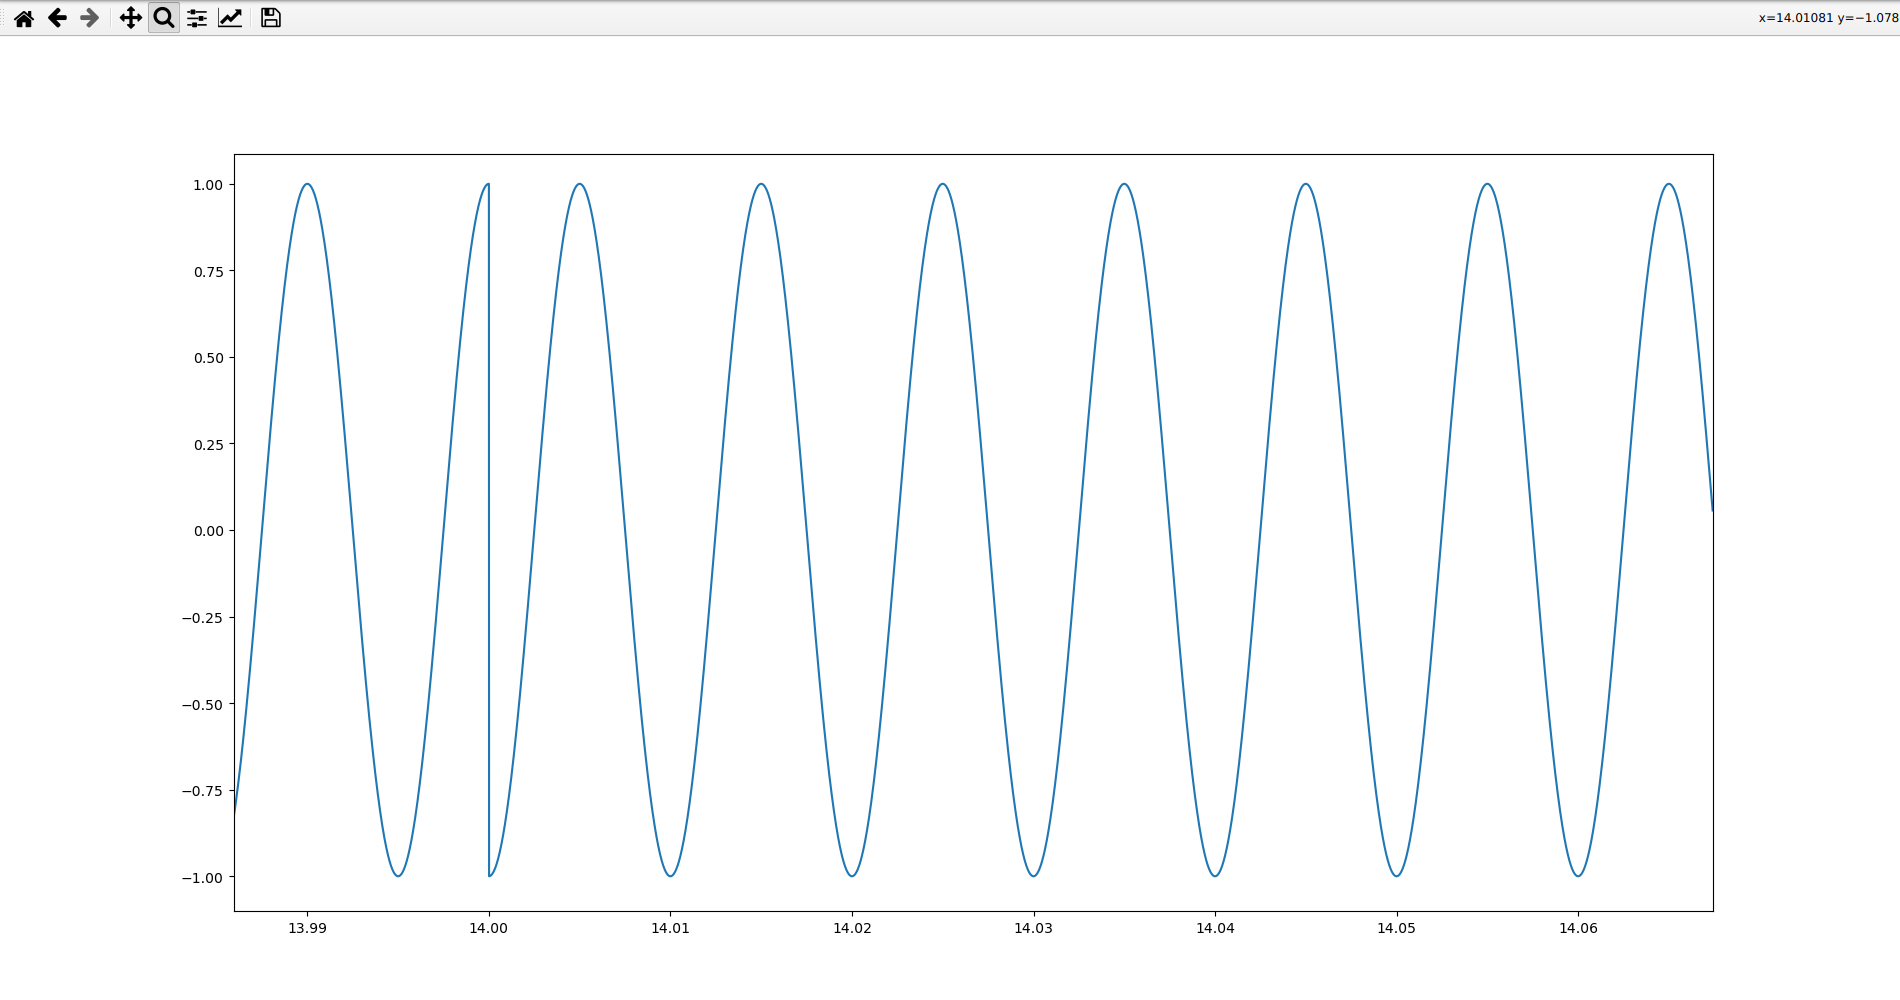
In the second one, we observe a 180° phase shift. Note that in the real world, we often avoid this as it causes high frequency components, and we instead shift phases at a smooth point intersected by both the non-phased and phased wave. In this challenge, I took the liberty of making it a straight 180° phase shift to make your tools more easily detect it:
In the third one, we observe that there are sometimes waves and sometimes periods where there is nothing:
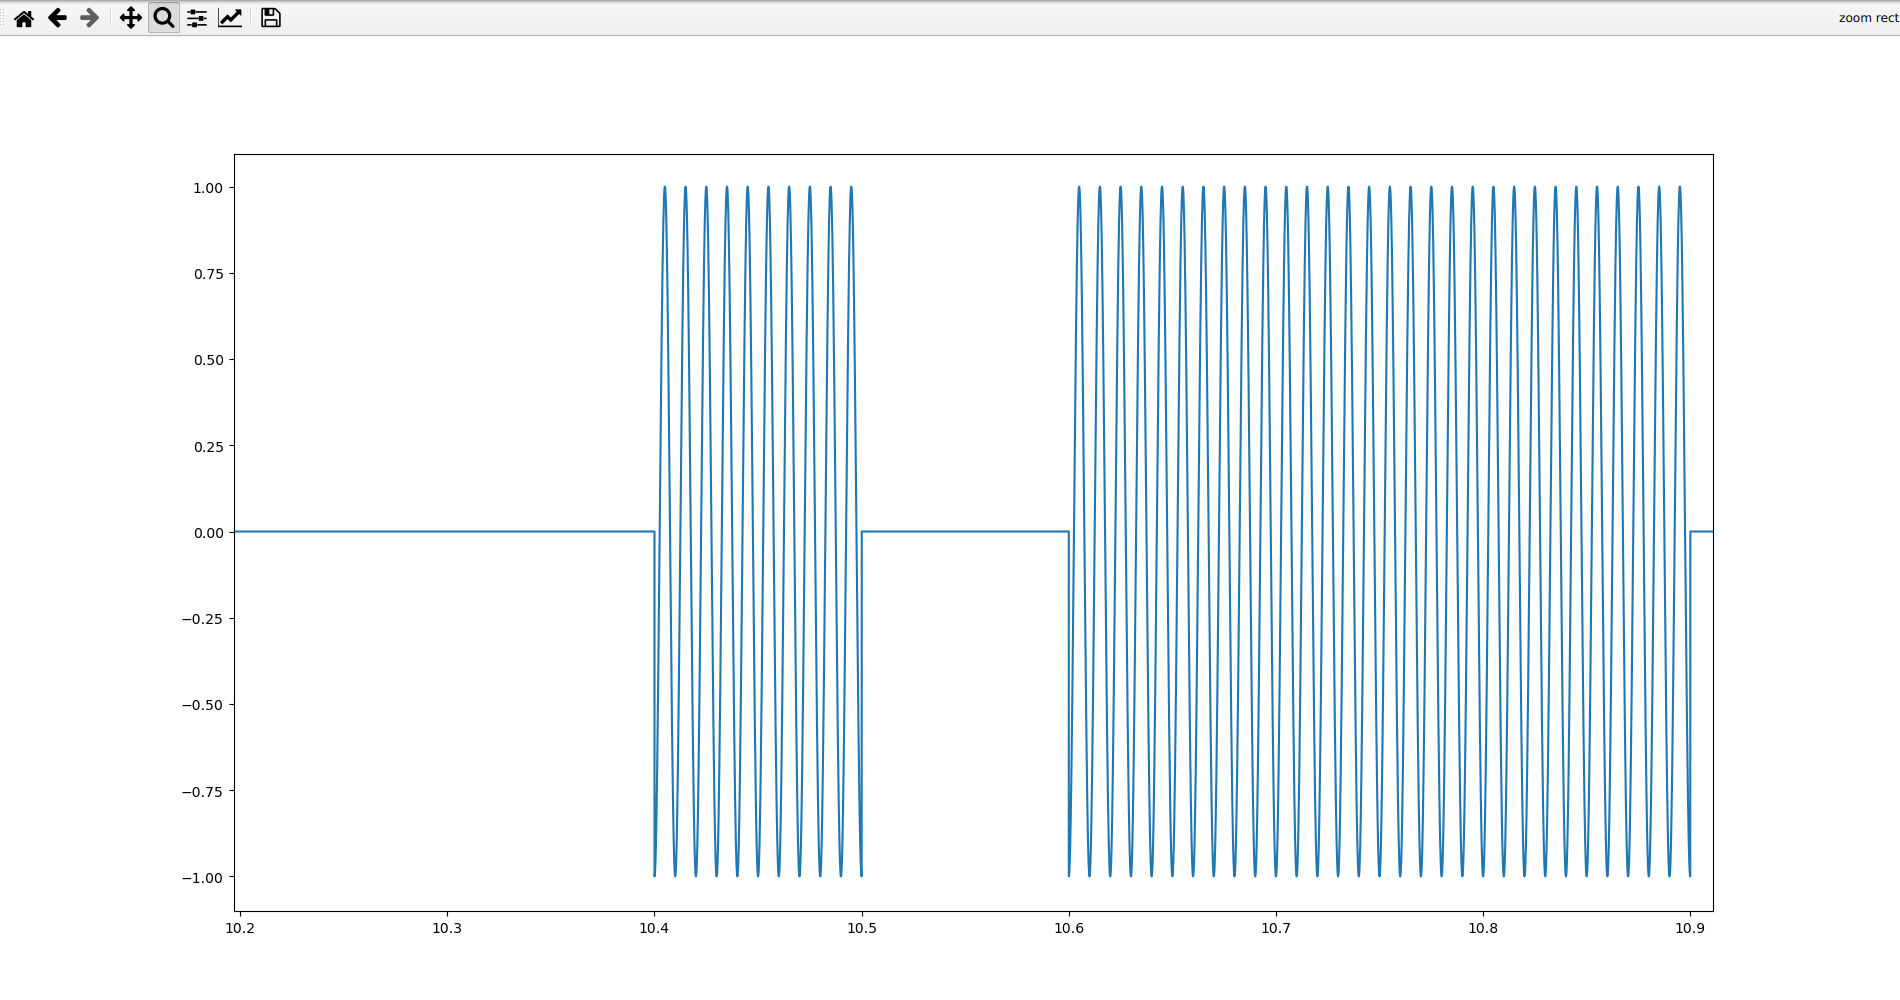
There are three main properties of radio waves that we can modify in order to transmit data: frequency, phase, and amplitude. In order to transmit digital data, we often modulate some form of carrier wave with defined values based on our data. For example, we can transmit digital data by changing the frequency in what is known as frequency shift keying, where a 1-bit may be one frequency and a 0-bit another; we can change the phase in phase shift keying, where a 1-bit may be phased or unphased and a 0-bit may be the opposite; and we can change the amplitude in amplitude shift keying, where a 1-bit may be one amplitude and a 0-bit another. OOK (on-off keying) is the simplest form of amplitude shift keying and simply lets one of the symbols be zero amplitude, hence the flat lines.
We can assume that the first one is frequency shift keying. We can also confirm this by actually measuring its frequencies using any number of methods: counting peaks, periods, calculating first derivatives, etc. This challenge truly is a “hundred approaches to the same problem” type of open-ended challenge.
The following is an example solution, deliberately over-verbose for your education and understanding:
#!/usr/bin/env python3

import pickle
from math import cos, pi

# Index of unique frequencies that is a 0 for FSK.
FSK_ZERO_FREQ_INDEX = 0

# True if shifted is 0 in PSK.
PSK_SHIFTED_IS_ZERO = False

# True if on is 0 in ASK.
ASK_ON_IS_ZERO = False

# Additional padding bits in ASK.
ASK_PADDING_L = 1
ASK_PADDING_R = 0

def read_samples(file):

	with open(file, "rb") as f:
		data = pickle.load(f)

	return data

def solve_fsk():

	print("==[ FSK ]==")

	fsk = read_samples("samples/part1-points.pickle")

	peaks = []

	for i in range(1, len(fsk)-1):
		if fsk[i][1] > fsk[i-1][1] and fsk[i][1] > fsk[i+1][1]:
			peaks.append(fsk[i][0])

	# Determine the frequencies.
	freqs = [round(1/(peaks[i+1]-peaks[i]), 0) for i in range(len(peaks)-1)]
	uniqFreqs = list(set(freqs))
	print(f"Unique frequencies: {uniqFreqs} Hz")

	# Calculate the symbol frequency.
	lastT = peaks[0]
	symbolFreq = None

	for i in range(len(freqs)-1):

		if freqs[i] != freqs[i+1]:

			duration = peaks[i+1] - lastT
			lastT = peaks[i+1]

			if symbolFreq == None or 1/duration > symbolFreq:
				symbolFreq = round(1/duration, 2)

	print(f"Symbol frequency: {symbolFreq} Hz")

	# Demodulate.
	lastT = peaks[0]
	symbols = []

	for i in range(1, len(peaks)):
		if round(peaks[i], 3) >= round(lastT + 1/symbolFreq, 3):
			if freqs[i-1] == uniqFreqs[FSK_ZERO_FREQ_INDEX]:
				symbols.append(0)
			else:
				symbols.append(1)
			lastT = peaks[i]

	# Decode the output.
	bits = "".join([str(s) for s in symbols])
	octets = [bits[i*8:i*8+8] for i in range(len(bits)//8)]
	string = "".join([chr(int(octet, 2)) for octet in octets])
	print(f"Raw bits: {bits}")
	print(f"Decoded: {string}")

def solve_psk():

	print("==[ PSK ]==")

	psk = read_samples("samples/part2-points.pickle")

	peaks = []

	for i in range(1, len(psk)-1):
		if psk[i][1] > psk[i-1][1] and psk[i][1] > psk[i+1][1]:
			peaks.append(psk[i][0])

	# Determine the frequency.
	freq = round(1/(peaks[1]-peaks[0]), 0)
	print(f"Carrier frequency: {freq} Hz")

	# Detect all the times of the phase shifts.
	shifts = []

	for i in range(len(peaks)-1):
		if round(peaks[i]+1/freq, 3) != round(peaks[i+1], 3):
			shifts.append(peaks[i] + (1/(2*freq))*(len(shifts)%2))

	# Calculate the symbol frequency.
	symbolFreq = None

	for i in range(len(shifts)-1):
		duration = shifts[i+1] - shifts[i]
		if symbolFreq == None or 1/duration > symbolFreq:
			symbolFreq = round(1/duration, 2)

	print(f"Symbol frequency: {symbolFreq} Hz")

	# Find the temporal starting point of the sinusoid.
	ts = 0

	for value in psk:
		if value[1] != 0:
			ts = value[0]
			break

	symbols = []
	shifted = False
	shifts.insert(0, ts)

	# Be sure to decode the last sequence of symbols.
	shifts.append(peaks[-1])

	# Demodulate.
	for i in range(1, len(shifts)):
		duration = shifts[i] - shifts[i-1]
		for j in range(int(round(duration*symbolFreq, 0))):
			if shifted:
				symbols.append(1)
			else:
				symbols.append(0)
		shifted = not shifted

	if PSK_SHIFTED_IS_ZERO:
		for i in range(len(symbols)):
			if symbols[i] == 0:
				symbols[i] = 1
			else:
				symbols[i] = 0

	# Decode the output.
	bits = "".join([str(s) for s in symbols])
	octets = [bits[i*8:i*8+8] for i in range(len(bits)//8)]
	string = "".join([chr(int(octet, 2)) for octet in octets])
	print(f"Raw bits: {bits}")
	print(f"Decoded: {string}")

def solve_ask():

	print("==[ ASK ]==")

	ask = read_samples("samples/part3-points.pickle")

	peaks = []

	for i in range(1, len(ask)-1):
		if ask[i][1] > ask[i-1][1] and ask[i][1] > ask[i+1][1]:
			peaks.append(ask[i][0])

	# Determine the frequency.
	freq = round(1/(peaks[1]-peaks[0]), 0)
	print(f"Carrier frequency: {freq} Hz")

	# Find all the times where we change between nonzero and zero amplitude.
	changes = []

	for i in range(len(ask)-1):
		if (ask[i][1] != 0 and ask[i+1][1] == 0) or (ask[i][1] == 0 and ask[i+1][1] != 0):
			changes.append(ask[i][0])

	# Calculate the symbol frequency.
	symbolFreq = None

	for i in range(len(changes)-1):
		duration = changes[i+1] - changes[i]
		if symbolFreq == None or 1/duration > symbolFreq:
			symbolFreq = round(1/duration, 2)

	print(f"Symbol frequency: {symbolFreq} Hz")

	# Demodulate.
	durations = [int(round((changes[i+1]-changes[i])*symbolFreq, 2)) for i in range(len(changes)-1)]
	symbols = []

	for i, duration in enumerate(durations):
		for _ in range(duration):
			if i % 2 == 0:
				symbols.append(1)
			else:
				symbols.append(0)

	if ASK_ON_IS_ZERO:
		for i in range(len(symbols)):
			if symbols[i] == 0:
				symbols[i] = 1
			else:
				symbols[i] = 0

	# Decode the output.
	bits = "".join(["0"]*ASK_PADDING_L + [str(s) for s in symbols] + ["0"]*ASK_PADDING_R)
	octets = [bits[i*8:i*8+8] for i in range(len(bits)//8)]
	string = "".join([chr(int(octet, 2)) for octet in octets])
	print(f"{ASK_PADDING_L} bits of left padding, {ASK_PADDING_R} bits of right padding.")
	print(f"Raw bits: {bits}")
	print(f"Decoded: {string}")

def main():

	solve_fsk()
	solve_psk()
	solve_ask()

if __name__ == "__main__":
	main()
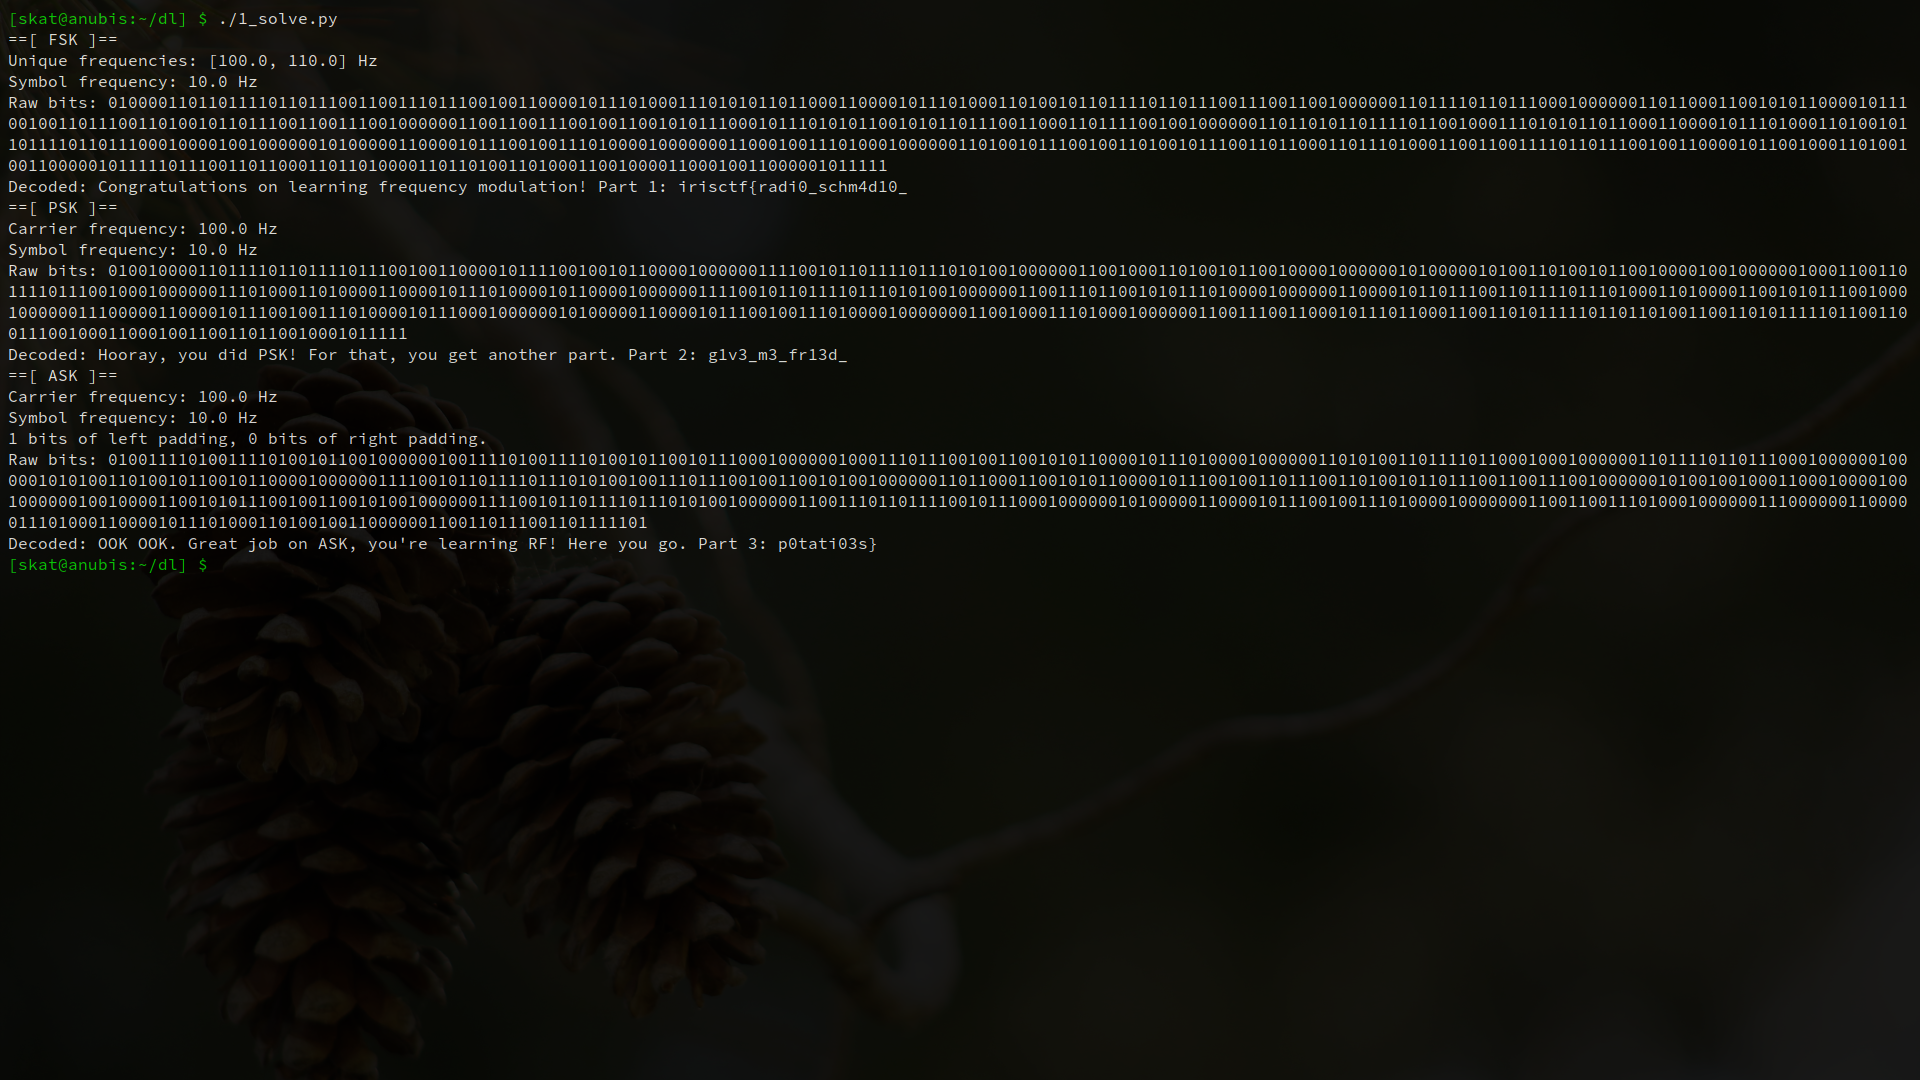
I’m truly impressed by the variety of solutions for this challenge! One player told me that they approached PSK by detecting abrupt discontinuities – something that I hadn’t even thought of! Bravo to everyone who solved this.
Radio Frequency / babyrf 2
URL: Radio Frequency
This challenge builds off of babyrf 1. Now that you’ve learned what modulation and demodulation are – sidenote, that’s why it’s called a modem – you must address another big problem in radio: what do we do if we have a long string of 1s or a long string of 0s? We will have trouble knowing where one symbol starts and the other begins.
The answer is encoding! We can encode our data such that we guarantee a minimum number of transitions. Schemes that do this are commonly referred to as self-clocking signals because they don’t need another signal to clock – they can do it themselves in the way that they order their data. The specific encoding schemes used in this challenge were Manchester, Non-Return to Zero Inverted (IBM Code), and 4B/5B. In Manchester, a 1 is represented as a high-low transition while a 0 is represented as a low-high transition. In NRZI, a 1 is a transition while a 0 is a non-transition. In 4B/5B, we encode 4 bits into 5 bit codewords such that we guarantee a minimum number of transitions. Note that NRZI is not inherently self-clocking and there are edge cases where it will not self-clock, but it is still used in RF because these edge cases are rare to meet and its implementation is simple.
Just to make this challenge easier for you, I halved the data rate of the part that is encoded with Manchester. This means that the exact same demodulator can be used from babyrf 1 without the need for modification, if your approach was not dynamic to that sort of thing, anyway. You can use the same demodulators from babyrf 1 and then just write some functions on top of them to decode the bits! Just remember to perform analysis on the radio samples first, though, since they do not follow the order of demodulation in babyrf 1.
This is again a very open-ended “hundred approaches to the same problem” type of challenge. The following is an example solution written in Python, and again overly verbose for your education and understanding:
#!/usr/bin/env python3

import pickle
from math import cos, pi

# Index of unique frequencies that is a 0 for FSK.
FSK_ZERO_FREQ_INDEX = 0

# True if shifted is 0 in PSK.
PSK_SHIFTED_IS_ZERO = False

# True if on is 0 in ASK.
ASK_ON_IS_ZERO = False

# Additional padding bits in ASK.
ASK_PADDING_L = 1
ASK_PADDING_R = 0

def read_samples(file):

	with open(file, "rb") as f:
		data = pickle.load(f)

	return data

def decode_manc(bits):

	# IEEE 802.3: 1 is a high->low signal, 0 is a low->high signal.
	output = []
	pairs = [bits[i*2:i*2+2] for i in range(len(bits)//2)]

	for pair in pairs:
		if pair == "01":
			output.append(0)
		else:
			output.append(1)

	return output

def decode_nrzi(bits):

	# NRZI (aka IBM code): 1 flips, 0 stays.
	output = []

	# We start high.
	bits = "1" + bits

	for i in range(1, len(bits)):
		if bits[i-1] == bits[i]:
			output.append(0)
		else:
			output.append(1)

	return output

def decode_4b5b(bits):

	# 4B5B: standard encoding table.
	output = []
	table = {
		"11110": [0,0,0,0],
		"01001": [0,0,0,1],
		"10100": [0,0,1,0],
		"10101": [0,0,1,1],
		"01010": [0,1,0,0],
		"01011": [0,1,0,1],
		"01110": [0,1,1,0],
		"01111": [0,1,1,1],
		"10010": [1,0,0,0],
		"10011": [1,0,0,1],
		"10110": [1,0,1,0],
		"10111": [1,0,1,1],
		"11010": [1,1,0,0],
		"11011": [1,1,0,1],
		"11100": [1,1,1,0],
		"11101": [1,1,1,1],
	}

	codes = [bits[i*5:i*5+5] for i in range(len(bits)//5)]
	output = []

	for code in codes:
		output += table[code]

	return output

def solve_psk_manc():

	print("==[ PSK Manchester ]==")

	psk = read_samples("samples/part1-points.pickle")

	peaks = []

	for i in range(1, len(psk)-1):
		if psk[i][1] > psk[i-1][1] and psk[i][1] > psk[i+1][1]:
			peaks.append(psk[i][0])

	# Determine the frequency.
	freq = round(1/(peaks[1]-peaks[0]), 0)
	print(f"Carrier frequency: {freq} Hz")

	# Detect all the times of the phase shifts.
	shifts = []

	for i in range(len(peaks)-1):
		if round(peaks[i]+1/freq, 3) != round(peaks[i+1], 3):
			shifts.append(peaks[i] + (1/(2*freq))*(len(shifts)%2))

#	# Calculate the symbol frequency.
#	symbolFreq = None
#
#	for i in range(len(shifts)-1):
#		duration = shifts[i+1] - shifts[i]
#		if symbolFreq == None or 1/duration > symbolFreq:
#			symbolFreq = round(1/duration, 2)
#			print(symbolFreq)

	# Manually compensating for error in our numerical method, determined after
	# running the commented out code above.
	symbolFreq = 10
	print(f"Symbol frequency: {symbolFreq} Hz")

	# Find the temporal starting point of the sinusoid.
	ts = 0

	for value in psk:
		if value[1] != 0:
			ts = value[0]
			break

	symbols = []
	shifted = False
	shifts.insert(0, ts)

	# Be sure to decode the last sequence of symbols.
	shifts.append(peaks[-1])

	# Demodulate.
	for i in range(1, len(shifts)):
		duration = shifts[i] - shifts[i-1]
		for j in range(int(round(duration*symbolFreq, 0))):
			if shifted:
				symbols.append(1)
			else:
				symbols.append(0)
		shifted = not shifted

	if PSK_SHIFTED_IS_ZERO:
		for i in range(len(symbols)):
			if symbols[i] == 0:
				symbols[i] = 1
			else:
				symbols[i] = 0

	# Decode the output.
	rawBits = "".join([str(s) for s in symbols])
	bits = "".join([str(s) for s in decode_manc(rawBits)])
	octets = [bits[i*8:i*8+8] for i in range(len(bits)//8)]
	string = "".join([chr(int(octet, 2)) for octet in octets])
	print(f"Raw bits: {rawBits}")
	print(f"Decoded bits: {bits}")
	print(f"Decoded string: {string}")

def solve_fsk_nrzi():

	print("==[ FSK NRZI ]==")

	fsk = read_samples("samples/part2-points.pickle")

	peaks = []

	for i in range(1, len(fsk)-1):
		if fsk[i][1] > fsk[i-1][1] and fsk[i][1] > fsk[i+1][1]:
			peaks.append(fsk[i][0])

	# Determine the frequencies.
	freqs = [round(1/(peaks[i+1]-peaks[i]), 0) for i in range(len(peaks)-1)]
	uniqFreqs = list(set(freqs))
	print(f"Unique frequencies: {uniqFreqs} Hz")

	# Calculate the symbol frequency.
	lastT = peaks[0]
	symbolFreq = None

	for i in range(len(freqs)-1):

		if freqs[i] != freqs[i+1]:

			duration = peaks[i+1] - lastT
			lastT = peaks[i+1]

			if symbolFreq == None or 1/duration > symbolFreq:
				symbolFreq = round(1/duration, 2)

	print(f"Symbol frequency: {symbolFreq} Hz")

	# Demodulate.
	lastT = peaks[0]
	symbols = []

	for i in range(1, len(peaks)):
		if round(peaks[i], 3) >= round(lastT + 1/symbolFreq, 3):
			if freqs[i-1] == uniqFreqs[FSK_ZERO_FREQ_INDEX]:
				symbols.append(0)
			else:
				symbols.append(1)
			lastT = peaks[i]

	# Decode the output.
	rawBits = "".join([str(s) for s in symbols])
	bits = "".join([str(s) for s in decode_nrzi(rawBits)])
	octets = [bits[i*8:i*8+8] for i in range(len(bits)//8)]
	string = "".join([chr(int(octet, 2)) for octet in octets])
	print(f"Raw bits: {rawBits}")
	print(f"Decoded bits: {bits}")
	print(f"Decoded string: {string}")

def solve_ask_4b5b():

	print("==[ ASK 4B5B ]==")

	ask = read_samples("samples/part3-points.pickle")

	peaks = []

	for i in range(1, len(ask)-1):
		if ask[i][1] > ask[i-1][1] and ask[i][1] > ask[i+1][1]:
			peaks.append(ask[i][0])

	# Determine the frequency.
	freq = round(1/(peaks[1]-peaks[0]), 0)
	print(f"Carrier frequency: {freq} Hz")

	# Find all the times where we change between nonzero and zero amplitude.
	changes = []

	for i in range(len(ask)-1):
		if (ask[i][1] != 0 and ask[i+1][1] == 0) or (ask[i][1] == 0 and ask[i+1][1] != 0):
			changes.append(ask[i][0])

	# Calculate the symbol frequency.
	symbolFreq = None

	for i in range(len(changes)-1):
		duration = changes[i+1] - changes[i]
		if symbolFreq == None or 1/duration > symbolFreq:
			symbolFreq = round(1/duration, 2)

	print(f"Symbol frequency: {symbolFreq} Hz")

	# Demodulate.
	durations = [int(round((changes[i+1]-changes[i])*symbolFreq, 2)) for i in range(len(changes)-1)]
	symbols = []

	for i, duration in enumerate(durations):
		for _ in range(duration):
			if i % 2 == 0:
				symbols.append(1)
			else:
				symbols.append(0)

	if ASK_ON_IS_ZERO:
		for i in range(len(symbols)):
			if symbols[i] == 0:
				symbols[i] = 1
			else:
				symbols[i] = 0

	# Decode the output.
	rawBits = "".join([str(s) for s in symbols])
	bits = "".join([str(s) for s in decode_4b5b(rawBits)])
	octets = [bits[i*8:i*8+8] for i in range(len(bits)//8)]
	string = "".join([chr(int(octet, 2)) for octet in octets])
	print(f"Raw bits: {rawBits}")
	print(f"Decoded bits: {bits}")
	print(f"Decoded string: {string}")

def main():

	solve_psk_manc()
	solve_fsk_nrzi()
	solve_ask_4b5b()

if __name__ == "__main__":
	main()
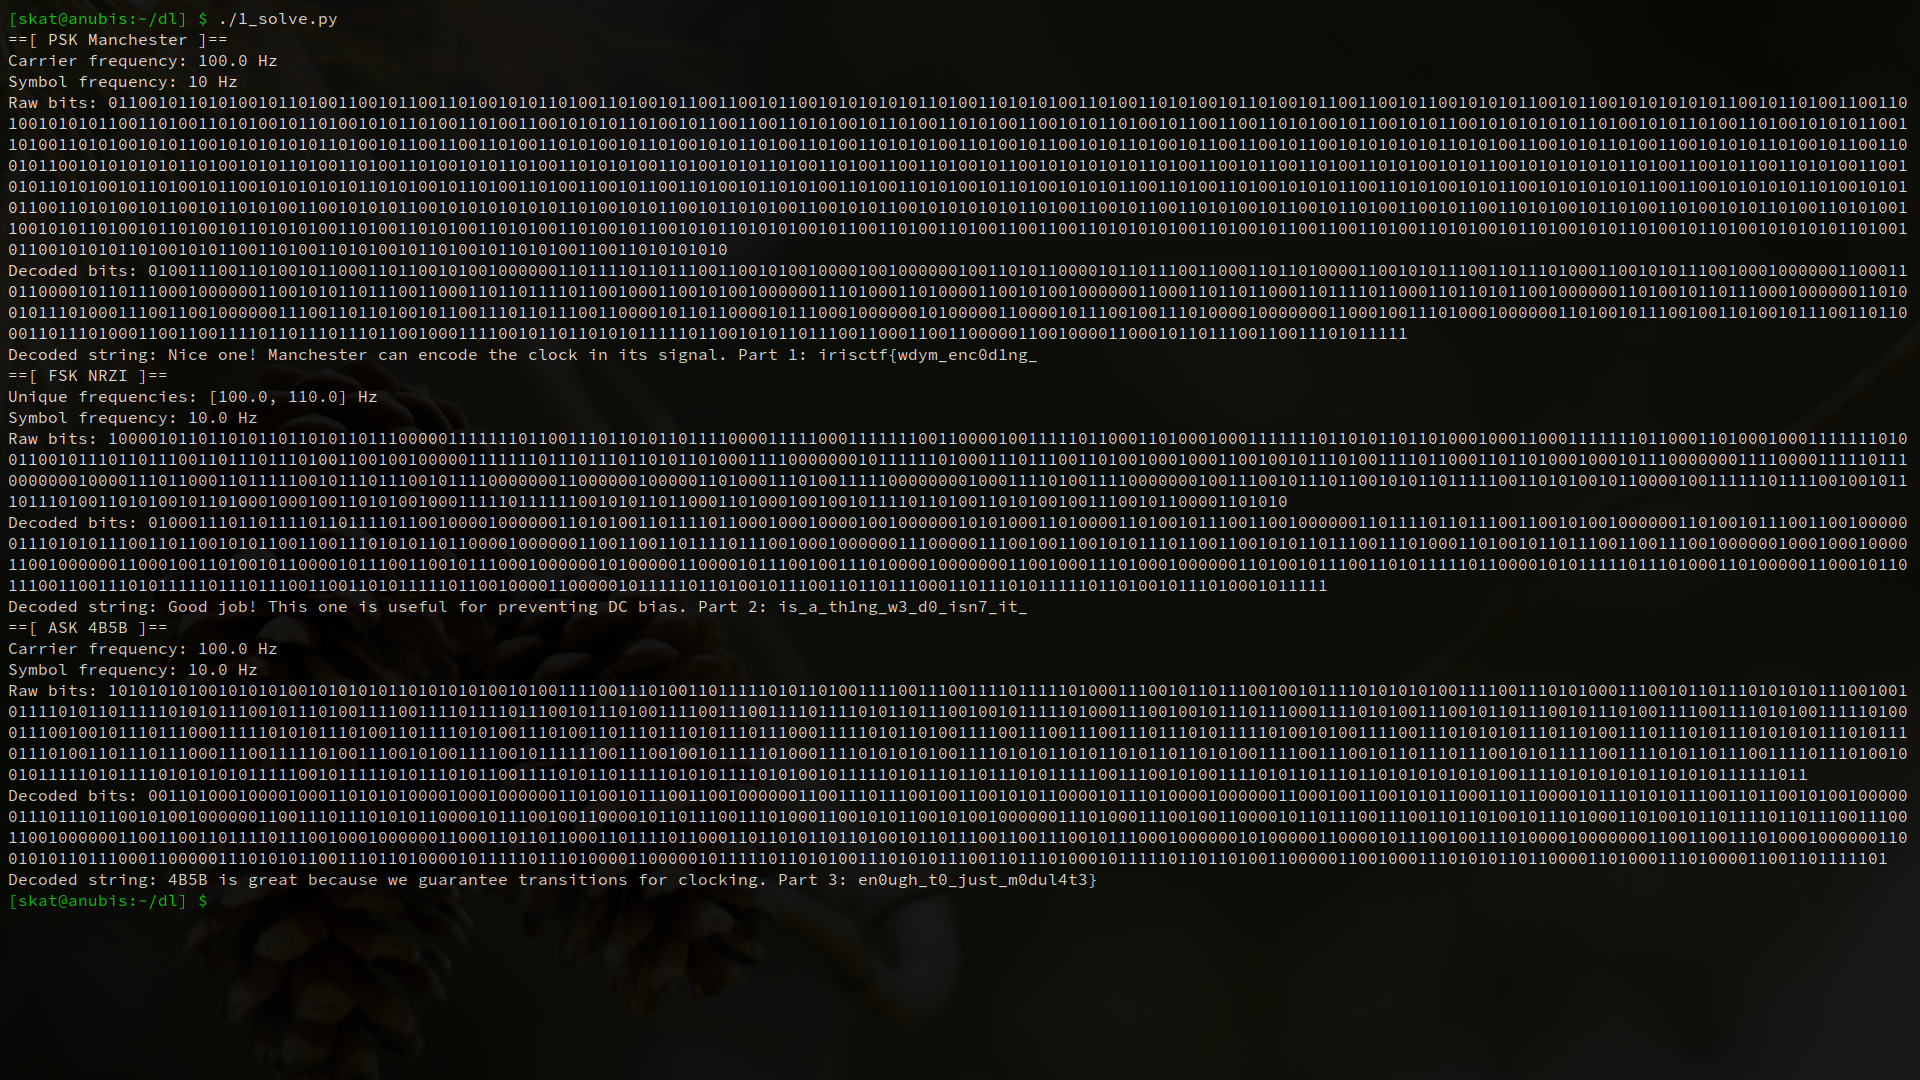
With babyrf 1 and 2, you learned some important RF fundamentals: the properties that we can change about radio waves in order to transmit data, and the way that we encode our data in transit.
Radio Frequency / monke
URL: Radio Frequency
Welcome to your first radio hacking tool: URH. For “Social Engineering Experts,” the only team to have solved this and the only team to have solved an IRL RF challenge (in the last hour of the competition too!), congratulations on having solved a real-life RF challenge! For all the RF challenges except for babyrf 1 and 2, I did actually manually program a HackRF One to transmit and capture the transmission with an RTL-SDR. These challenges featured real radio equipment and real radio captures actually done on the unlicensed frequency (US).
In this challenge, we’re dealing with a variant of OOK:
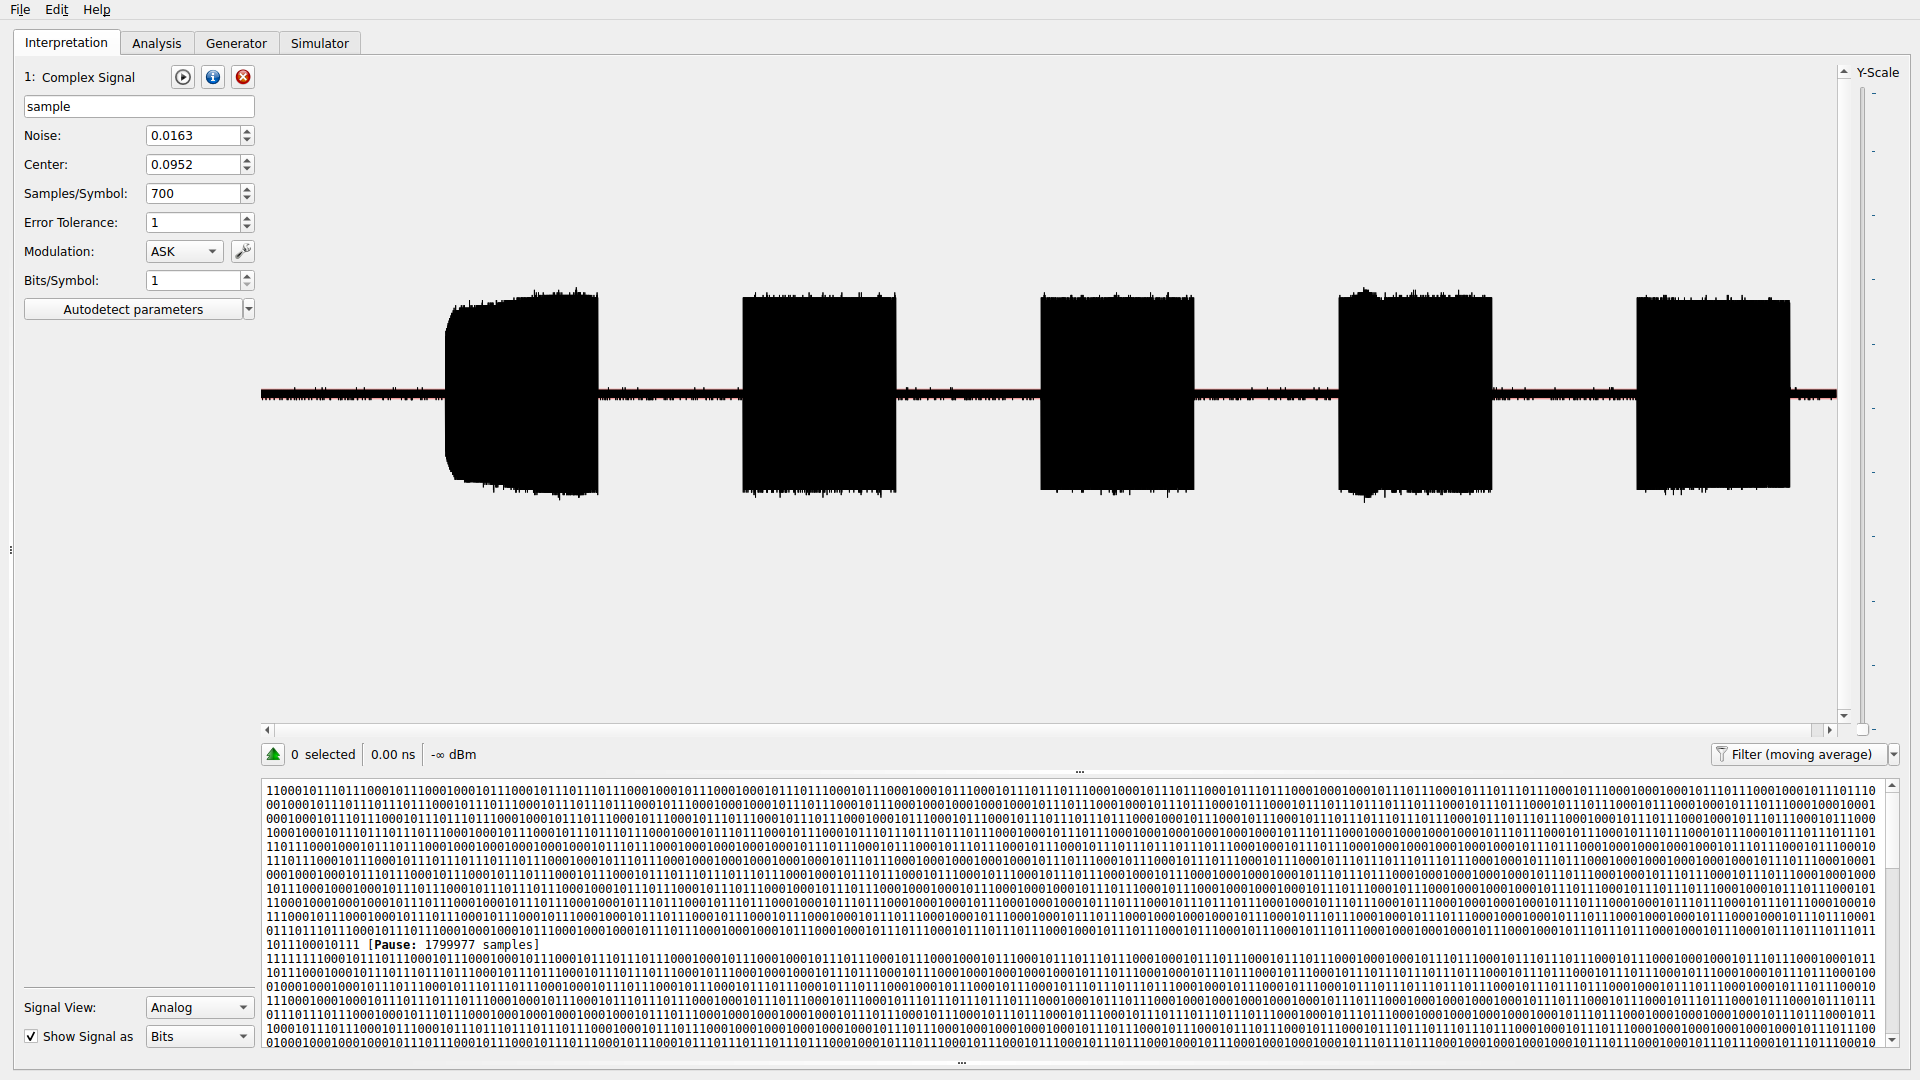
Upon zooming in, we can see that there are two distinct durations of pulses: a long one, and a short one.
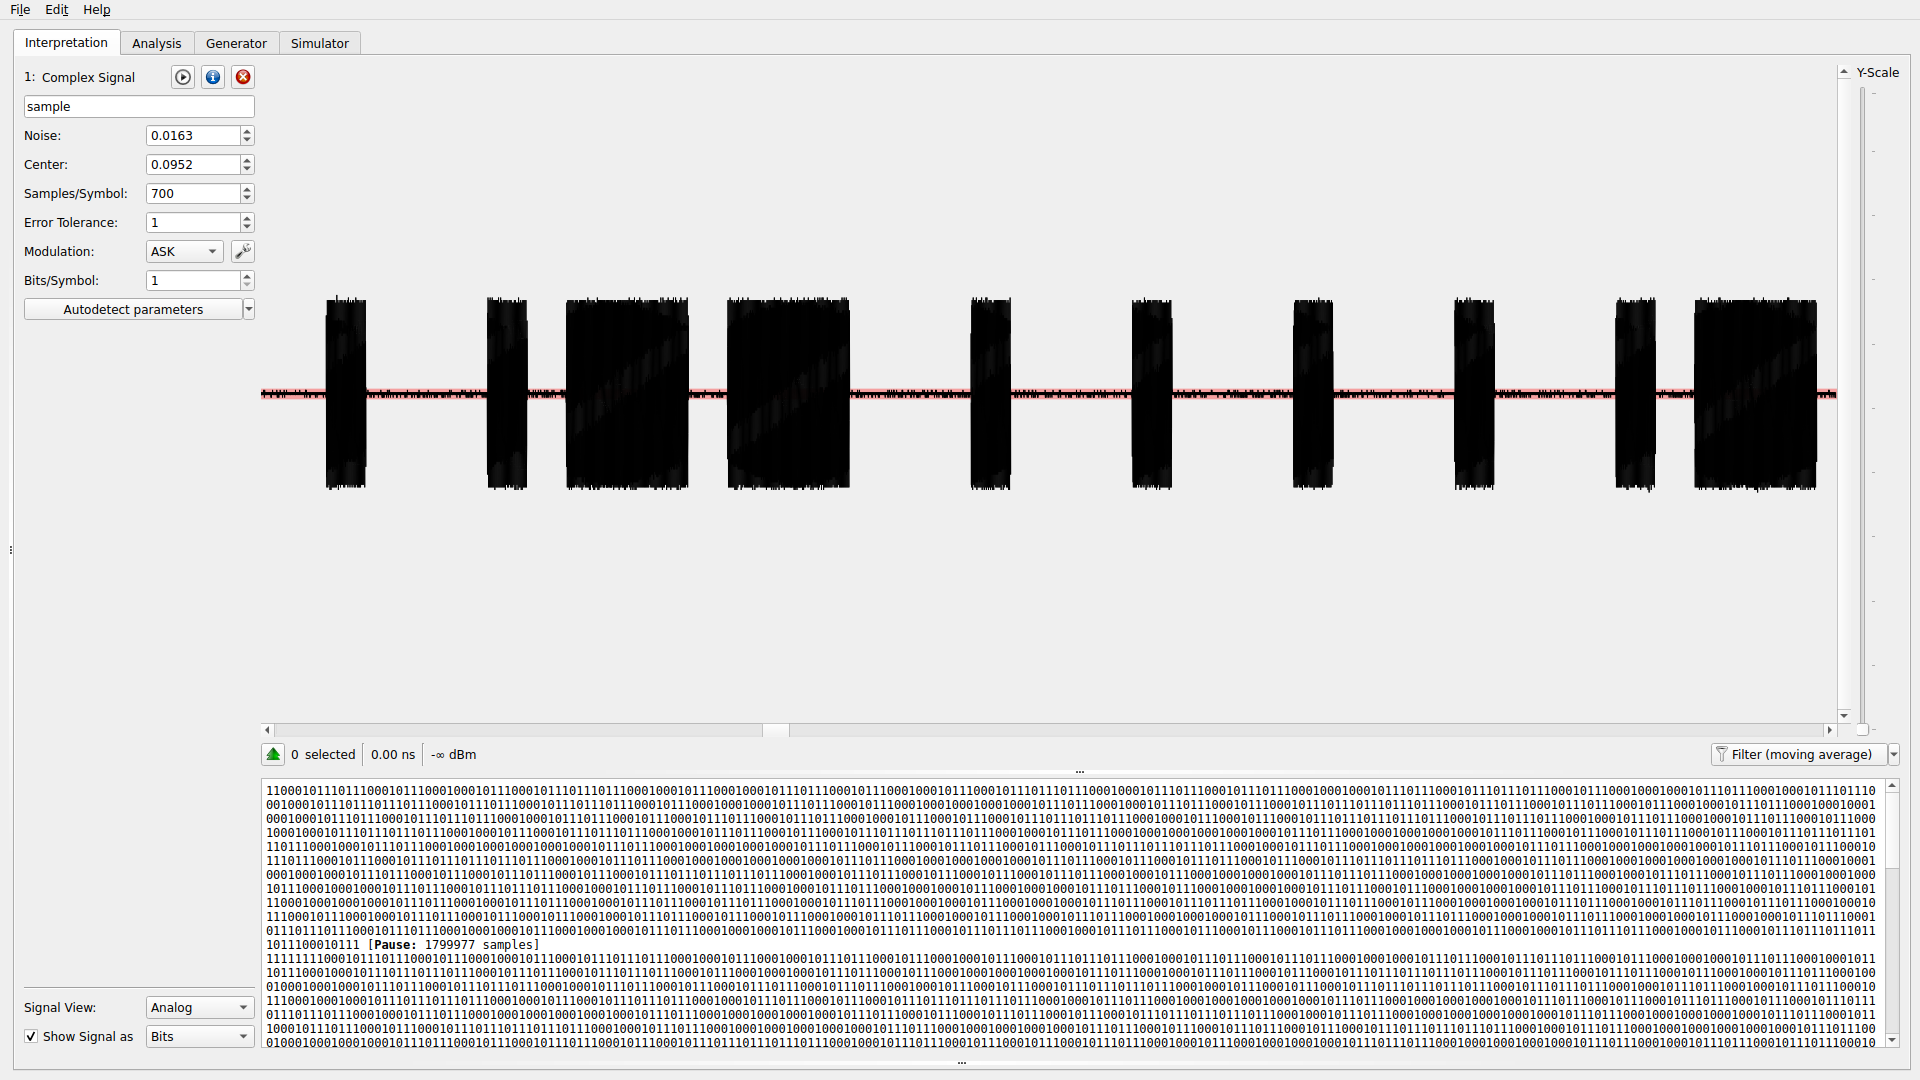
No matter what, we can see that the length from the start of a period of silence to the end of a pulse is approximately 3000 samples, though. Thus, we have discovered the encoding scheme: all symbols last for 3000 samples, but one symbol ends with approximately 800 samples of waves while another symbol ends with approximately 2400 samples of waves. We can get URH to try to decode ASK with 200 samples per symbol and then assign a long pulse to a 0 and a short pulse to a 1. If our assumptions about 0/1 are wrong, we can simply flip the bits.
irisctf{th3_m0nkey_s4ys_00k_00k_00k_00k_00k_5d83b76b447436b743e552af17b175a9}
I hope this was educational or at least had any value to you. It took me a while to get this done while I was bogged down with other things. If you have any questions, feel free to contact me on Discord via the IrisCTF server at skat#4502.
Happy hacking!